
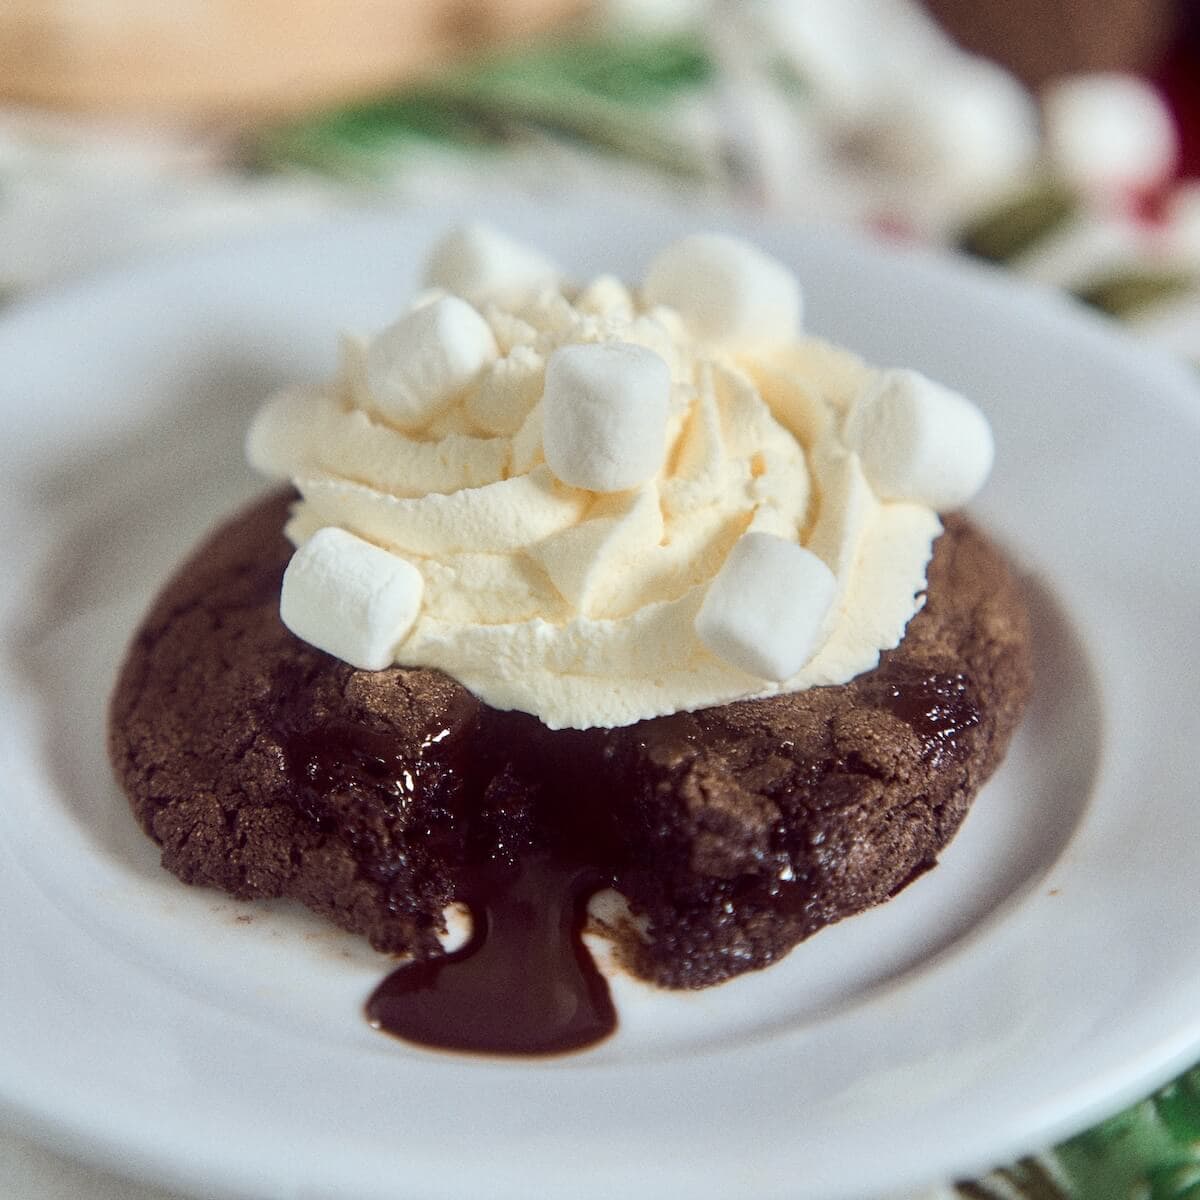
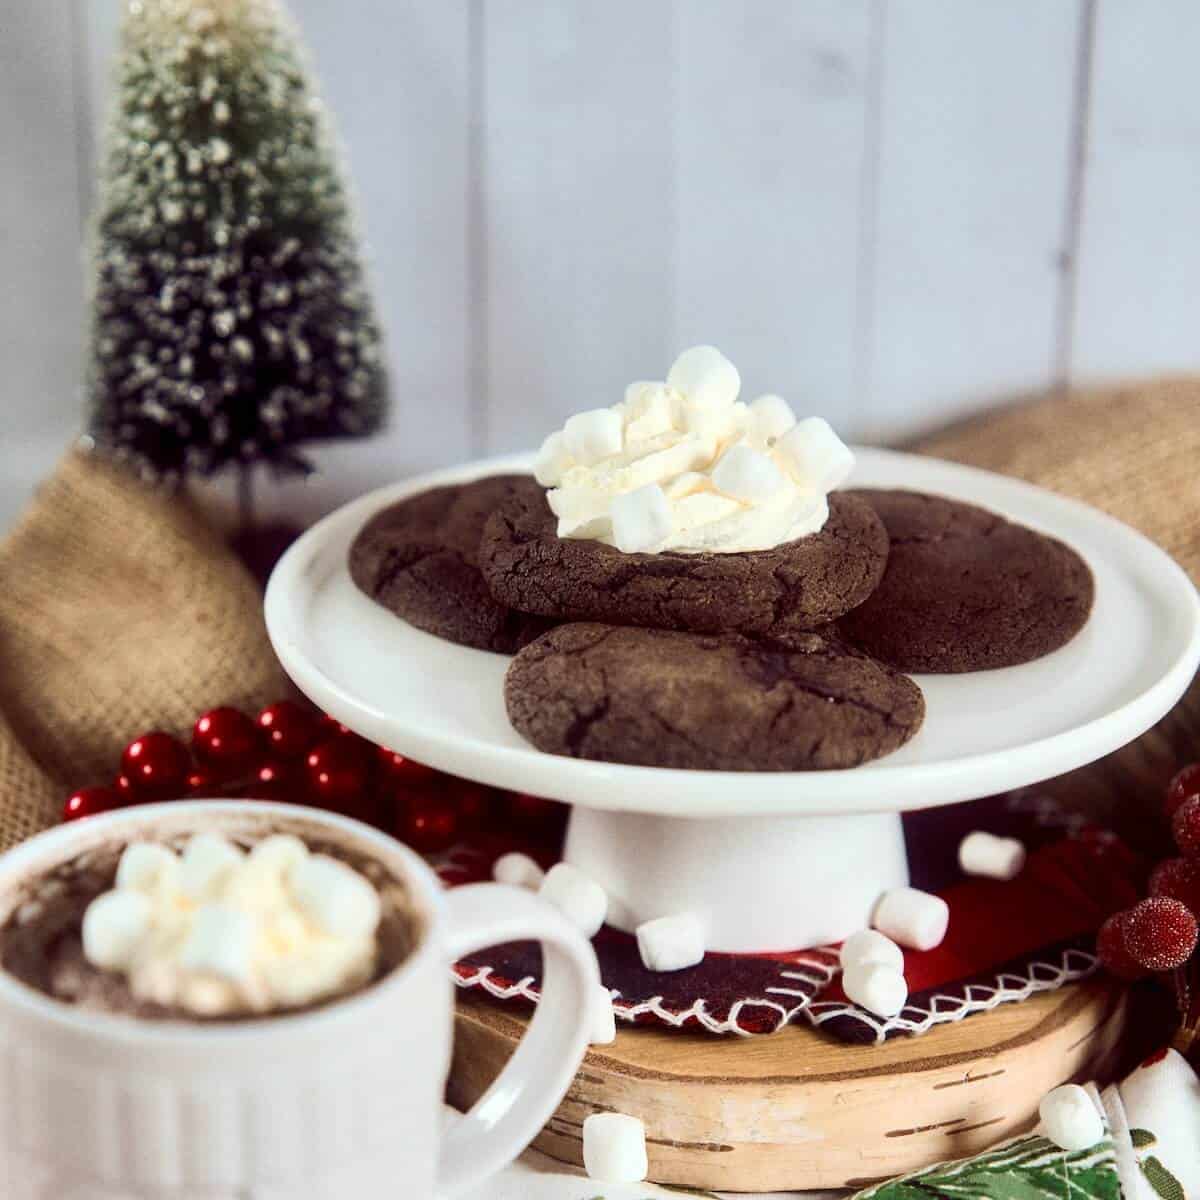
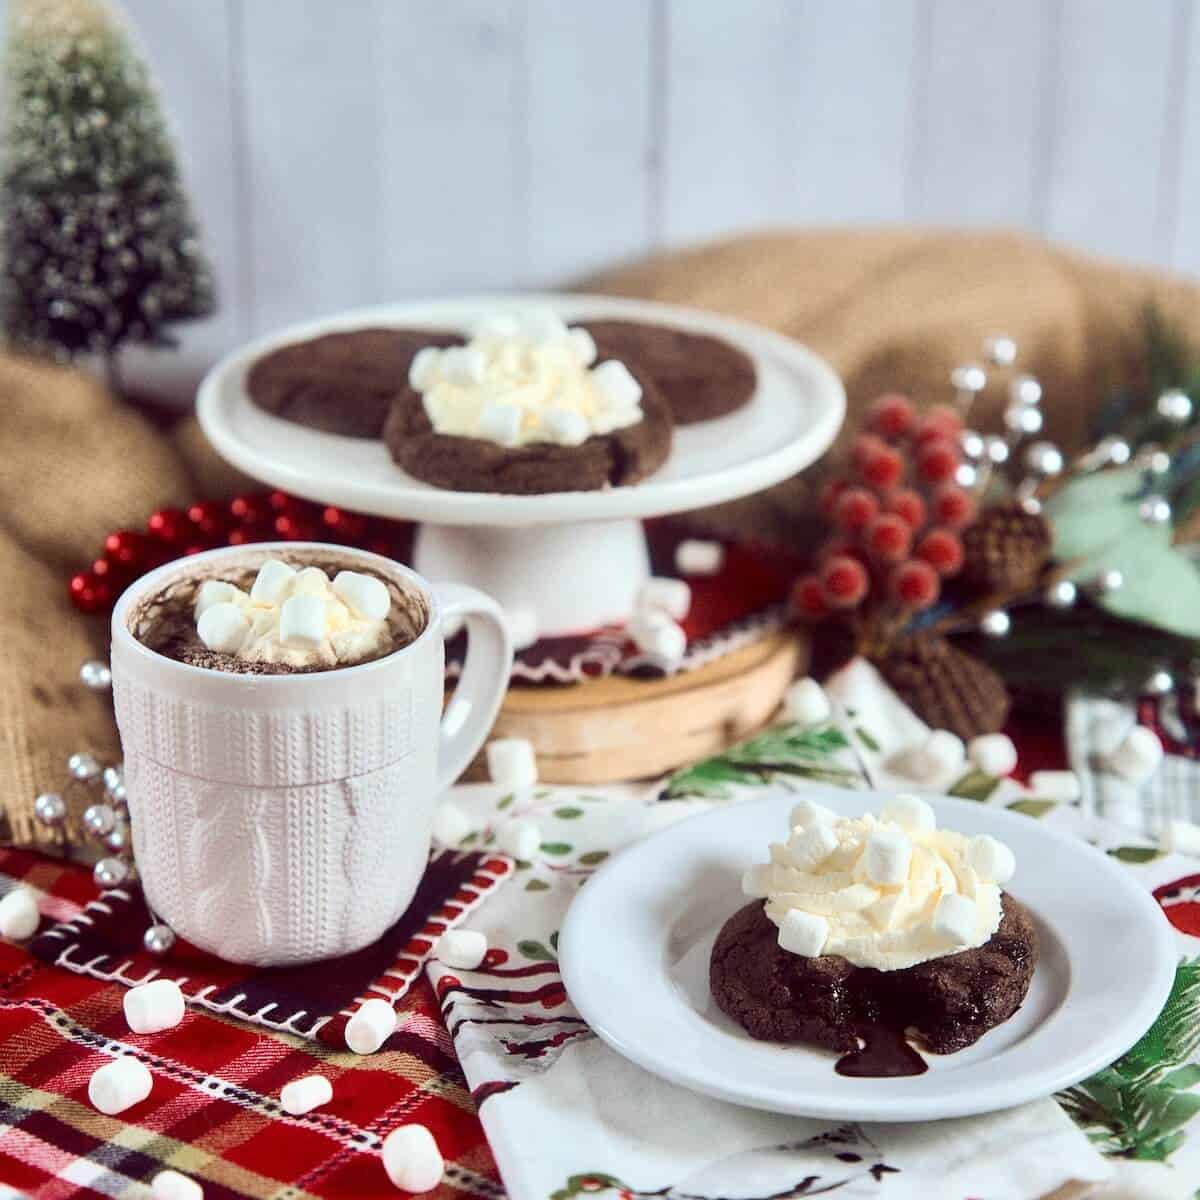
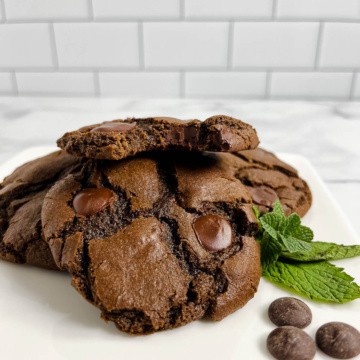
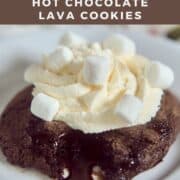
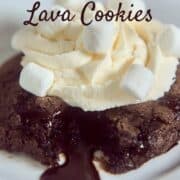
Indulge in the ultimate chocolate treat with these Hot Chocolate Lava Cookies! Made with dark chocolate, hot cocoa mix, and a gooey fudge center, these cookies are the perfect winter treat. Top them with whipped cream and mini marshmallows for a cozy dessert that tastes just like a rich cup of hot cocoa. Perfect for chocolate lovers and winter gatherings, this easy recipe will be your go-to for sweet indulgence!
Jump to:
Why this recipe works
- An intensely-flavored soft and chewy chocolate cookie
- Rich hot fudge oozes out of the warm cookies for more chocolate goodness
- Chocolate lava cookies are made in one bowl for easy clean up, no ramekins needed
- Top the warm baked cookies with whipped cream and mini marshmallows for a delicious handheld version of hot cocoa!
Winter's cold temperatures beg for warming drinks, and curling up with a steaming mug of rich hot cocoa sounds so comforting.
Can we mimic that hot cocoa comfort in a cookie? We sure can!
Sure, you can make a really good chocolate cookie, like double chocolate chip cookies or flourless chocolate walnut cookies. But to mimic that comforting mug of hot chocolate, we need to go large, and we need to go decadent!
Imagine a rich dark chocolate cookie stuffed with warm fudge, and you have a Chocolate Lava Cookie. Now use hot cocoa mix in the chocolate lava cookie dough, and top the warm baked cookies with whipped cream and mini marshmallows, and you have Hot Chocolate Lava Cookies.
Think of these as the cookie version of chocolate lava cake, taken up a notch!
These one bowl chocolate cookies come together quickly, and I give you step-by-step instructions on how to shape and fill your cookies for success.
And for a fun variation, take a page from my Double Chocolate Mint Cookies and infuse the butter with fresh mint before starting the dough.
These molten lava cookies are best served warm, so bake as many as you currently need and freeze the rest of the unbaked cookies for later.
Hot Chocolate Lava Cookies are a chocoholic's dream, perfect for Valentine's Day, Date Night, or anytime you want hot cocoa comfort in a decadent cookie form. How fun is that!
⭐⭐⭐⭐⭐
Literally one of my favourite cookies of all time! These are magical and so fudgy, totally worth the extra bit of time to fill them!
- Ella
Recipe ingredients
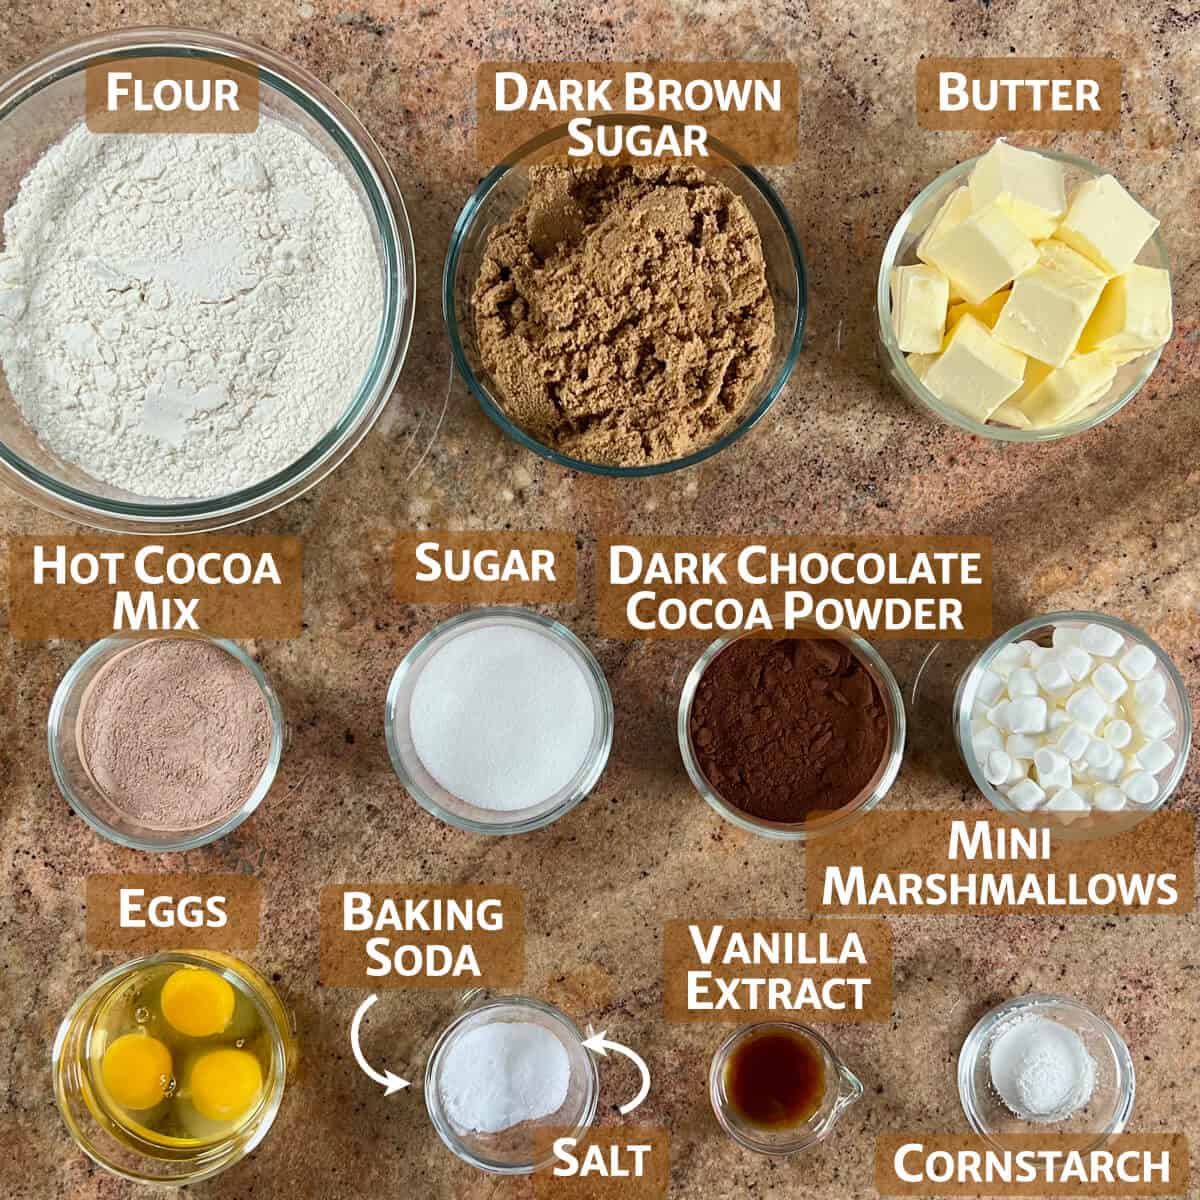
You'll need the following ingredients to make this Hot Chocolate Lava Cookies recipe:
Ingredient Notes
The chocolate cookie dough is made from all-purpose flour, butter, dark brown sugar, granulated sugar, eggs, vanilla extract, baking soda, and kosher salt.
Dark chocolate cocoa powder: Using dark chocolate cocoa powder gives these cookies an intensely rich chocolate flavor. You can use regular cocoa powder instead of the dark chocolate if you prefer. The cookies will just have a less intense chocolate flavor.
Either way, you can use natural cocoa powder or Dutch-processed since the dark brown sugar (which contains molasses) is acidic enough to react with the baking soda.
Hot cocoa mix: Here hot cocoa mix is used not only in the cookie dough, but also as a coating before and after shaping the filled cookies. Using store bought hot chocolate mix is fine, but it's super easy to make homemade hot cocoa mix with just three pantry ingredients.
Cornstarch: Helps to keep the cookies soft since the flour, cocoa powder, and hot cocoa mix can dry out the dough.
Hot fudge sauce (not shown): The "lava" in these molten chocolate cookies is actually hot fudge sauce. That's the thick fudgy sauce (like chilled chocolate ganache), NOT the thinner chocolate syrup. You'll use the product chilled so that it will be scoopable before being enclosed in the cookie dough.
You can use commercially made hot fudge, or make your own homemade hot fudge sauce without all those additives and preservatives in the store bought version. It's quick and easy, and you can even use dark chocolate cocoa powder to really intensify the "lava" filling!
Toppings: Chocolate Lava Cookies are delicious on their own, but top them with whipped cream (not shown) and mini marshmallows, and you've got yourself a truly special treat. They look and taste like the richest hot chocolate there is!
See the recipe card for a full list of ingredients and measurements.
Types of cocoa powder
You might notice that when some recipes call for cocoa powder, they specify the type of cocoa powder to use, either natural or Dutch-processed. Why is that?
According to Taste of Home, the answer lies in the flavor and acidity of the cocoa powder, and whether the cocoa powder is the primary ingredient that will react with a chemical leavener (baking soda or baking powder) to creact the bubbles that make the recipe rise.
Natural cocoa powder is an untreated product, light in color, that is slightly acidic. It works well for recipes that are leavened with baking soda (which needs an acid to react with) and don't contain other acidic ingredients, like brown sugar, buttermilk, sour cream, or yogurt.
With Dutch-processed cocoa powder (aka Dutched chocolate, European-style, or alkalized cocoa powder), the cocoa beans are treated with an alkaline solution prior to being made into powder. This process tames the acidity, giving the cocoa powder a darker color and softer, smoother, milder chocolate flavor. Dutch-processed cocoa powder works well in:
- Recipes that don't require leavening, like chocolate pudding, chocolate mousse, or chocolate buttercream frosting
- Recipes that are only leavened with baking powder (which doesn't need to react with an acid), like chocolate cake truffles
- Recipes that use baking soda, but contain other acidic ingredients as well, like Black and White Cookie Cake or Eggless Chocolate Cake
Learn more about natural vs Dutch-processed cocoa powder.
How to make Hot Chocolate Lava Cookies
Step 1: Make the dough
Using a stand mixer fitted with the paddle attachment, cream together the butter, dark brown sugar, and granulated sugar until light and fluffy, about 4 to 5 minutes. Add in the eggs and vanilla extract and mix until thoroughly combined (photo 1).
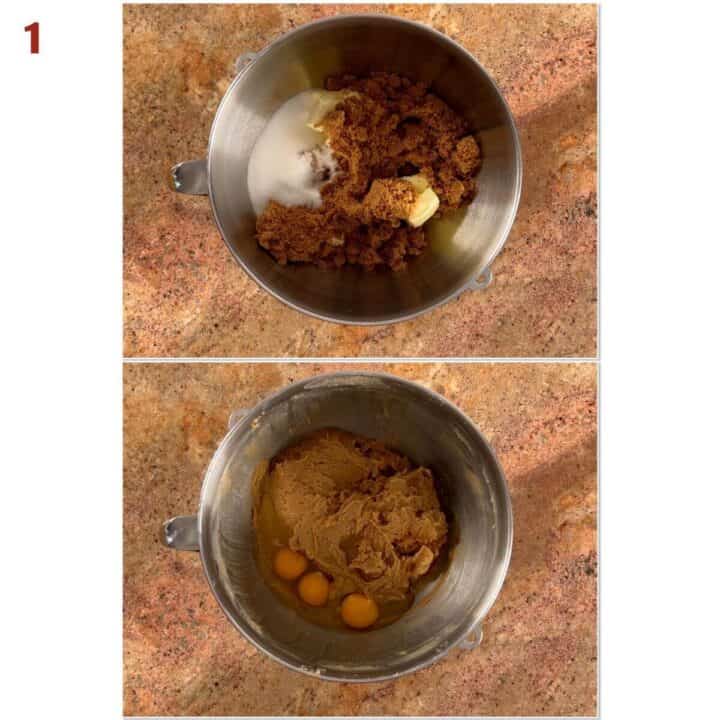
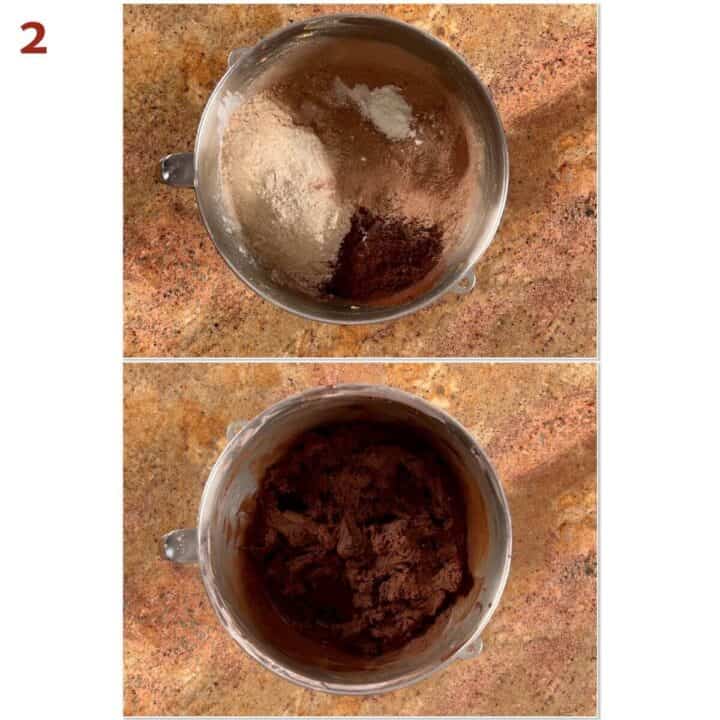
Add the flour, cocoa powder, hot cocoa mix, cornstarch, baking soda, and salt. Mix until the dough is just combined, about 2 minutes (photo 2). The dough will be soft and sticky.
Step 2: Portion the dough
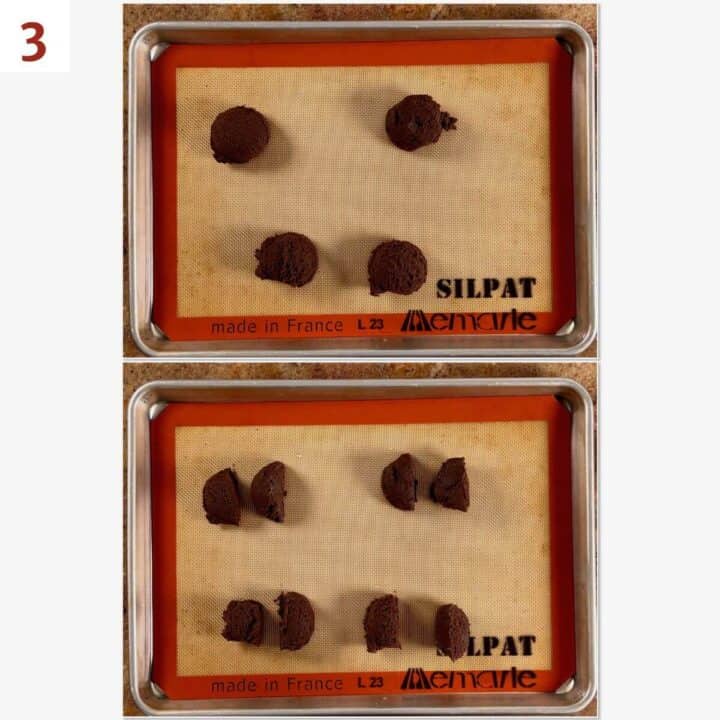
Using an extra large cookie scoop, portion the dough into ¼-cup mounds. Divide each mound in half with a bench scraper or knife (photo 3).
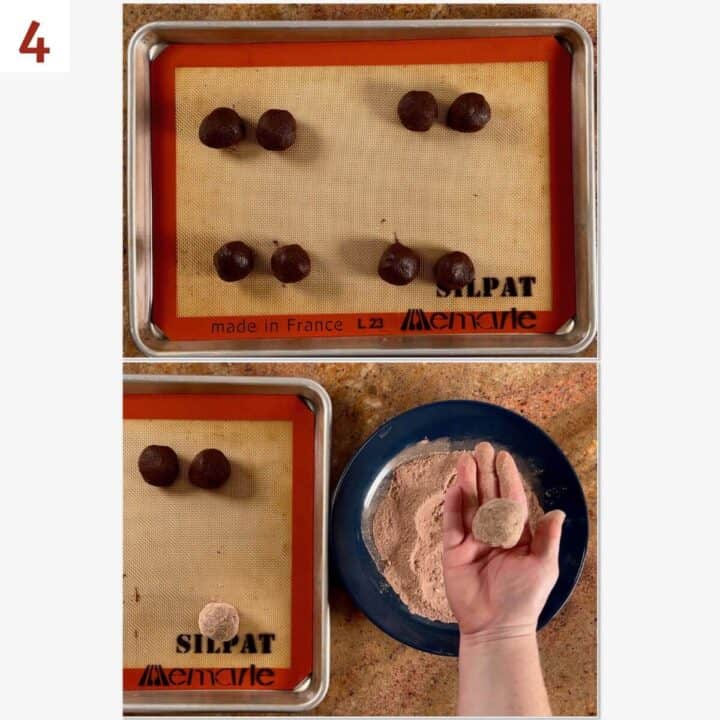
Shape each portion with wet hands into a ball. Roll each ball in hot cocoa mix (photo 4).
Assemble a few cookies at a time
It's best to make only a few cookies at a time (each cookie needing 2 balls of dough) since the dough can dry out and can be hard to seal later. Cover the rest with a kitchen towel or plastic wrap.
Step 3: Assemble the cookies
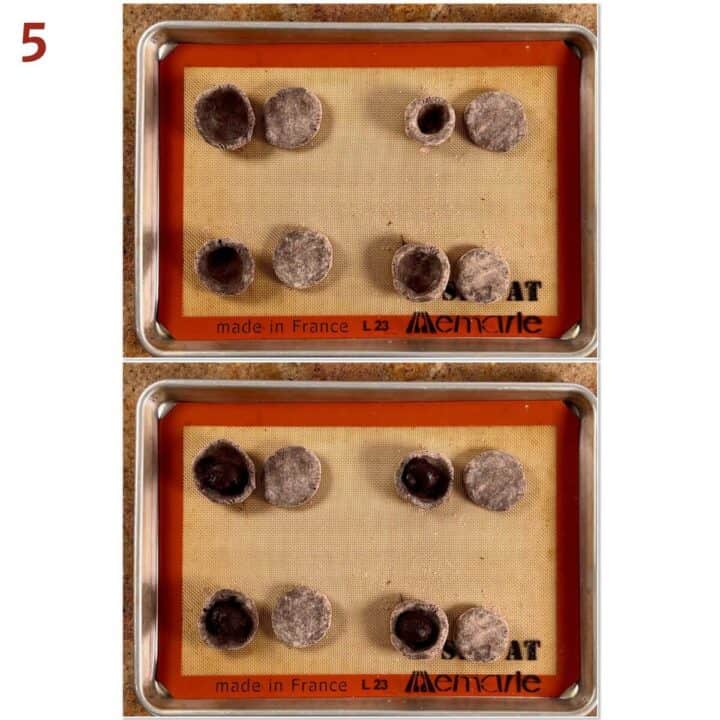
Flatten half of the balls that you're currently working with into thick disks. With the remaining balls, use your thumb and shape them into little bowls.
Using a small cookie scoop, fill the bowls' wells with 1 tablespoon of chilled hot fudge sauce (photo 5).
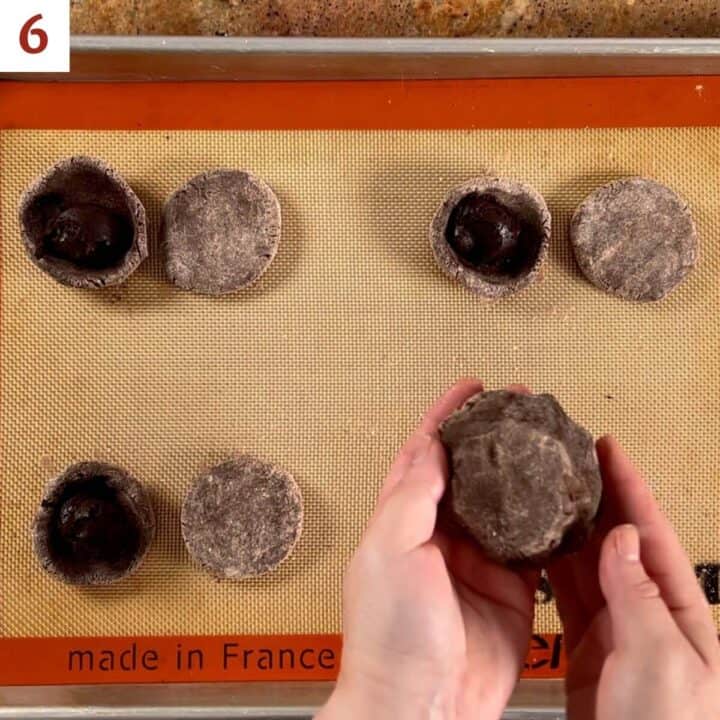
Place a dough disk on top of the filled bowl and seal around the edges (photo 6).
Re-roll the filled dough into a ball and roll again in hot cocoa mix. Repeat with the remaining cookie dough.
Step 4: Bake the cookies
Place 4 to 6 cookies on a half sheet baking pan lined with a Silpat silicone mat or parchment paper, giving them lots of space because they will spread.
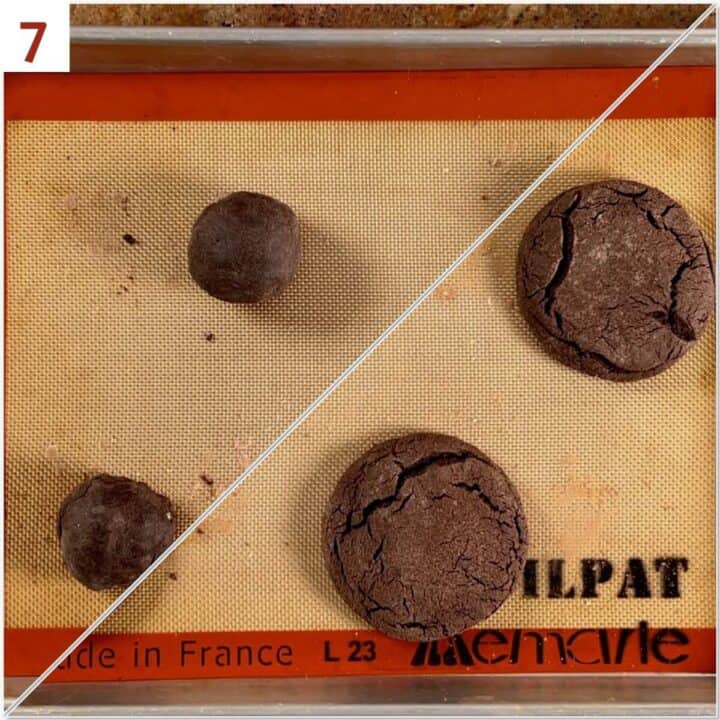
Bake at 350˚F for 13 to 15 minutes. The cookies will start to crack and crinkle and will spread. You will know they are done when the centers of the cookies no longer look wet (photo 7).
Remove the cookies from the oven. Quickly top each warm cookie with whipped cream and sprinkle with mini marshmallows. Serve immediately so the hot fudge center stays warm.
Storage and make-ahead instructions
Storage instructions: These cookies are best served warm from the oven, so try not to let them cool. It's best to bake only the number of cookies you will eat.
While reheating the baked cookies is ok, it does tend to dry them out a bit.
Make-ahead instructions: You can freeze the unbaked filled cookie balls for up to 3 months. Bake from frozen at 325˚F for 15 to 17 minutes.
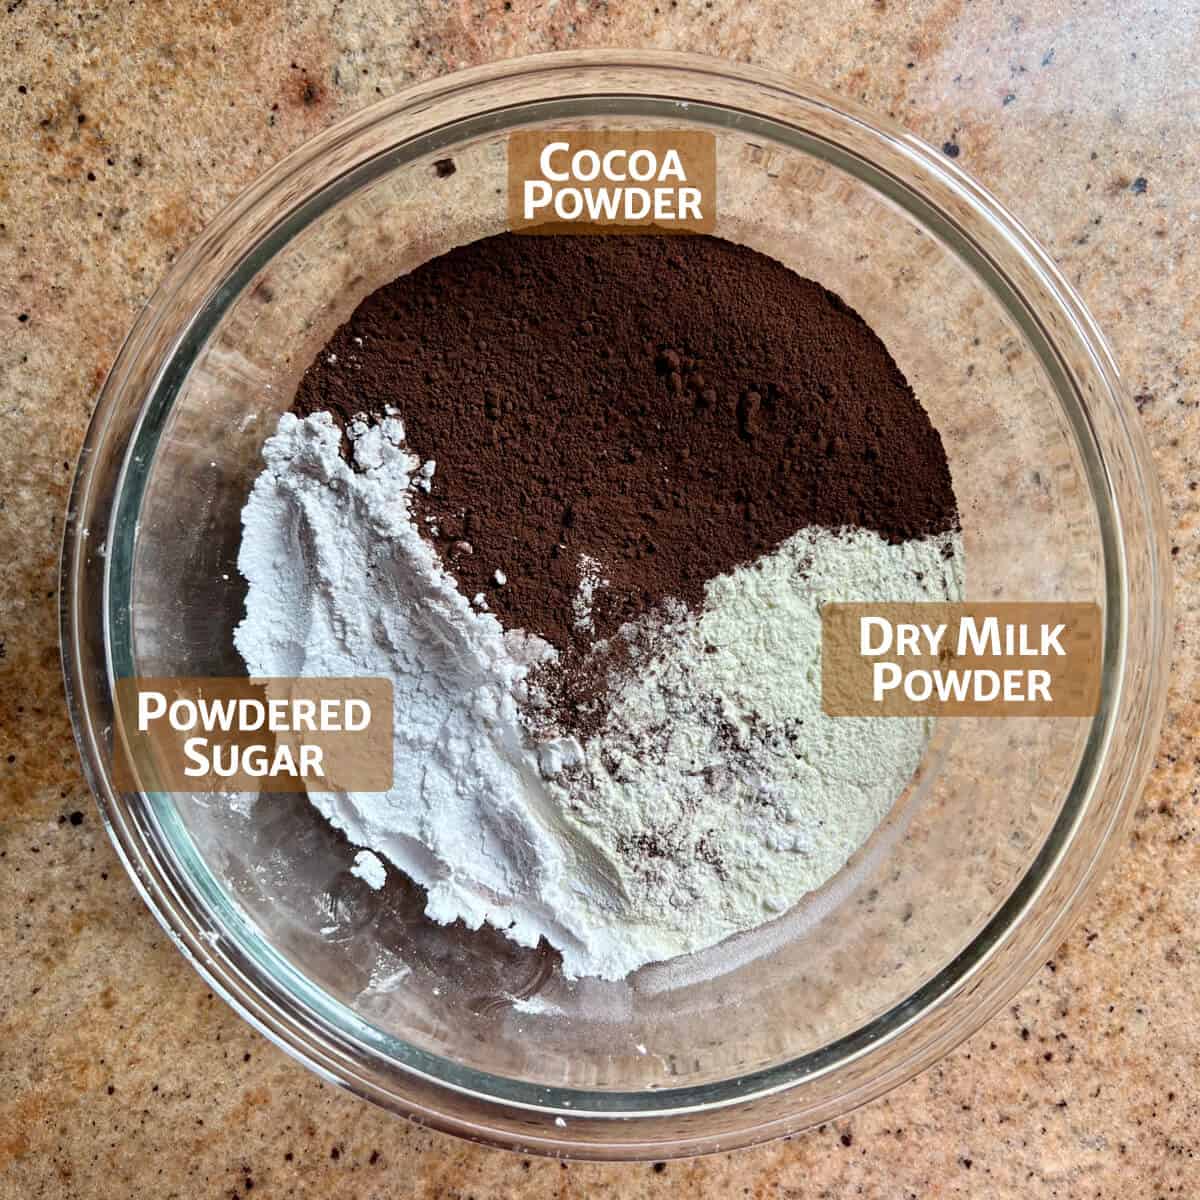
How to make hot cocoa mix
Making your own hot cocoa mix is super easy! All you need are three ingredients:
- powdered sugar
- dry milk powder
- cocoa powder (either regular or dark chocolate)
Check out more about making your own homemade hot cocoa mix, plus how to make a superlative mug of hot cocoa and how to package it for gifting!
Questions asked and answered
Here are some questions you might have...
These cookies will spread while baking (thus the need to give them room on the baking pan), but there's no need to chill the shaped cookie dough before baking.
My Hot Chocolate Lava Cookies recipe wasn't designed to be a Crumbl molten lava cookie copycat since I'm emphasizing the use of hot cocoa mix and the additional garnish. I like to think that these are more of an upgrade, really.
Didn't find the answer you're looking for?
Ask AI to answer for this specific recipe:
Disclaimer: I am not responsible for the quality of AI information

I hope you like this recipe! Let me know if you have any questions, and don't forget to leave a comment and rating. Thanks!
Slainté! L'chaim! Cheers!
- Tammy
Recipe

Hot Chocolate Lava Cookies
Equipment
Ingredients
For the cookies
- 1½ cups unsalted butter, softened (3 sticks), see Recipe Notes
- 1½ cups dark brown sugar, packed
- ½ cup granulated sugar
- 3 large eggs
- 1 tablespoon pure vanilla extract
- 3¾ cup all-purpose flour
- 1 cup dark chocolate cocoa powder, see Recipe Notes
- ½ cup hot cocoa mix, plus extra for coating, homemade or store bought, see Recipe Notes
- 1 tablespoon cornstarch
- 2 teaspoons baking soda
- 1 teaspoon kosher salt
For the filling
- 1 cup hot fudge sauce, homemade or store bought, chilled
For the garnish
- whipped cream, lightly sweetened
- mini marshmallows
Instructions
- Preheat the oven to 350 °F. Line a half sheet baking pan with a Silpat silicone mat or parchment paper. Set aside.
- Make the dough: Using a stand mixer fitted with the paddle attachment, cream together 1½ cups unsalted butter, 1½ cups dark brown sugar, and ½ cup granulated sugar until light and fluffy, about 4 to 5 minutes. Add in 3 large eggs and 1 tablespoon pure vanilla extract and mix until thoroughly combined.
- Add 3¾ cup all-purpose flour, 1 cup dark chocolate cocoa powder, ½ cup hot cocoa mix, 1 tablespoon cornstarch, 2 teaspoons baking soda, and 1 teaspoon kosher salt. Mix until the dough is just combined, about 2 minutes. The dough will be soft and sticky.
- Portion the dough: Using a large cookie scoop, portion the dough into ¼-cup mounds. Divide each mound in half and shape with wet hands into a ball. Roll each ball in hot cocoa mix.
- Assemble the cookies: It's best to make only a few cookies at a time (each cookie needing 2 balls of dough) since the dough can dry out and can be hard to seal later. Cover the rest with a kitchen towel or plastic wrap.Flatten half of the balls that you're currently working with into thick disks. With the remaining balls, use your thumb and shape them into little bowls.
- Using a small cookie scoop, fill the bowls' wells with 1 tablespoon of the c1 cup hot fudge sauce (chilled).
- Place a dough disk on top of the filled bowl and seal around the edges.Re-roll the filled dough into a ball and roll again in hot cocoa mix. Repeat with the remaining cookie dough.
- Bake the cookies: Place 4 to 6 cookies on the prepared baking pan, giving them lots of space because they will spread. Bake for 13 to 15 minutes. The cookies will start to crack and crinkle and will spread. You will know they are done when the centers of the cookies no longer look wet.
- Remove the cookies from the oven. Quickly top each warm cookie with whipped cream and sprinkle with mini marshmallows. Serve immediately.
- Storage instructions: These cookies are best served warm from the oven, so try not to let them cool. It's best to bake only the number of cookies you will eat.While reheating the baked cookies is ok, it does tend to dry them out a bit.
- Make-ahead instructions: You can freeze the unbaked filled cookie balls for up to 3 months. Bake from frozen at 325 °F for 15 to 17 minutes.


Ella says
Literally one of my favourite cookies of all time! These are magical and so fudgy, totally worth the extra bit of time to fill them!