
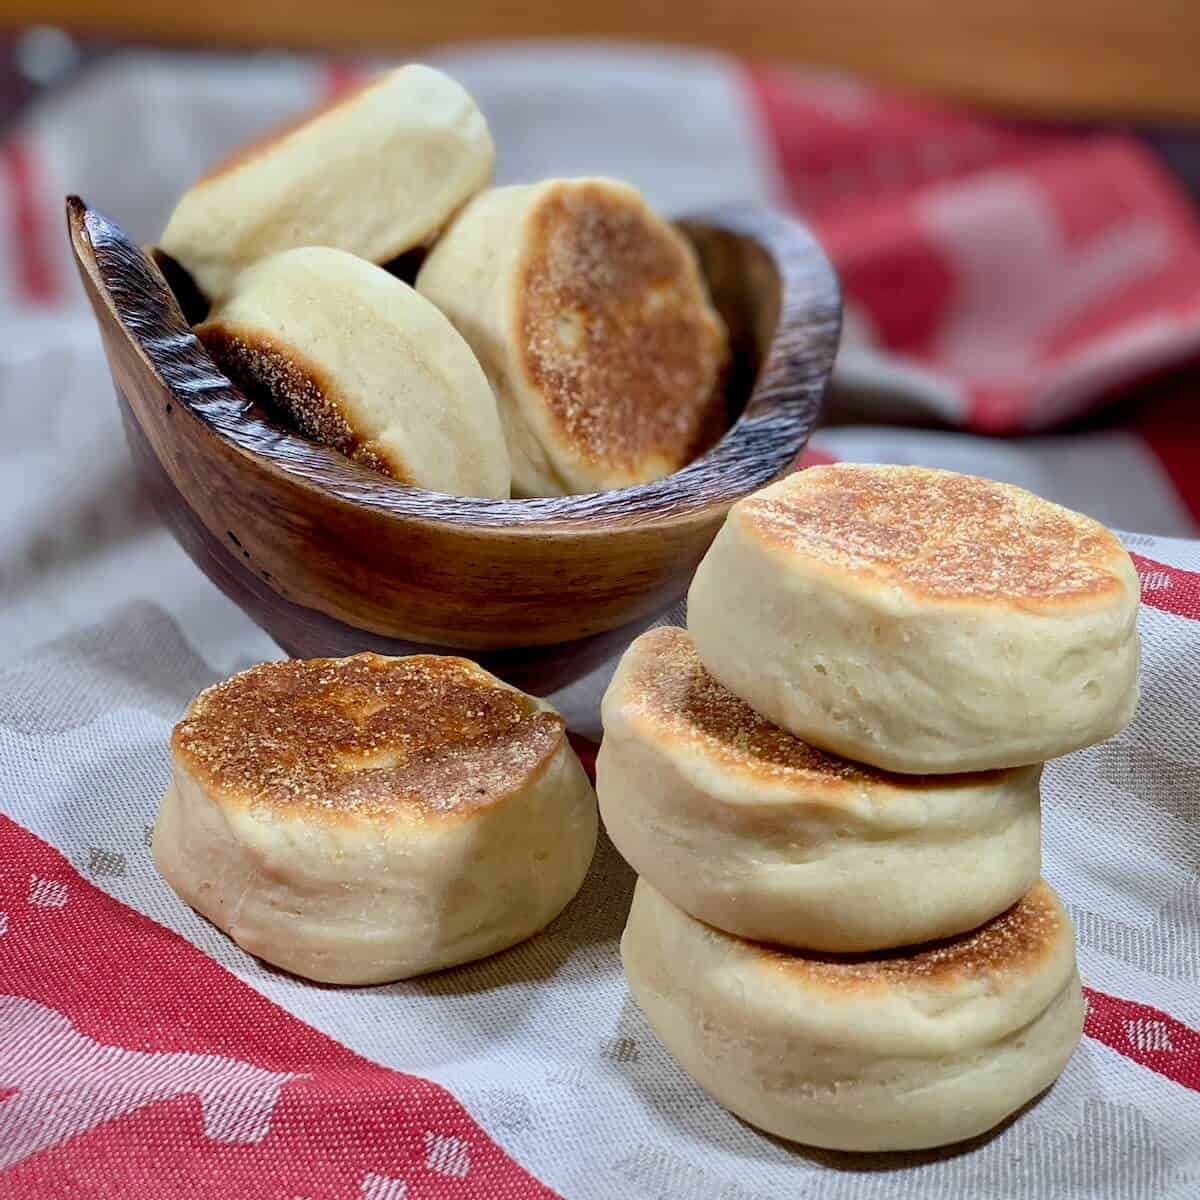
With their crunchy exterior and soft interior, these tangy, easy to make homemade English muffins made with sourdough starter discard will bring a smile to your face and your breakfast table!
Jump to:
- Why this recipe works
- Recipe Ingredients
- How to leave out the commercial yeast
- How to make sourdough English muffins
- Check the griddle temperature
- Storage instructions
- Don't use a knife to cut English muffins
- Questions asked and answered
- More recipes featuring sourdough discard to try
- Good news for sourdough bakers!
- Recipe
- Comments
[February, 2022: I've reworked the recipe and updated this post with all new pictures. Enjoy!]
Why this recipe works
- An easy to make dough that uses sourdough starter discard for extra flavor
- Cooks on the stove, so you don't need to turn the oven on
- Has a crunchy exterior, a soft interior, and toasts beautifully
What happens when you're maintaining a sourdough starter each week, but don't want to bake anything with the sourdough discard because it's too hot and you don't want to turn on the oven?
How about making Sourdough Discard English Muffins, those gloriously versatile breakfast treats? They can go from a vehicle to transport melted butter and jam to your mouth with crunchy, tangy ease to a wonderful base for Eggs Benedict (complete with Hollandaise Sauce, of course) or English Muffin Pizza.
And the best part is that they cook on the stove so no oven needed! A hearty breakfast can be had, any time of year. Bliss.
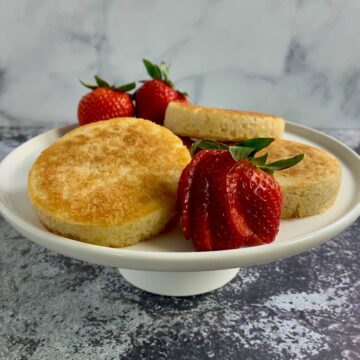
Homemade sourdough discard English muffins have that crunchy exterior and soft interior that's so important to this breakfast staple, with a tang from the sourdough starter discard.
⭐⭐⭐⭐⭐
Turned out beautifully! Love all the alternate directions available and tips and tricks. I couldn't bare to toss my discard and was so grateful for a same day recipe!
- Michelle
Recipe Ingredients
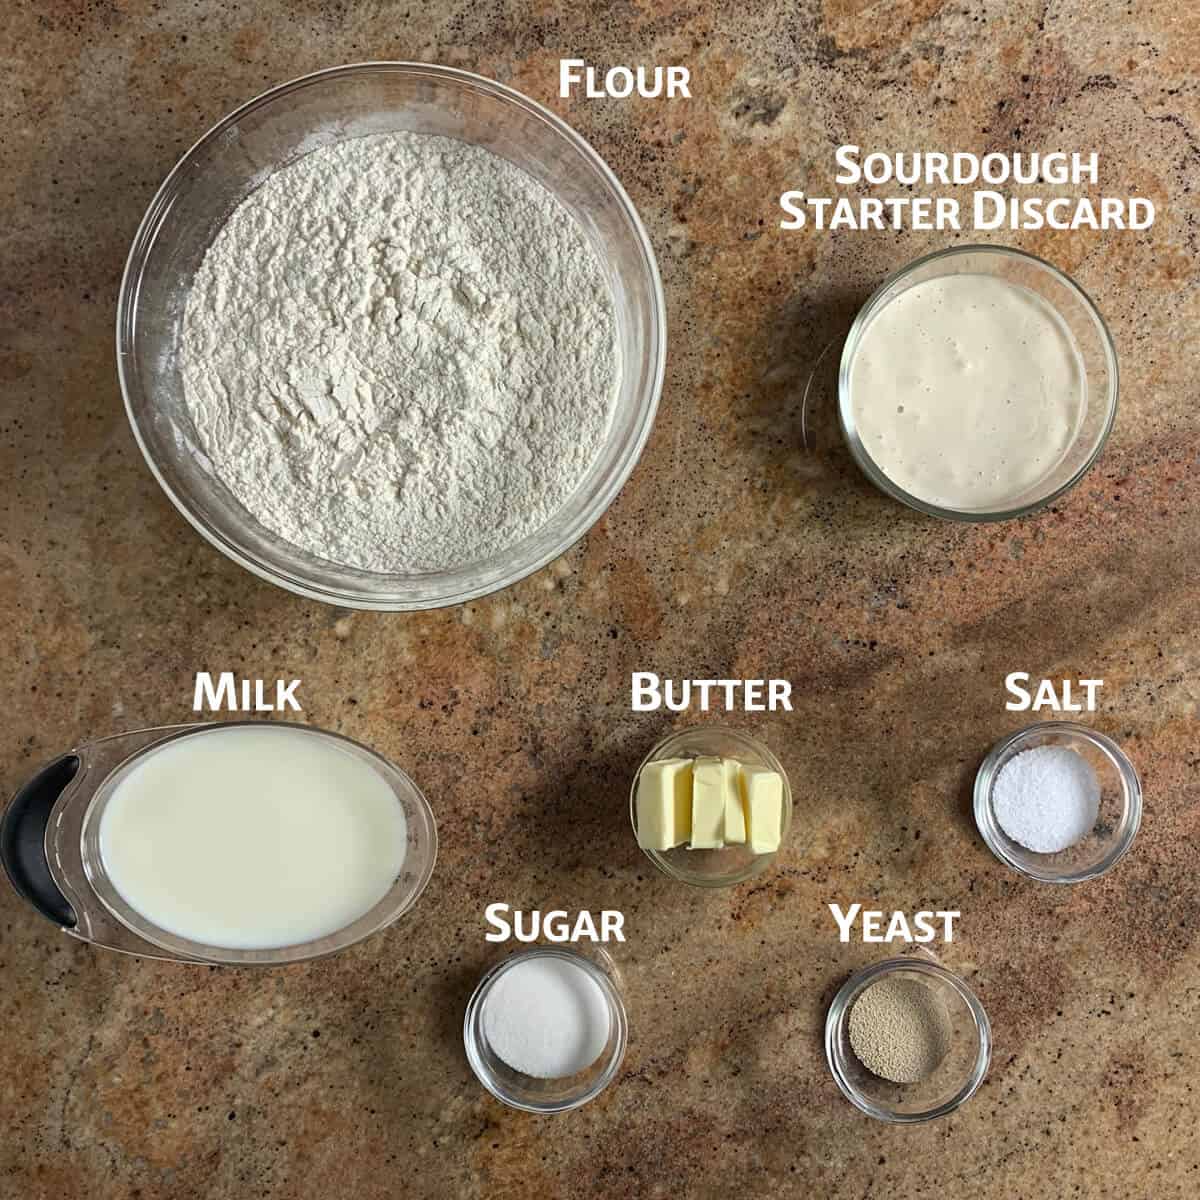
You'll need the following ingredients to make this sourdough English muffins recipe:
Ingredient Notes
Homemade sourdough English muffins contains all the usual sourdough discard bread suspects: flour, unfed sourdough starter, yeast, and salt, with a few tweaks.
Sourdough starter discard: Using fed sourdough starter can give you a better rise (depending on how vigorous your starter is), but using unfed sourdough starter discard works just fine. If you do use fed starter (and it's active and bubbly), you can omit the yeast, but the rising times can be longer.
Yeast: I use instant yeast in all my baking, but you can also use Active Dry yeast. If you use Active Dry yeast, then you might want to sprinkle yeast on to the warmed milk with a teaspoon of sugar and allow it to sit for a few minutes before proceeding with the recipe. Letting it foam "proves" the yeast is active and ready to go to work.
If you'd like to omit the yeast and just use fed, active sourdough starter, see the instructions below.
Kosher salt: Not all Kosher salts are the same, and the brand you choose can make a different when the amount of salt in the recipe gets larger.
In this sourdough ciabatta recipe, I use Diamond Crystal brand, which has lighter grains of salt (and contains less sodium), so 1 tablespoon is 8 grams. In contrast, Morton's Kosher salt has larger, flat flakes than are saltier, so 1 tablespoon is 16 grams. That's why you'll see a range of metric weights for the kosher salt.
Milk: Used instead of water to soften the dough. You can also use your favorite unflavored milk substitute.
Butter: Keeps the bread dough from being too fluffy (like when making pizza dough).
Mix-ins: If desired, you can use a variety of mix-ins to change the flavor of your English muffins, like fresh blueberries or cinnamon and raisins. Make the flavor suit your preferences!
Cornmeal (or semolina): Sprinkled on the dough to keep it from sticking to the griddle.
See the recipe card for a full list of ingredients and measurements.
How to leave out the commercial yeast
If you don't want to use commercial yeast in this sourdough English muffins recipe, replace the yeast with ½ cup (114 grams) of active, fed starter, reduce the amount of flour by about ½ cup (57 grams), and reduce the milk by about ¼ cup (57 grams). The rising time will be longer (about double) for both the first and second rises. (Note: there are some rounding inconsistencies here due to the volume vs. weight measurement conversion.)
How to make sourdough English muffins
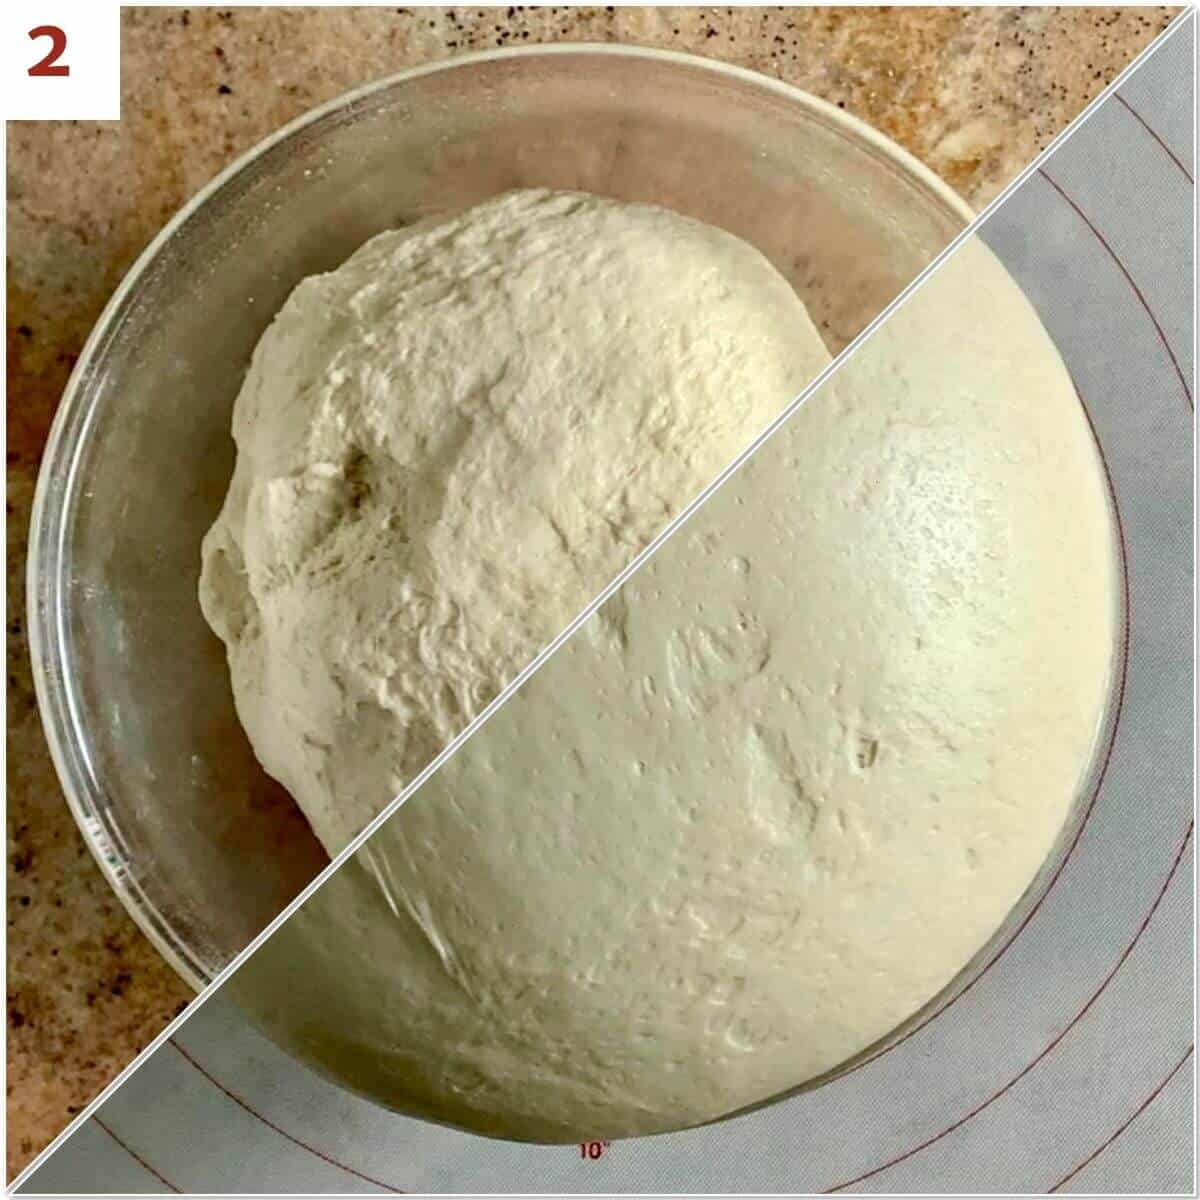
Step 1: Make the dough
A sourdough discard English muffin recipe starts like other sourdough-based bread.
Mix the dough ingredients (including any optional spices), then knead with a stand mixer, a bread machine, or by hand (photo 1). The dough should be soft and elastic, but not sticky. If necessary, add more flour in 1 tablespoon increments until you get the desired consistency (this is especially necessary if you're baking on a humid day).
If you want to add any optional mix-ins, do so now before the first rise. You can see how I fold mix-ins into my Sourdough Jalapeño Cheddar Bread.

If you're baking the same day, place the dough in a lightly greased bowl, cover, and place in a warm area to rise for about 1½ hours, or until it's noticeably puffy (photo 2).
If you prefer, you can also retard the dough by placing the covered bowl in the refrigerator after it has sat at room temperature for about 30 minutes to let the yeast get started. Chill for 8 hours, or up to 2 days. This allows the sourdough to ferment slowly and develop a more pronounced sour flavor.
If you've retarded the dough in the refrigerator, allow the dough to rest for about an hour on the counter to warm to room temperature. Gently deflate the dough, turn it out onto a lightly floured work surface, cover it, and let it sit for a few minutes to relax the gluten.
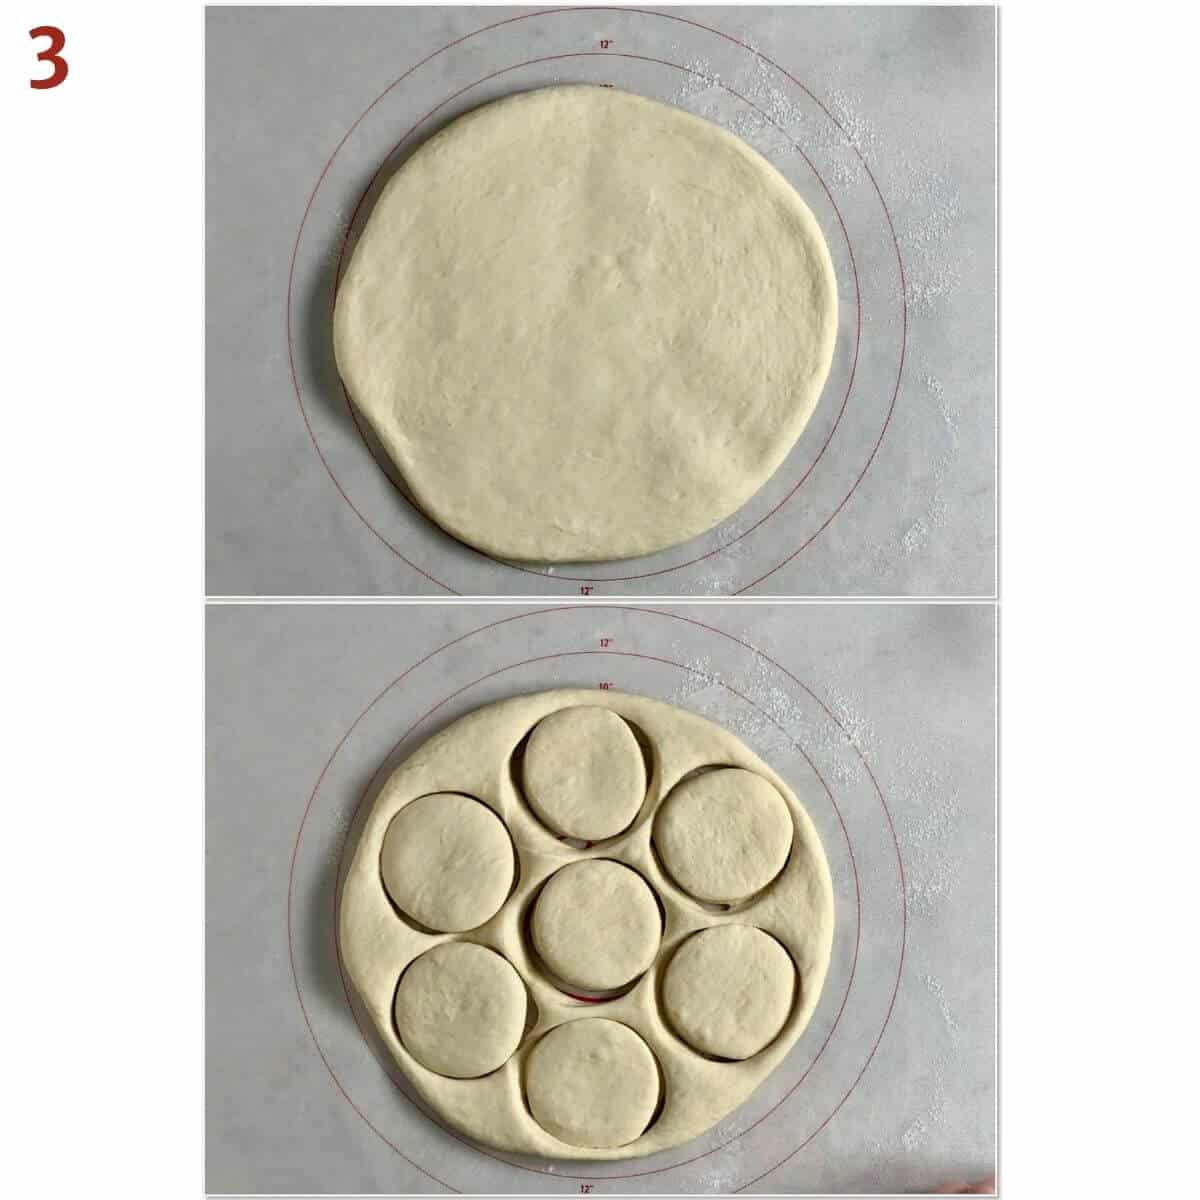
Step 2: Portion the dough
You can divide up the dough one of two ways:
Option 1: Roll out half the dough to about ½-inch thick, then use a 3-inch round cookie cutter to cut out rounds, re-rolling and cutting up the scraps (photo 3). Repeat with the other half of the dough.
Option 2: Divide the dough into 24 equal pieces (I weigh the dough using a kitchen scale and divided by 24, then cut pieces to that weight). Shape each piece into a round ball, then flatten each ball into a 3-inch round. Flatten each ball slightly larger than 3 inches, and trim edges with a 3-inch round cookie cutter or trim all around the edge with a pair of scissors (photo 4).

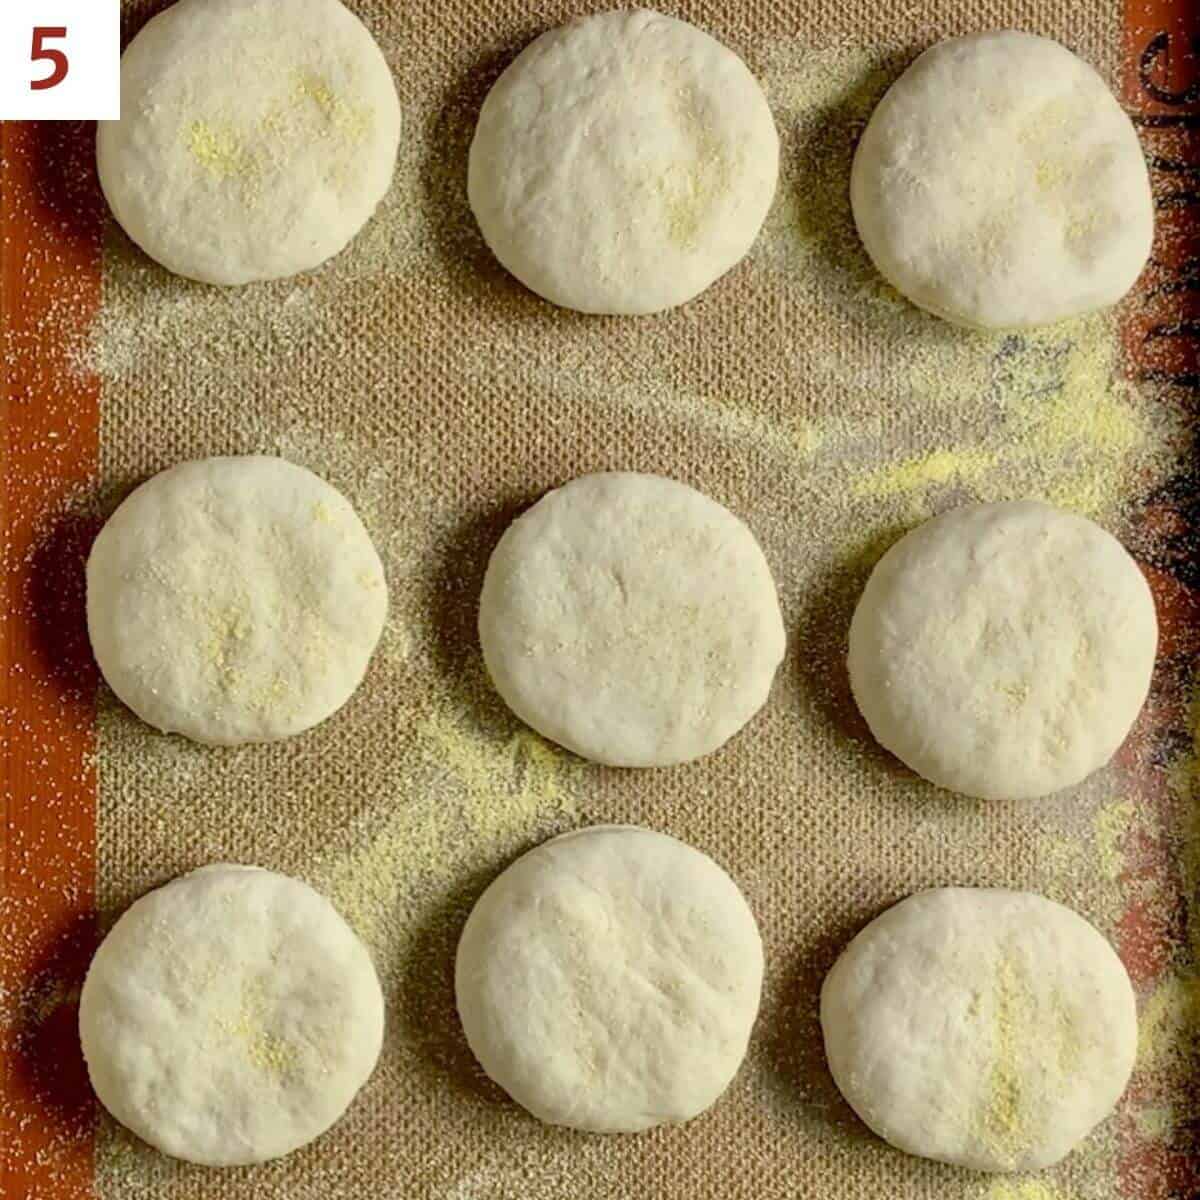
Step 3: Let the muffins rise again
Place the rounds, evenly spaced, onto a half sheet baking pan sprinkled with cornmeal or semolina, 12 per sheet (photo 5). Sprinkle them with additional cornmeal or semolina, cover with plastic wrap, and let them rise on the counter until light and puffy, about 45 to 60 minutes. If the dough has been refrigerated overnight and you didn't let it come to room temperature first, the rise time will be about 2 hours.
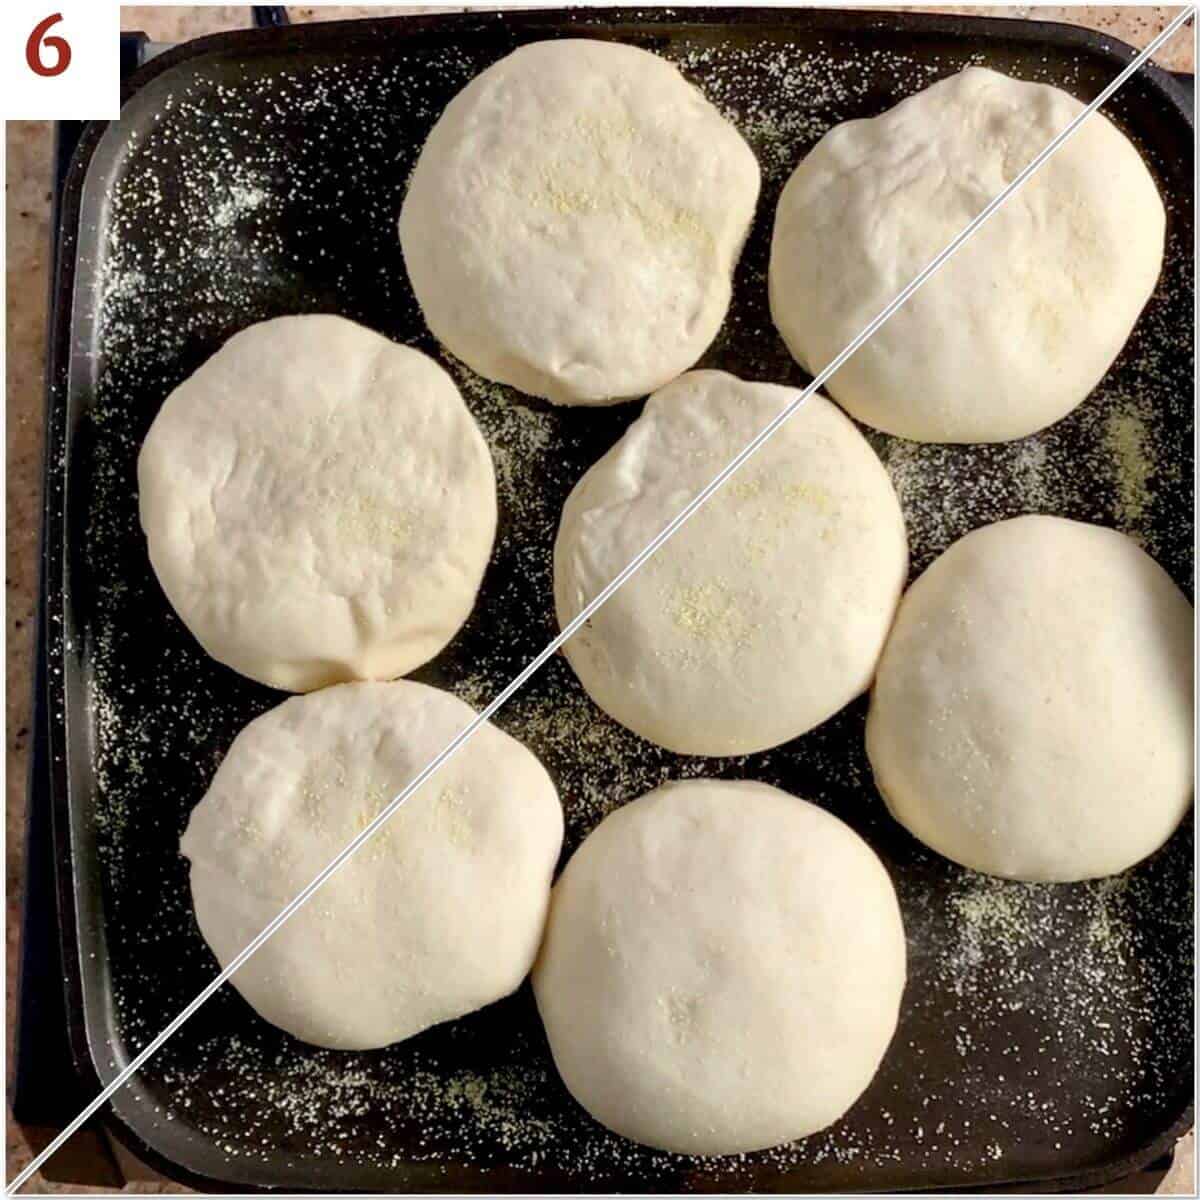
Step 4: Cook the muffins
Carefully transfer the rounds, as many that will fit without crowding, to a large electric griddle preheated to 350°F (or lower) or an ungreased griddle or frying pan that has been preheated over medium-low heat.
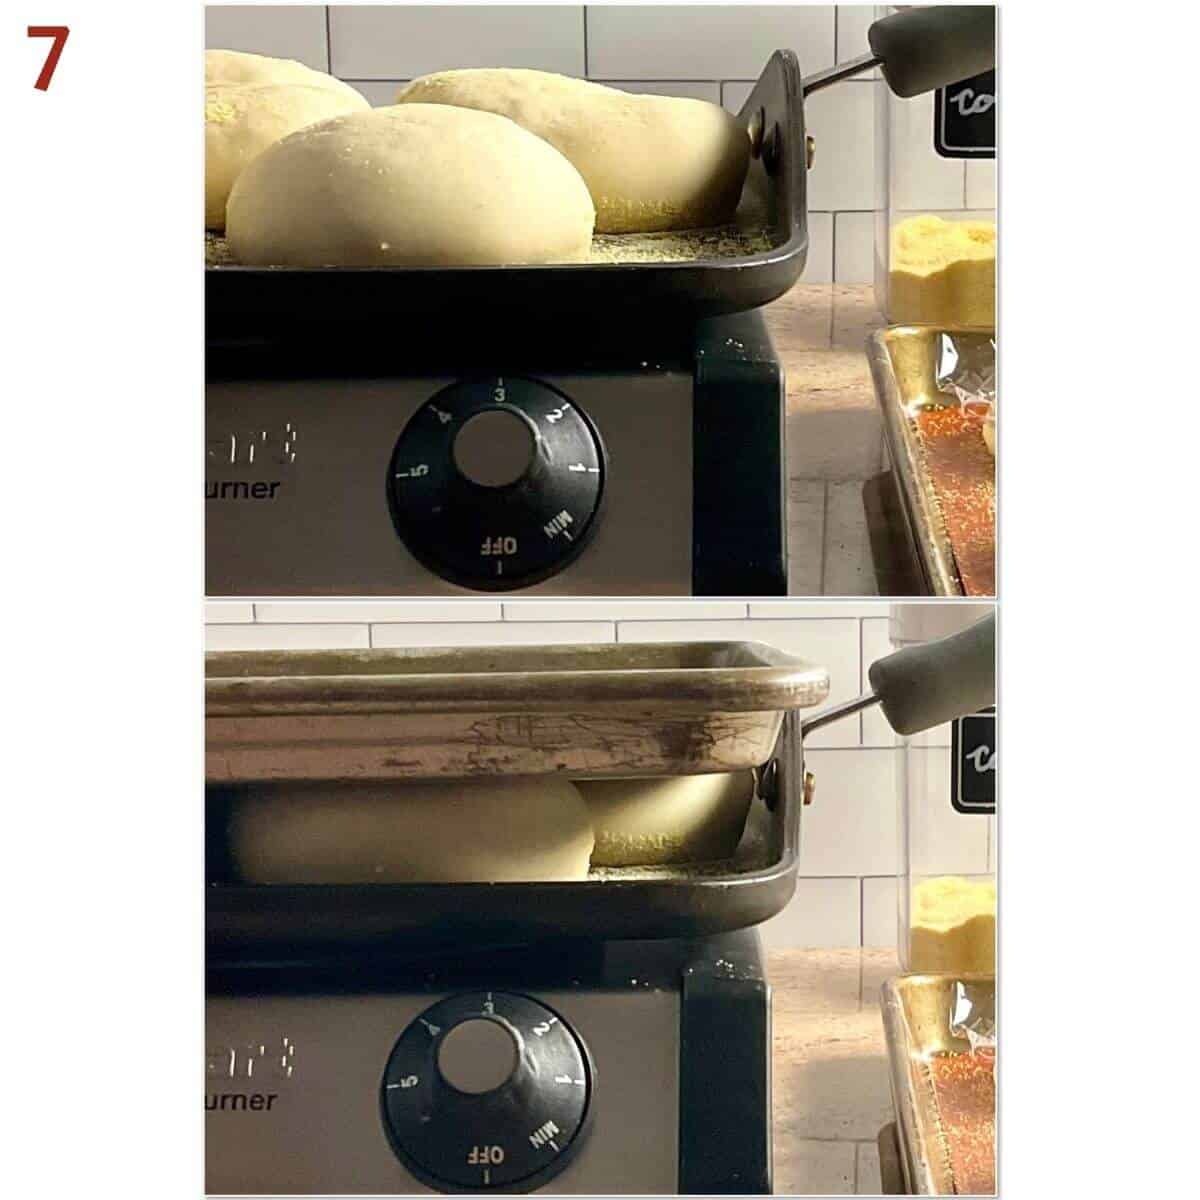
Spray the bottom of a quarter sheet baking pan (or similarly flat but not overly heavy object) with baking spray, then set aside, sprayed side up. The baking pan helps keep muffins flat across the top (rather than domed) while they're cooking.
Cook the muffins for about 5 minutes on one side. The dough will puff up as it cooks (photo 6).
Check the griddle temperature
My first batch of sourdough discard English muffins burned on one side because I had heated the griddle too hot - you don't want it any hotter than 350˚F (177˚C). An infrared temperature gun helps to make sure the griddle isn't too hot.
I quickly reduced the heat and the rest turned out fine. I salvaged that batch by cutting off the burnt edges. They still toasted up nicely, so crisis averted.
If your English muffins are still cooking too fast at 350˚F, reduce the temperature by 25˚F (-4˚C) and try again. You may need to adjust as needed to find your best cooking temperature.
Lay the quarter sheet baking pan on the puffed up muffins, sprayed side down (photo 7). Continue cooking for 5 to 7 minutes, then remove the baking pan.
Turn the muffins over and cook them, without the baking pan on top, for 10 to 12 minutes (photo 8).
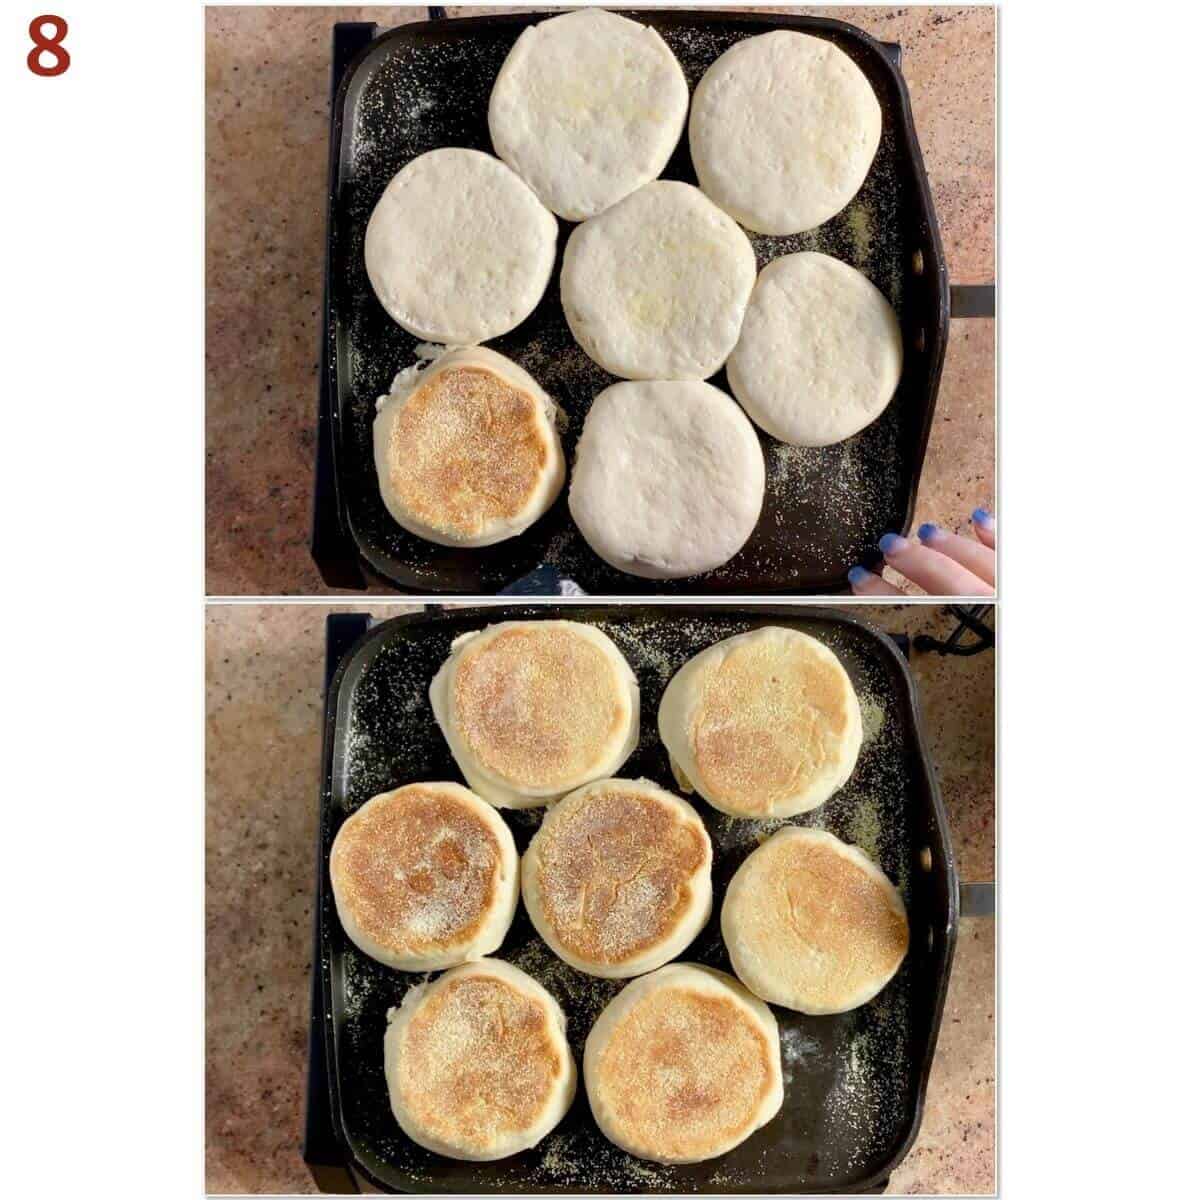
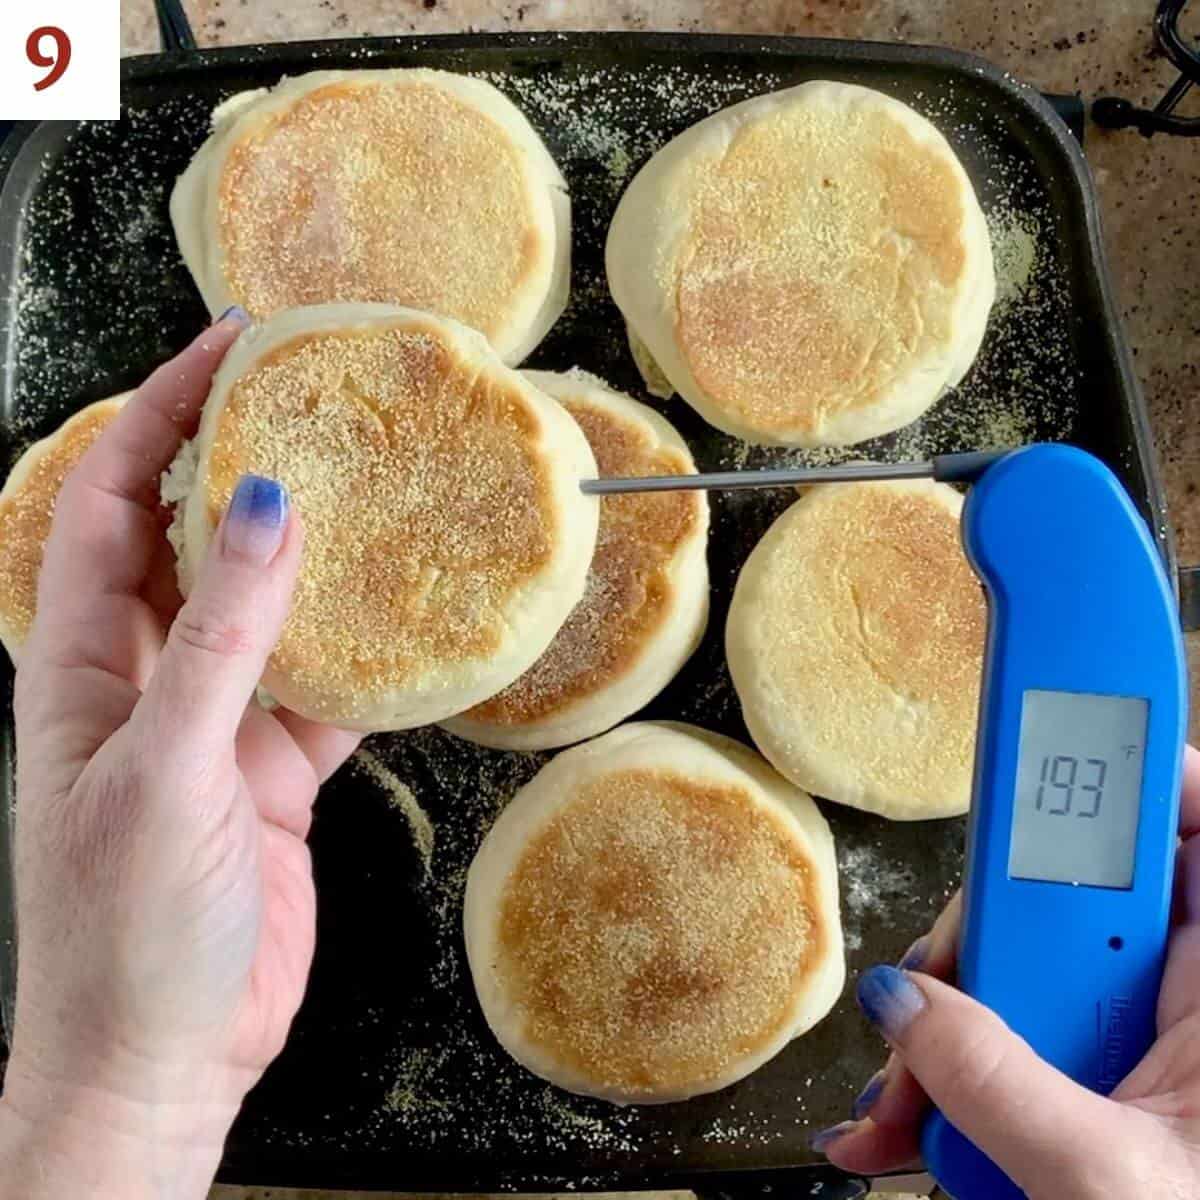
The English muffins will be done when they're golden brown and the centers read 190°F on a digital thermometer (photo 9). The edges may feel a bit soft, but that's fine.
If you're having trouble getting the muffins to cook all the way through on the stove top, cook until golden brown on both sides, then transfer to a preheated 350°F oven and bake until the muffins' interior show no sign of wet dough, about 10 minutes or so.
Storage instructions
Store the muffins in an airtight container at room temperature for 4 or 5 days, or freeze in an airtight bag for a month.
Don't use a knife to cut English muffins
The best way to get English muffins ready for toasting is to split them open with a fork (aka "fork split"). You push the fork into the side of a fully cooled English muffin, and keep going around the edge until it splits open.
You heard me right - don't cut them open!
The reason is that you want an uneven surface, that when toasted, gets brown and crispy and provides all the nooks and crannies to hold whatever toppings you use.
It makes a difference. Trust me!

Questions asked and answered
Here are some questions you might have...
English Muffins are related to the English crumpet. Crumpets are made by pouring a thick batter into ring molds on a hot griddle. The batter puffs up with holes on top (not unlike a pancake) and cooked until the top appears dry. The crumpets are then flipped over, the rings are removed., and the crumpets cook until the bottoms turn golden brown.
English Muffins are a yeasted dough that's cooked on a griddle, turned over, and cooked on the other side so the holes form on the inside. No special rings are needed since the dough is strong enough to hold together without them.
An English ex-pat named Samuel Bath Thomas invented what he called "English toaster crumpets" in his New York City bakery after emigrating in 1874.
According to The History of English Muffins from Just a Pinch, Thomas' English Muffins "were thinner than a traditional English crumpet and fork-split" giving "…the inside a rougher surface" (aka the "nooks & crannies" we know and love today).
Thanks, Mr. Thomas!
Didn't find the answer you're looking for?
Ask AI to answer for this specific recipe:
Disclaimer: I am not responsible for the quality of AI information

I hope you like this recipe! Let me know if you have any questions, and don't forget to leave a comment and rating. Thanks!
Slainté! L'chaim! Cheers!
- Tammy
More recipes featuring sourdough discard to try


Good news for sourdough bakers!
Discover a new method to feed your starter with less flour, making your baking both sustainable and scrumptious.
Plus, get my bonus recipe for naturally-leavened sourdough bread using unfed starter for fresh bread any time.
Recipe

Sourdough Discard English Muffins
Equipment
- griddle
Ingredients
- 7 cups all-purpose flour
- 1 cup sourdough starter discard, at room temperature, see Recipe Notes
- 2 cups milk, or an unflavored milk substitute, warmed between 100°F to 110°F
- ¼ cup unsalted butter, at room temperature
- 2 tablespoons granulated sugar
- 1 tablespoon instant yeast, or Active Dry yeast, see Recipe Notes
- 1 tablespoon kosher salt, Diamond Crystal brand (see Recipe Notes)
- mix-ins, optional, like cinnamon, raisins, or fresh blueberries.
- cornmeal or semolina, for sprinkling
Instructions
- Make the dough: In the bowl of a stand mixer fitted with a dough hook, combine 7 cups all-purpose flour, 1 cup sourdough starter discard, 2 cups milk, ¼ cup unsalted butter, 2 tablespoons granulated sugar, 1 tablespoon instant yeast, 1 tablespoon kosher salt, and any optional spice mix-ins.You can also knead the dough in a bread machine or by hand if desired.
- Knead to form a smooth dough. The dough should be soft and elastic, but not sticky. If necessary, add more flour or water in 1 tablespoon increments until you get the desired consistency (this is especially necessary if you're baking on a humid day).
- Fold in any optional larger mix-ins into the dough. You can see how I fold mix-ins into my Sourdough Jalapeño Cheddar Bread.
- If you're baking the same day, place the dough in a lightly greased bowl, cover, and place in a warm area to rise for about 1½ hours, or until it's noticeably puffy.If you prefer, you can also retard the dough by placing the covered bowl in the refrigerator after it has sat at room temperature for about 30 minutes to let the yeast get started. Chill for 8 hours, or up to 2 days. This allows the sourdough to ferment slowly and develop a more pronounced sour flavor.
- If you've retarded the dough in the refrigerator, allow the dough to rest for about an hour on the counter to warm to room temperature. Gently deflate the dough, turn it out onto a lightly floured work surface, cover it, and let it sit for a few minutes to relax the gluten.
- Shaping Option 1: Divide the dough in half. Working with one half at a time, roll the dough out to ½-inch thick, and cut in rounds using a 3-inch round cookie cutter. Re-roll and cut any remaining scraps. Repeat with the remaining half of dough.
- Shaping Option 2: Divide the dough into 24 equal pieces (I weigh the dough using a kitchen scale and divided by 24, then cut pieces to that weight). Shape each piece into a round ball, then flatten each ball into a 3-inch round. For a somewhat more even rise as the muffins cook, flatten each ball slightly larger than 3 inches, and trim edges with a 3-inch round cookie cutter (or trim all around the edge with a pair of scissors). Muffins with cut (rather than flattened) sides will rise more evenly, and you can use the trimmings to get extra portions. Win!
- Continuing: Place the rounds, evenly spaced, onto half sheet baking pan sprinkled with cornmeal or semolina, 12 per sheet. Sprinkle them with additional cornmeal or semolina, cover with plastic wrap, and let them rise on the counter until light and puffy, about 45 to 60 minutes. If the dough has been refrigerated overnight and you didn't let it come to room temperature first, the rise time will be about 2 hours.
- Cook the muffins: Carefully transfer the rounds, as many that will fit without crowding, to a large electric griddle preheated to 350 °F (or lower - see the Recipe Notes) or an ungreased griddle or frying pan that has been preheated over medium-low heat.
- Spray the bottom of a quarter sheet baking pan (or similarly flat but not overly heavy object) with baking spray, then set aside, sprayed side up. The baking pan helps keep muffins flat across the top (rather than domed) while they're cooking.
- Cook the muffins for about 5 minutes on one side, then lay the quarter sheet baking pan on the puffed up muffins, sprayed side down. Continue cooking for 5 to 7 minutes, then remove the baking pan. Turn the muffins over and cook them, without the baking pan on top, for 10 to 12 minutes or until they're golden brown and the centers read 190 °F on a digital thermometer. The edges may feel a bit soft, but that's fine.
- Remove the muffins from the griddle, and cool on a wire rack. English muffins can be cut in half with a bread knife or fork-split (to get a rougher surface), then toasted. Serve with butter and/or jam and enjoy!
- Storage instructions: Store the muffins in an airtight container at room temperature for 4 or 5 days, or freeze in an airtight bag for a month.
- This recipe is easily halved using 2 teaspoons yeast and ½ cup unfed sourdough starter.


Kimberley Millar says
Pretty spot on! Have to say good directions to follow and always appreciate the videos! Thank you… a keeper
(Even took picture but don’t see where to add)
Tammy Spencer says
Hi Kimberley, I’m glad you like them! The best way to add a picture is to post it on Instagram (tagging @scotch_scones) or Facebook (tagging @scotchandsconesblog). I’ll see it and promote it there. Thanks!
Marissa says
These are outstanding! Followed exactly with delightful results. Will try the longer ferment in frigerator next time for more flavor and possibly height? How do you get them so tall? Thank you for sharing. A definite keeper!
Tammy Spencer says
Hi Marissa, I'm so glad you like them! Like with biscuits, the best way to get height is to use a 3-inch round cookie cutter to cut out the muffins, cutting straight down (not twisting). That releases the sides and allows the dough to "grow" when cooking. Good luck, and happy baking! 😉
Kathleen Sadler says
I can’t wait to try this.
viktoria carlyle says
thank you for great recipe and detailed instructions. I'm a newbie and was very happy with result.
Tammy Spencer says
Hi Viktoria, I’m so glad you liked the recipe! Thanks for sharing, and happy baking! 🙂
Wynelle Erickson says
If I want to freeze them should it be done before or after cooking
Tammy Spencer says
Hi Wynelle, It’s best to freeze English muffins in an airtight container after they’ve been baked and cooled. They should keep for several months. Good luck, and happy baking!
Karen says
Hi, I’m planning on making them today but want to add raisins and cinnamon and possibly some with blueberries. How and when do I add these in?
Tammy Spencer says
Hi Karen, Thanks for the question. You can add the cinnamon with the rest of the dough ingredients when making the dough. For the mix-ins, the best time is just after you've made the dough (before the first rise). You can see how I fold mix-ins into my Sourdough Jalapeño Cheddar Bread. I'll update the recipe to indicate this. Good luck, and happy baking! 😉
Karen says
Thank you I’ll let you know how it turns out tomorrow since I’m going to refrigerate overnight and bake in the morning.
Donna says
FYI there’s a glitch on the page when using an iPad- the Ingredients section is missing. I was able to go to my iPhone to see it, but on the iPad it just goes from Equipment to Instructions. I tried refreshing, exiting and coming back, etc. It never shows up. Just letting you know
Tammy Spencer says
Hi Donna, How strange! I’m sorry that you had a issue on your iPad. It must have been a short-term glitch as by the time I checked on several iPads, I didn’t have this problem. I hope things have straightened out for you, too! Good luck, and happy baking! 😉
Kimberley says
Pretty spot on! Have to say good directions to follow and always appreciate the videos! Thank you… a keeper
(Even took picture but don’t see where to add)
Starla says
made these and they came out great. they tasted more like a roll than an English muffin. theyre still yummy
Tammy Spencer says
Hi Starla, I’m glad you enjoyed them! Thanks for sharing 🙂
Magan says
Love this recipe! Thank you so much for sharing it! I do have a question though- I stead of making English muffins, can I use the dough to make bread? I’m looking for an “English muffin toasting bread” which has the same consistency and flavor as muffins. Would this recipe work in a loaf pan?
Tammy Spencer says
Hi Magan, I’m so glad you like this recipe! As for your question, I haven’t tried to bake it in a loaf pan so I don’t have any personal experience doing it. However, a quick search showed me that it should be able to bake up in a loaf pan. After mixing the dough, put it into a greased loaf pan sprinkled with cornmeal and let it rise for about 45 to 60 minutes (it should be just crowning over the top of the pan). Bake at 400°F for about 22 to 27 minutes.
Please let me know if this works, and I’ll include it in the post. Good luck, and happy baking! 😉
Josselyn says
I used whole grain flour for my starter, will that affect the taste or rising of the English muffins?
Tammy Spencer says
Hi Josselyn, that's an interesting question. With a ratio of 7 cups of all-purpose flour vs. ½ cup of whole wheat flour in your starter (assuming you have a 1 : 1 ratio of flour to water in your starter), you might not notice the flavor of the muffins being altered too much. I also don't think the rise time would be affected. As a side note, you could replace up to 25% of the all-purpose flour with whole wheat flour if you wanted. If the dough is a little too dry, you could add a little water to moisten it. I haven't tried this personally, but I love to hear your results if you do. Good luck, and happy baking! 😉
Angela says
Oof, my dough is not rising at all.
Maybe I’ll try flatbread with this dough that I have. Also tasty!
Tammy Spencer says
Hi Angela, I’m sorry the dough didn’t work rise as expected, and I like your workaround - very clever! As for why the dough didn’t rise, my first thoughts are: (1) is the yeast active (that is, not expired)? and,(2) Did you use too much flour? A heavy, dense dough makes the yeast work extra hard. Measuring the weight with a kitchen scale insures the best results. Just some ideas to help with troubleshooting. I hope you’ll try again and get better results. Good luck! 😉
Laura says
Love this recipe. The muffins came out great. I did not proof overnight and next time I'll do that for a tangier flavor.
Tammy Spencer says
Hi Laura, I’m so glad you liked them! Thanks for sharing, and happy baking 🙂
Nicole says
Hi! I’m new to all this… love that King Arthur Baking company circle measuring sheet you have. What is that called/do you have the link? Thanks!
Tammy Spencer says
Hi Nicole, Thanks for the question. The mat is King Arthur Baking’s Rolling Mat (Note: not an affiliate link). It’s made of silicone, and I use it for rolling out pie dough as well as making scones. It comes in very handy! 😉
Agnes says
I really enjoyed making these with my discard and they taste great. Instructions were clear and easy to follow. I had a little trouble with my grill and regulating the temp. it's a stove top one and the temp wasn't consistent everywhere, but I adjusted. I can't wait to make them again. Thanks!
Tammy Spencer says
Hi Agnes, I’m so glad you like them! Thanks for sharing 🙂
Casey says
How long do you knead these in a stand mixer?
Tammy Spencer says
Hi Casey, Good question. Generally speaking, I’ll knead the dough for about 5 to 7 minutes on medium low speed (#3 on my KitchenAid mixer) using a dough hook until the dough is smooth and elastic. Happy baking!
Sharon Green says
I used my stand mixer to mix the dough. I may have over kneaded it. It’s stiff and not rising. What can I do to fix it
Tammy Spencer says
Hi Sharon, A stiff dough could mean that there’s not enough moisture present. This can happen if you’re using a strong flour (like bread flour) or the air in your kitchen has a low humidity. I would try adding water or milk to the dough in 1 tablespoon increments to try and soften it. Good luck, and happy baking!
Lindsay says
These are the best English muffins I've ever had. I've made them with discard and active starter. I'll be making them every week.
Tammy Spencer says
Hi Lindsay, I’m so glad you like them. Thanks for sharing! 🙂
Hannah says
I tried mixing in my stand mixer with dough hook. It was so dry with the 7 cups of flour and never mixed together. I tried dumping onto the counter to mix by hand and it never would combine. It was a dry floury mess. 7 cups of flour is correct?
Tammy Spencer says
Hi Hannah, I’m sorry the recipe didn’t worked as expected. The texture of bread dough is highly dependent on the kitchen’s environment - on cold, dry days you may need more moisture than the recipe suggests, while warm, humid days you’d need less. If your dough was too dry, it’s best to add water in 1 tablespoon increments until a smooth dough forms. Good luck, and happy baking! 😉
Momma G says
My son said these are so much better than the ones from the store! Made these dough yesterday and cooked them this morning, so delicious. I halved the recipe but it still made 18, I used a biscuit cutter and it worked perfectly. Thank you for sharing this!
Tammy Spencer says
So glad you liked them! 🙂
Alyssa Ingram says
Hi! Thank you for taking the time to create this recipe.
I do not own a griddle. How should I prepare these?
Thank you!
Tammy Spencer says
Hi Alyssa, good question. You can use a large skillet, especially if you have something smaller that will fit inside to flatten the muffins as described. Good luck, and happy baking! 😉
Willow says
This recipe is great! I’ve tried lots and this one is by far my favorite. I’ve made them sour by letting them cold ferment for a day and I’ve made them all in one morning because my kids asked for them and they do not disappoint ever. The cookie sheet on top while cooking is a game changer for me too and they turned out prettier that store bought
Tammy Spencer says
Hi Willow, I'm so glad you like the recipe. Thanks for sharing, and happy baking! 😉
Karen Dunaway says
If you use only half the dough and want to freeze it, how do you prepare it for use later? Just thaw, bring to room temp and use? or is there another process? How long can I place the unused dough in the refrigerator before I use it? Can I use the remaining dough for pizza? and if I can, what would the cooking time be?
No comment yet, will probably make first thing in the morning.
Thank you for the recipe and answering my questions.
Karen D.
Tammy Spencer says
Hi Karen, Thanks for your questions! Generally speaking, freezing yeasted dough can be done before the first rise (after kneading) or after portioning the dough. You'd freeze the dough for an hour, then wrap tightly with plastic wrap and keep in an airtight bag for up to 4 weeks. Thaw overnight in the refrigerator before continuing with the recipe (see the link for more details). Note that I haven't tried this method myself, so I can't guarantee results. If you do try it, please let me know how it goes.
As for using this dough for pizza, you can use my pizza dough recipe instructions for the times and temperatures. Just know that this dough is softer with more fat than I use in my pizza dough recipe. Good luck with all this, and happy baking! 🙂
Jess says
Thanks for this recipe! Mine look and taste great, however, the inside did not have all those great crevices and air bubble pockets that I'm accustomed to. I probably messed this up somewhere along the line!
Tammy Spencer says
Hi Jess, I'm glad the look and taste of the muffins was right, and I'm thinking that there might be a couple of reasons why you didn't see the air bubbles. First, did you let the dough rise and proof for the proper amount of time? Underproofed dough can create a flatter finished product. Second, did you slice or fork-split the muffins? Slicing produces a flat surface, while using a fork to poke holes and then split the muffin gives a much more uneven surface. If neither of these reason apply, then if you'd like you can email me and we can troubleshoot what you did. 😉
Tara says
Amazing!! So glad I made these
Tammy Spencer says
Hi Tara, so glad you liked them! 🙂
Mary Thompson says
Oh my - this recipe is a keeper. My muffins weren’t as pretty as store bought. They sure beat store bought on flavor!
Tammy Spencer says
I’m so glad you liked them! Thanks for sharing 🙂
D says
I have made a few different recipes, these came out the best. Pillowy tasty and they toast the best.
Tammy Spencer says
I’m so glad you like them! Thanks for sharing 🙂
Kelly says
Easy to follow recipe. They turned out so good. It was my first successful sourdough discard recipe.
Tammy Spencer says
Hi Kelly, I’m glad you liked them! Thanks for sharing, and happy baking! 🙂
Nadine says
this was such a quick and easy recipe to follow, I was able to use up all my discard I had saved! Very tasty and I will never buy English Muffins again, I would like to incorporate some whole wheat flour to the recipe for more fiber, any suggestions? I didn't have a cookie cutter so I used a glass jar a little smaller than 3", so I got 29, possibly my dough was less than 1/2 " high, but very happy with the finished product! thank you for sharing your recipe!
Tammy Spencer says
Hi Nadine, I’m so glad you liked this recipe! Generally speaking, you can replace up to about 40% of the all-purpose flour with whole wheat flour in a bread recipe. In this recipe, that would be about 2¾ cups or 330 grams of flour. I haven’t tried this myself, so please let me know how it goes if you do it. Happy baking! 😉
Jenna says
These are the best English muffins!! Unfortunately, I have developed a dairy allergy - could I replace the butter with coconut oil? And if I only have bread flour on hand, should I still use 7 cups?
Thank you!
Tammy Spencer says
Hi Jenna, I'm glad you like these English muffins. If you can't use butter, I'd recommend using a butter substitute - I'd be worried that coconut oil would impart its flavor on the final product (unless you don't mind that, then go ahead). As for the bread flour, it might make the dough a little stiffer, which you can counter by using less milk initially and adjust as needed to get the dough consistency just right. Let us know how it goes, and happy baking! 😉
EWalter says
In your recipe notes you said to put your yeast in the water but there's no water in this recipe. can you clarify?
Tammy Spencer says
Good spot! You can prove the yeast in the warmed milk used in the recipe. I’ve updated the recipe to reflect this. Thanks for letting me know!
Talya says
The recipe still doesn’t reflect this step. Likely why mine didn’t turn out 😅
Tammy Spencer says
Hi Talya, I'm sorry the recipe didn't meet your expectations. However the recipe notes do say that you can prove the yeast in the warmed milk if you want, especially if you're using Active Dry yeast.
Monica Salazar says
I was nervous to make these as I've never made English muffins and I'm new to bread baking, but this recipe made making the perfect English muffins easy as can be! I felt so proud of myself, and my boyfriend has requested I make a batch every week :^) Thanks so much!
Tammy Spencer says
Hi Monica, I’m so glad you like them. Thanks for sharing, and happy baking! 😉
Les says
That’s a lot of flour for this recipe. I used 6 cups, and the dough turned out way too thick and dry. I am skeptical of dough recipes that don’t use grams, and this is the reason why.. sorry, this recipe didn’t work for me.
Tammy Spencer says
Hi Les, I'm sorry the recipe didn't work for you. My sourdough starter is considered 100% hydrated, or 50/50 water and flour. If your discard has a different ratio, that could affect the hydration of the dough. And if the dough is too thick, you can always thin it with more liquid. With respect to your comment about dough recipes using grams, I do provide weight measurements for all my recipes. It's the unit conversion tab where you can choose between displaying US customary and metric units. I'd be happy to troubleshoot your issues if you'd like so that you can be successful next time. Good luck!
Sherry Barney says
Can I use the Carnation instant non-fat dry milk in the container if I don't have regular milk?
Tammy Spencer says
Hi Sherry, if you reconstitute the dry milk so that you'll have the equivalent of 2 cups milk, you should be fine. Happy baking!
terry bocci says
I made these this finished these this morning. Mixed the dough last night, shaped an cooked this morning. They were fabulous! I might make a few changes next time but nothing major: I would roll them a bit thinner mabe about 3 eighths instead of a half inch, also bread flour just to make it a little chewier. I also cooked them at about 300 degrees till they wer 200-205 in the center.
Tammy Spencer says
Hi Terry, I'm so glad you liked them! Thanks for sharing 😉
Teressa Bocci says
I have a question about time management. If I am reading this correctly I can make the dough in the afternoon let is sit at room temperature for 30 minutes, then put it in the refrigerator until the next day, than continue with the instructions.
Tammy Spencer says
That's correct! Just make sure to let the dough come to room temperature after you take it out of the refrigerator. 😉
Danielle says
Think I could add blueberries? If so, they would be fresh. Should I half them if they are big? Freeze them first maybe?
Tammy Spencer says
Hi Danielle, that’s an interesting idea. I haven’t tried it, but you could fold in a cup fresh blueberries after you’ve made the dough (before the first rise). I don’t think freezing them is necessary, but cutting the bigger ones might be a good idea. Let me know if you try it - I’m really interested in how it goes. Happy baking!
Danielle says
Also, is it 1.5 hours on the counter or 30 minutes and then the fridge? Or is it both? I am confused.
Tammy Spencer says
If you want to bake the same day, let the dough rest for 1½ hours on the counter. If you want to retard the dough to develop more flavor, let it sit for 30 minutes at room temperature, then chill for 8 hours, or up to 2 days. Bring the chilled dough to room temperature before proceeding with the next step.
Martin Hommer says
I'm a true beginner at Sour dough bread making. Followed your English muffin recipe and they came out FANTASTIC the first time. Love your easy to understand and follow directions. Thanks a bunch.
Tammy Spencer says
Thanks for sharing, Martin! I'm so glad you liked them. Hope you continue your sourdough journey with me, and Happy baking!
Tiffany says
Just to clarify, the time in the fridge overnight is in place of the time on the counter, not after rising on the counter?
Tammy Spencer says
Hi Tiffany, good question. You'll want to let the dough sit at room temperature for about 30 minutes before chilling it - this lets the yeast get started before retarding (I've updated the recipe to reflect this). Thanks for bringing it to my attention, and happy baking!
Tiffany says
Will bread flour work if I don’t have AP on hand?
Tammy Spencer says
Hi Tiffany, Bread flour should work, although the dough might be a bit stiffer to work. Give it a try and let me know how it goes for you 😉
Whitney says
Hi, I want to make this recipe today, but I rarely, if ever, have cows milk on hand. Could I use almond milk instead? Will it make a difference in the recipe? Thanks!
Tammy Spencer says
Hi Whitney, thanks for the question. Yes, you can use (unflavored) almond milk or your favorite milk substitute. I've updated the recipe to mention it.
Debra says
I made these but it doesn't taste like English muffins doesn't have the texture of muffins. it's like eating bread. Not sure what went wrong.
Tammy Spencer says
Hi Debra, Sorry the recipe didn't turn out to your liking. These English muffins have a soft and fluffy interior, like bread, from using milk instead of water. And if you cut them using the fork-slice method, you'll get that irregular surface that toasts up nicely. If you want a denser texture next time, you might try replacing some or all of the milk with water and/or cutting back on the total amount of liquid to make a denser dough. Good luck, and happy baking!
Jen says
350 on my griddle was way too hot, almost burning them before the 1st 3 minutes. Wish that note from the post had made it to the Recipe.
Trying the next batch with a lower temp.
Tammy Spencer says
Hi Jen, Sorry the temperature wasn't quite right for you. I've added a note about the griddle temperature to the recipe card itself - thanks for pointing that out to me. I hope the next batch works better. Happy baking!
Claudette says
I love this recipe and use it all the time to make discard English muffins. I have one question, though. If ai’m going to put my dough in the refrigerator for a day or 2, do I let it rise first?
Tammy Spencer says
Hi Claudette, If you want to hold the dough, it’s best to do it for the first rise for up to 2 days( that helps develop the flavor, too). You can let the dough rise for maybe 30 minutes before refrigerating, but you don’t have to. Just let the dough come to room temperature when you’re ready to shape the rounds.
I’m glad you like these English muffins. Happy baking! 🙂
Michelle Helm says
Turned out beautifully! Love all the alternate directions available and tips and tricks. I couldn’t bare to toss my discard and was so grateful for a same day recipe!.
Tammy Spencer says
Hi Michelle, I’m so glad you liked them! 🙂
Kelly says
Made these today and they came out fantastic. I followed the recipe almost exactly. I never felt like they were puffing up when cooking so I omitted the sheet pan step. I just pan cooked in my cast iron skillet for 5 min on each side. They’re delicious! Will freeze half the batch and keep half for breakfasts this week.
Molly says
This is such a great recipe, thank you! I subbed 2 cups of all purpose flour for whole wheat and they turned out great. Such a delicious way to use some discard! I didn’t get as many nooks and crannies (separated with a fork) but maybe that was the whole wheat. I also used cast iron griddle pans to cook.
Tammy Spencer says
I'm glad you liked them, Molly! 🙂
Lisa says
I love these English Muffins! Your recipe and instructions are perfect asks so helpful. I don't think I'll ever buy English Muffins again! Their heavenly aroma filled my house for days! Thank you so much!!💖
Tammy Spencer says
I'm so glad you liked them, Lisa! Happy baking 🙂
Kirstin says
Hi! My husband loves to eat breakfast sandwiches and especially on English muffins. I was so excited to find a recipe to make them where I can use my sourdough discard! Going to try it today!
My question is about the Kosher salt. I don't have any right now just sea salt. Is it possible to use that instead? And if so, do I need a smaller amount?
Thanks!
Tammy Spencer says
Hi Kirstin, Thanks for the question. With salt, it's the size of the grain that matters - 1 tablespoon of kosher salt (coarse grain) will weigh less than 1 tablespoon of table salt (with it's finer grain). If you can use a kitchen scale to measure out 10 grams of your sea salt, then you'll have the equivalent of 1 tablespoon of kosher salt. If you don't have that option, then look at the grain of your sea salt - the finer it is, the less you'll want to use. Let me know how it goes for you, and happy baking! 😉
Kirstin says
Thanks for responding so quickly! I do have a scale so I will use that. And I will let you know how it goes.
Kirstin says
Tammy, I was finally able to make the muffins yesterday and they turned out great! I did the 10g of fine sea salt and they tasted good so it worked. Thank you so much!
Tammy Spencer says
Hi Kirsten, I'm so glad you were able to make this recipe work for you, and thanks for letting us know. Enjoy! 🙂
Loretta Kerner says
So good!
Tammy Spencer says
I'm so glad you like this recipe!
Roy says
Hi Tammy. I love the recipe and the muffins. Like someone else asked, mine didn’t have the irregular size air pockets. They were very even and smooth, much like store bought bread (I have a photo but don’t see any options to add photos). Unlike the previous poster I followed the recipe exactly for times and temperatures. I got a good rise and excellent taste, just not the irregular nooks & crannies I think of for English muffins. Any ideas?
Tammy Spencer says
Hi Roy, thanks for your question. I found the irregularities in the texture comes from splitting the muffins with a fork rather than slicing them. That contributes to a rougher texture when you toast them.
Other than that, the causes could be from differences in flour strength, how hydrated your dough is, and how active is your yeast. All those factors go into how the yeast will behave. You might try making the dough a little wetter (not by much, maybe a tablespoon or two more water) so that the dough isn’t as dense and more bubbles can form. Let me know if that helps, and happy baking! 😉
Mark says
A suggestion. for livening up discard sourdough in this recipe is to substitute some whole rye flour in for some of the AP flour. Yeast love rye because it is higher in nutrients than wheat flour. 5-8% rye to 92-95% AP is all it takes.
Tammy Spencer says
What a great suggestion! Thanks for sharing 😉
Kathy Rhodes says
So happy to have found your recipe! I actually used buttermilk rather than regular milk since I had it on hand and they tasted great.
They were a tad dense, but that was because I didn't think and dumped all the flour in at once (I immediately thought "You know better!"). I had to work small amounts of milk back into the dough to soften it, so the extra kneading probably hurt a bit but what a great recipe! Since I always have unfed starter in my fridge this will definitely be my "Go to" for english muffins.
Tammy Spencer says
Hi Kathy, I’m glad you made the recipe work for you! Thanks for letting us know. 🙂
Sarah says
I loved these! My discard isn't too lively right now so I was happy that your recipe used both unfed for flavor and yeast for rise. I only made a half batch but will definitely do a full batch next time!
Tammy Spencer says
I’m so glad you liked the recipe! Thanks for sharing 😉
KAREN says
Love this recipe! My muffins taste great and my kids love them. I didn't get the nocks and crannies that english muffins are known for. I used active starter rather than store bought yeast. And my muffins rose well. I did accidentally put the cookie sheet on the entire first 10 minutes. Do you think the weight of the pain prevented the nocks and crannies from forming?
Tammy Spencer says
Hi Karen, it is possible that the cookie sheet weighted the muffins down. But also it’s best to split them with a fork rather than slicing with a knife.
In any case, I’m glad you liked them. Thanks for sharing, and happy baking!
Kendall says
Thanks for this recipe! I made a half batch to use up discard and they're perfect. I scalded my milk then cooled it until warm to the touch as you said, or no longer steaming. Had no problems with the cold rise! Used a sharp-edged glass to cut them out and got a good enough edge that I didn't need to trim them.
Tammy says
Excellent! I'm glad you liked them. 😉
Meg says
Maybe a silly question but it’s unclear to me from the description / pictures - when you put the sheet pan on top of the cooking muffins are you flipping them first or is the pan going on top of the uncooked side ? If the later , do you need to spray the pan or anything to keep it from sticking to the raw dough side?
Tammy says
Not a silly question, Meg. The sheet pan goes on top of the English muffins before you flip them over to keep them flat (otherwise they dome up). Since you've sprinkled the top of the English muffins with cornmeal, they shouldn't stick to the pan. Good luck and happy baking!
Cheryl Hudgell says
Made these today they turned out great! with covid scare I Have been making bread every week this was nice to switch it up and use my sourdough starter for these muffins.
Tammy says
Hi Cheryl, I'm glad that you liked this recipe. I enjoy baking sourdough, and coming up with ways to use the starter discard poses a fun challenge. I hope you'll try some of the other ideas I've posted. Happy baking! 😉
Becci says
This recipe is AMAZING!! Thank you so much for great instructions and a recipe that helps me utilize all that sourdough discard! My sourdough English muffins turned out perfect and were a complete score with my family! ♥️
Tammy says
Hi Becci, I'm so pleased your family like this recipe! Thanks for sharing 😉
Erin says
These English muffins look amazing!!
Tammy says
Thanks! 🙂
Linda says
Hi there, I made the full recipe today and I am not sure about my dough? It seems to me that the dough is too thick ? Not very soft..When I push on the dough it doesn't really spring back, it kinda cracks? I have it in the refrigerator until tomorrow, hoping it will look like you're pic? Any suggestions are appreciated.
Tammy says
Hi Linda, thanks for writing. The thing about bread baking is that the dough texture is dependent on some factors that aren't entirely obvious. If your dough was too dry, it could be that (1) your starter has a different hydration level than mine so the dough needed more liquid, (2) the type of flour you're using might be absorbing more liquid (different strengths of flour will do this), and/or (3) the humidity is low, evaporating more liquid from the dough. In any case, it sounds like you needed to add a tablespoon or two of water to get the dough to its proper texture.
It might be difficult to fix the dough at this point...you could just leave it at this point and see what happens. You could also try and knead more water into the dough, but it'll be a soupy mess for a bit because the flour has already absorbed the liquid. Otherwise, you might have to chalk this up to "live & learn" and try again. Whatever you do, I'd be interested to hear how it goes. Good luck!
Claire says
Hi Tammy,
Thanks for all your creative suggestions for using sourdough starter! One question. Why do the English muffins need yeast in addition to the sourdough starter? I’m trying to cut out shop bought yeast altogether. I’m presuming it’s because muffins need more rise? Would ripe sourdough starter negate the need for additional yeast? I have only just got my first every sourdough starter going (yesterday) but can’t stand the thought of throwing anything away. (Especially whilst in lockdown due to C-19)!
Thanks in advance for your insights.
Claire (from England where we love English muffins!)
Tammy says
Hi Claire, thanks for your question. The need for commercial yeast stems from the fact that I'm using sourdough starter discard, which means that the yeast in the starter isn't very active (here the starter is really there to provide flavor). If you were using ripe (i.e. fed) starter that is vigorous and bubbling, you could probably get away without using commercial yeast. Also, with new starter, you need to let it get very active before baking with it solo. I haven't tried using ripe starter myself because I, like you, don't want to throw away the discard. Please let me know how it goes for you if you do decide to go for it. Happy Baking!
Kylene says
Attempted this recipe twice and my dough WILL NOT rise. Both times I used the counter rather than the fridge to cook same day. First time didn't rise at all but I cut the circles anyway and let sit and it took like six hours to see any sort of rise at all. I discarded because they were way too thin. Today I'm trying again and no rise after 2 hours on the counter. Letting sit longer but seems like a second round of the same. Thoughts?
Kylene says
Nevermind, saw comment above. I'm guessing I'm having the same problem.
Tammy says
Hi Kylene, I'm sorry you're having trouble with this recipe. If you think you're warming the milk too much, it kills the yeast before it has a chance to do its job. Try to warm the milk just until it simmers (small bubbles around the outside and lightly steaming). It won't take long to get there.
The other possibility is to make sure your yeast is fresh and active. A way to tell is to check the expiration date on the package (that's a dead giveaway). If you're still unsure, then you'll want to "proof the yeast," i.e. sprinkle the yeast onto the warmed milk with a teaspoon of sugar and let it sit for about 5 minutes. If the mixture foams, you know your yeast is active and you can proceed with making the dough. If it doesn't, you'll have to get yourself some fresh yeast.
I hope this helps. Good luck, stay safe, and happy baking! 😉
Adam Lefkowitz says
Tried making them, but they didn’t rise. Wondering if I overheated the milk and killed the yeast and sourdough? Anyway, will give it another go!
Tammy says
I think your suspicions might be correct...it's best to warm the milk until small bubbles form and the milk is steaming, but you don't want to boil it. If the milk does boil, allow it to cool until it's warm to the touch but won't burn your fingers.
I hope you try again and let me know how it goes. Good luck!
Sonna says
The Best English Muffin recipe I have tried! This will now be my go to recipe! They are mouth watering good!!
scotchscones says
I’m so glad you enjoyed them!
Randalle, A Toast and Tea says
Beautiful photos - I can almost smell them coming hot off the griddle! Also great inspiration to get a sourdough starter going. Thanks for sharing!
scotchscones says
Thanks for your kind words!
Leslie says
That looks so yummy!