
Combining sourdough tanginess with bagel chewiness, these sourdough bagels are a step above other homemade bagels. Toasted or warmed, they're great for breakfast and a great way to use sourdough starter discard!

Jump to:
[February, 2022: I've reworked the recipe and updated this post with all new pictures. Enjoy!]
Why this recipe works
- Combines sourdough tanginess and bagel chewiness into a delicious homemade bagel
- Make a variety of bagel flavors with mix-ins and/or toppings
- Can make the dough and freeze for later baking
I'm always thinking up creative ways to use my unfed sourdough starter after feeding it, like Sourdough Crumpets or Sourdough Gingerbread. When inspiration hits, experimentation follows.
Instead of making pizza dough, popovers, or focaccia (just some of my sourdough discard recipes), I decided to make sourdough discard bagels!
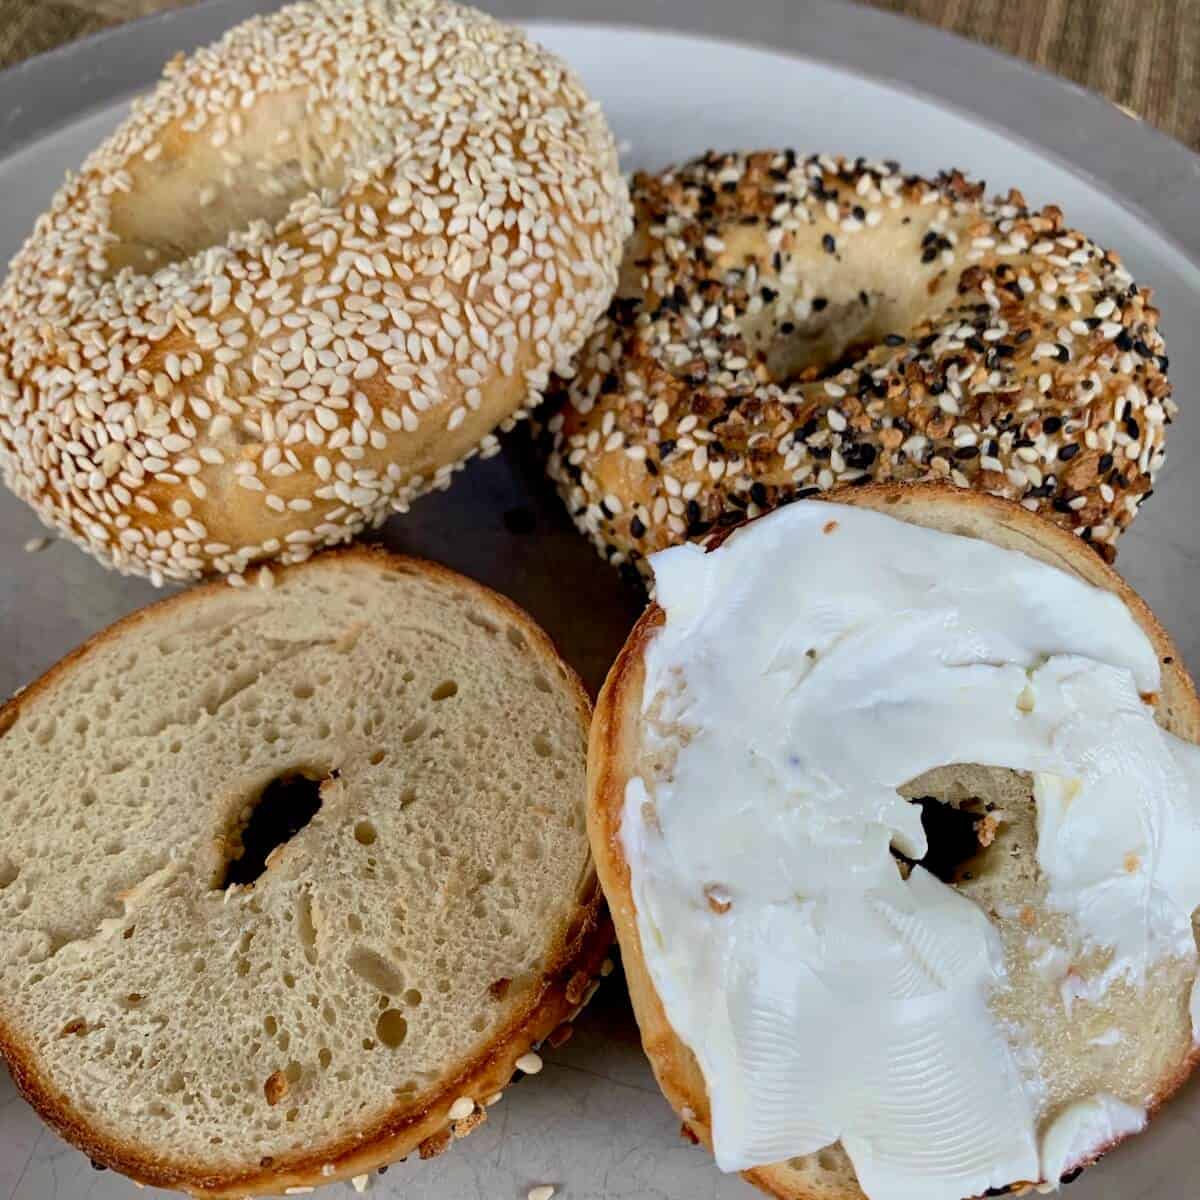
These sourdough bagels have a wonderful sourdough tang from the sourdough starter discard, yet still retain that bagel chewiness. The inside is soft and tender, and toasts up beautifully.
Also, my kitchen smells like a bagel shop when I make them. That alone is worth it!
You can toast your bagels with a shmear of cream cheese (my way) or eat them warm and whole (my husband's way). Top them with smoked salmon (maybe make your own Salmon on the Smoker!), use them to make Air Fryer Pizza Bagels, or choose another way entirely. I won't judge.
However you enjoy your sourdough bagels, try making them yourself!
⭐⭐⭐⭐⭐
I'm always trying to figure out what to with my discard. Thank you for figuring out the calculations so that I could use my discard. I used up all my discard in this recipe and the recipe was easy to follow. Bagels are my favorite so this will definitely be my go to discard recipe.
- Patty
Recipe Ingredients
You'll need the following ingredients to make this homemade sourdough bagel recipe:

Ingredient Notes
The ingredients for bagel making include the usuals, like bread flour, yeast, sugar (brown sugar, in this case), and salt, in addition to the starter discard.
Bread flour: Using bread flour provides a higher protein level than all-purpose flour, giving the sourdough bagels more strength and chewiness.
Sourdough starter discard: Sourdough discard is unfed sourdough starter, the amount you remove from your crock before feeding the remainder starter (I use the discard so that my sourdough maintenance is zero-waste). Since it's not active starter, it's used for flavor rather than fermentation (you'll need yeast for that).
No sourdough starter? No problem! You can make the bagels by replacing the starter with more flour and water (see the Recipe Notes for the exact amounts). They won't have that subtle sourdough tang, but will still be delicious!
Yeast: I use instant yeast in all my baking, but you can also use Active Dry yeast. If you use Active Dry yeast, then you might want to sprinkle yeast on to the warmed water with a teaspoon of sugar and allow it to sit for a few minutes before proceeding with the recipe. Letting it foam "proves" the yeast is active and ready to go to work.
If you'd like to omit the yeast and just use fed, active sourdough starter, see the FAQs below.
Honey: Used in a water bath to boil the bagels. This helps to gelatinize the outside of the dough, giving the bagels their characteristic chewiness.
Egg: With a tablespoon of water, the egg wash is brushed on the dough before baking for a shiny finish.
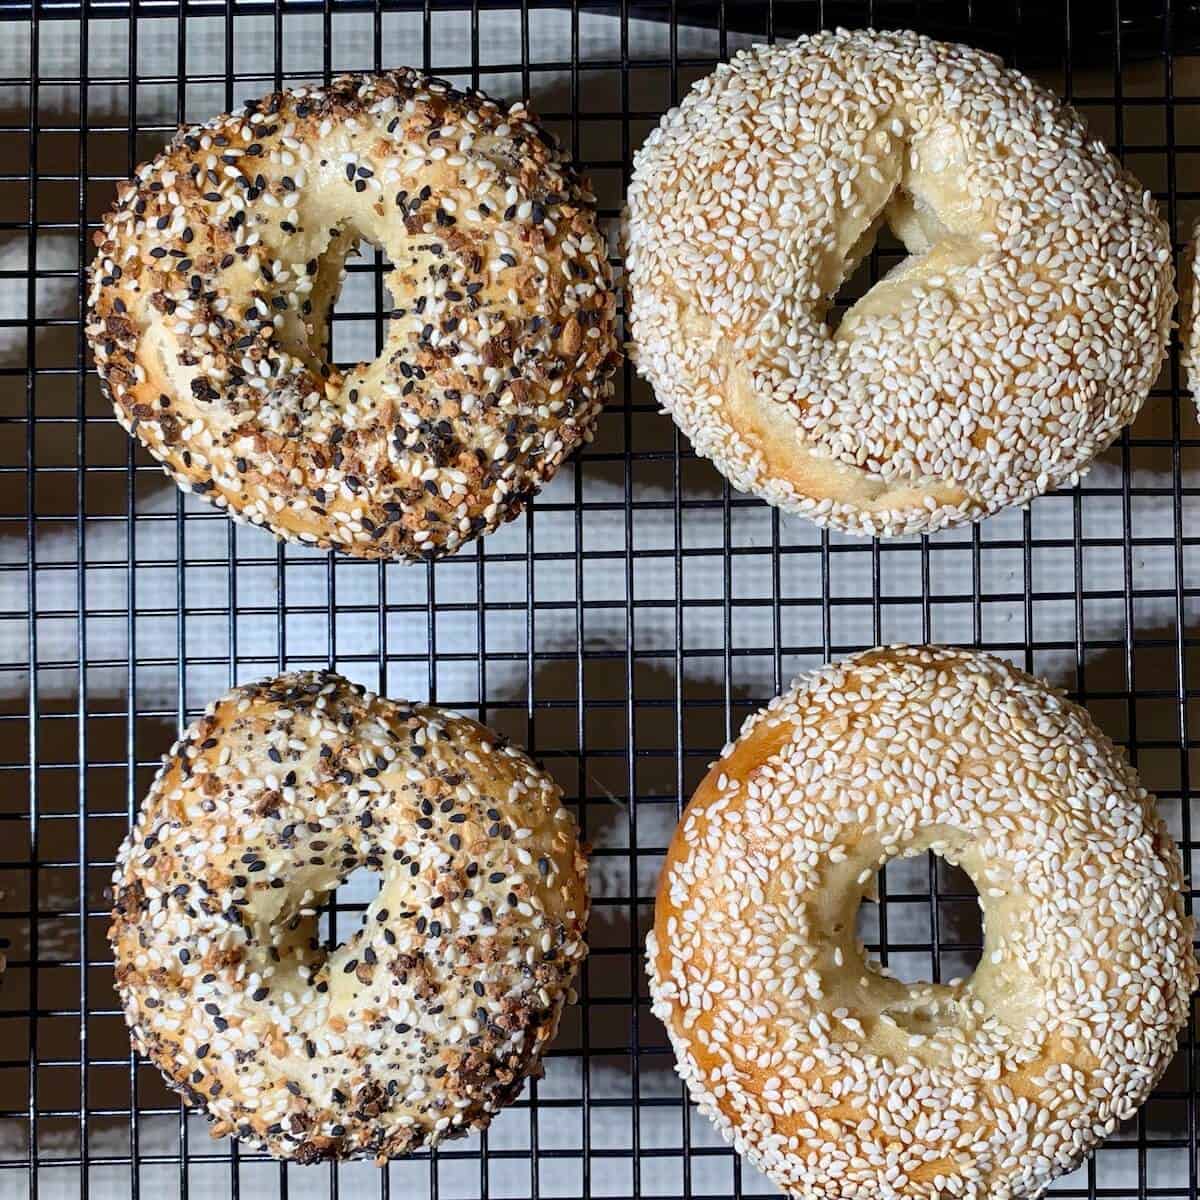
Toppings: Sourdough bagels can be enhanced with optional mix-ins or toppings, like sesame seeds or a seasoning blend.
See the recipe card for a full list of ingredients and measurements.
How to make a variety of bagel flavors
You can enhance plain sourdough bagels by adding mix-ins (like cinnamon and raisins) while creating the dough. You can also top the bagels by rolling or dunking them into a topping after brushing them with the egg wash before baking. Here are some ideas for different bagel flavors to get you started:
- Cheese Bagels (Asiago, Cheddar, etc): Fold in ½ cup of shredded cheese to the dough ingredients right after kneading (like I do when making Sourdough Jalapeño Chedder Bread). Sprinkle the shaped bagels with extra shredded cheese after the egg wash
- Cinnamon Raisin bagels: Add 3 tablespoons granulated sugar, 1 teaspoon ground cinnamon, and 1 teaspoon vanilla extract to the bagel ingredients when making the dough. Fold in ½ cup raisins to the dough after kneading
- Whole wheat bagels: Replace half of the bread flour with whole wheat flour when making the dough
- Everything Bagels: use ⅓ cup Everything bagel seasoning
- Sesame Seed Bagels: use ⅓ cup sesame seeds
- Poppy Seed Bagels: use ⅓ cup poppy seeds
- Salt Bagels: use ⅓ cup coarse salt. These are pretty salty, so feel free to go lighter on the salt
How to make sourdough bagels
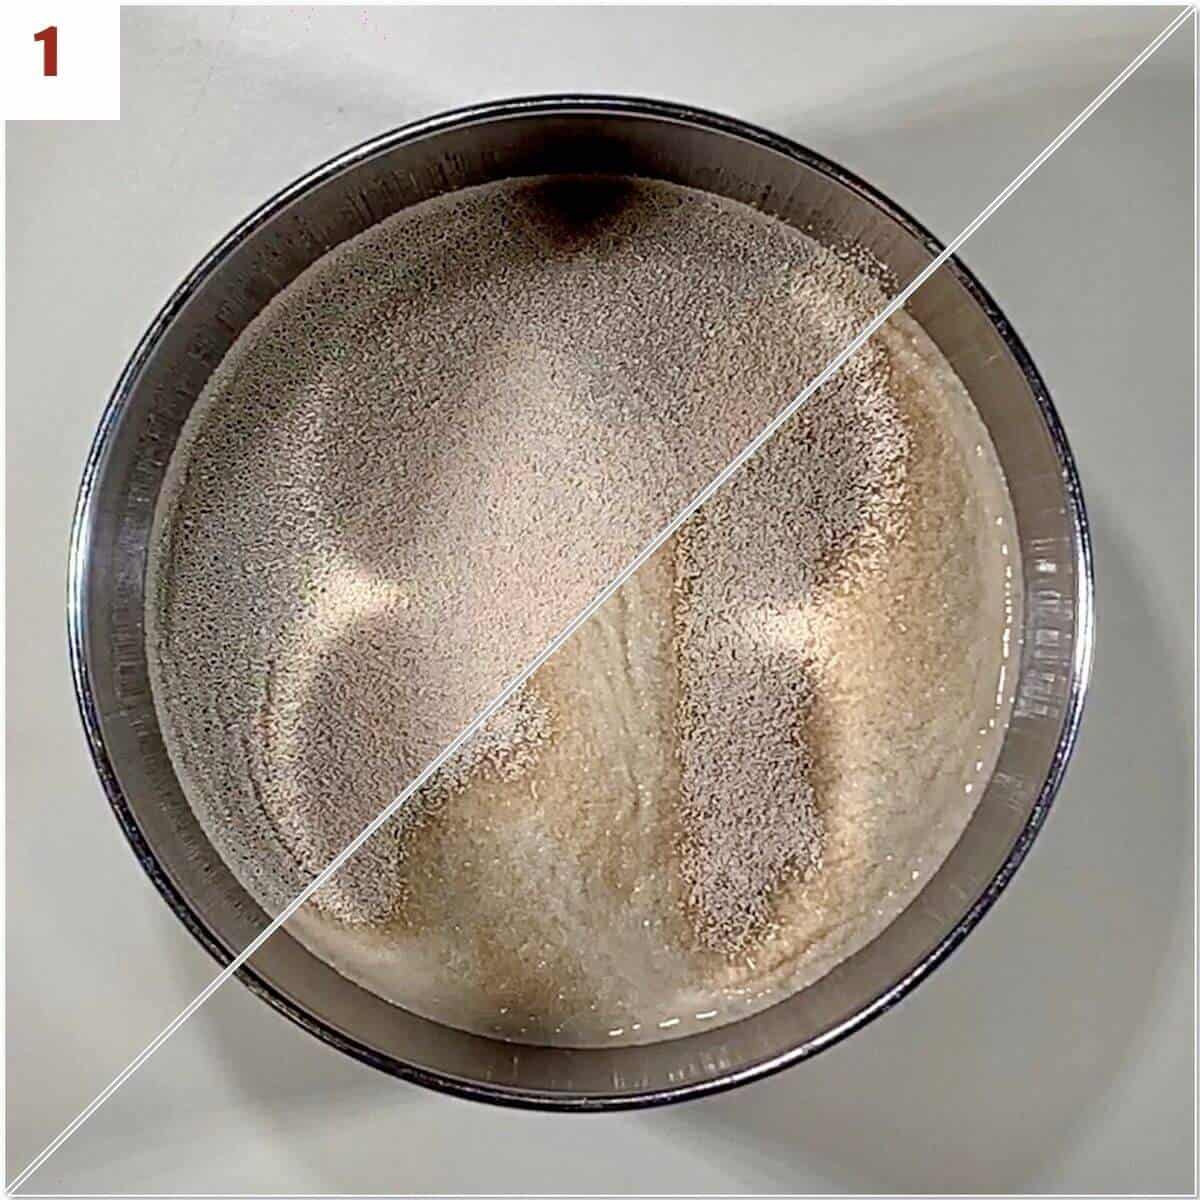
Step 1: Prove the yeast (optional)
This first step is optional if you want to prove (aka proof) the yeast (i.e. making sure it's alive and well). I don't normally do this step when I make bread dough because I use instant yeast which doesn't need it (as opposed to Active Dry yeast, which does). I usually just dump everything into the mixing bowl.
Whether you choose to prove your yeast is up to you, and I've included it here for demonstration purposes.
Heat ¾ cup (170 grams) of water until it's warm to the touch, about 100 to 110°F as read on a digital thermometer. Stir in 1 teaspoon of the sugar, then sprinkle the yeast over the water and set aside to proof for about 5 minutes or until bubbles form on the surface of the water (photo 1).
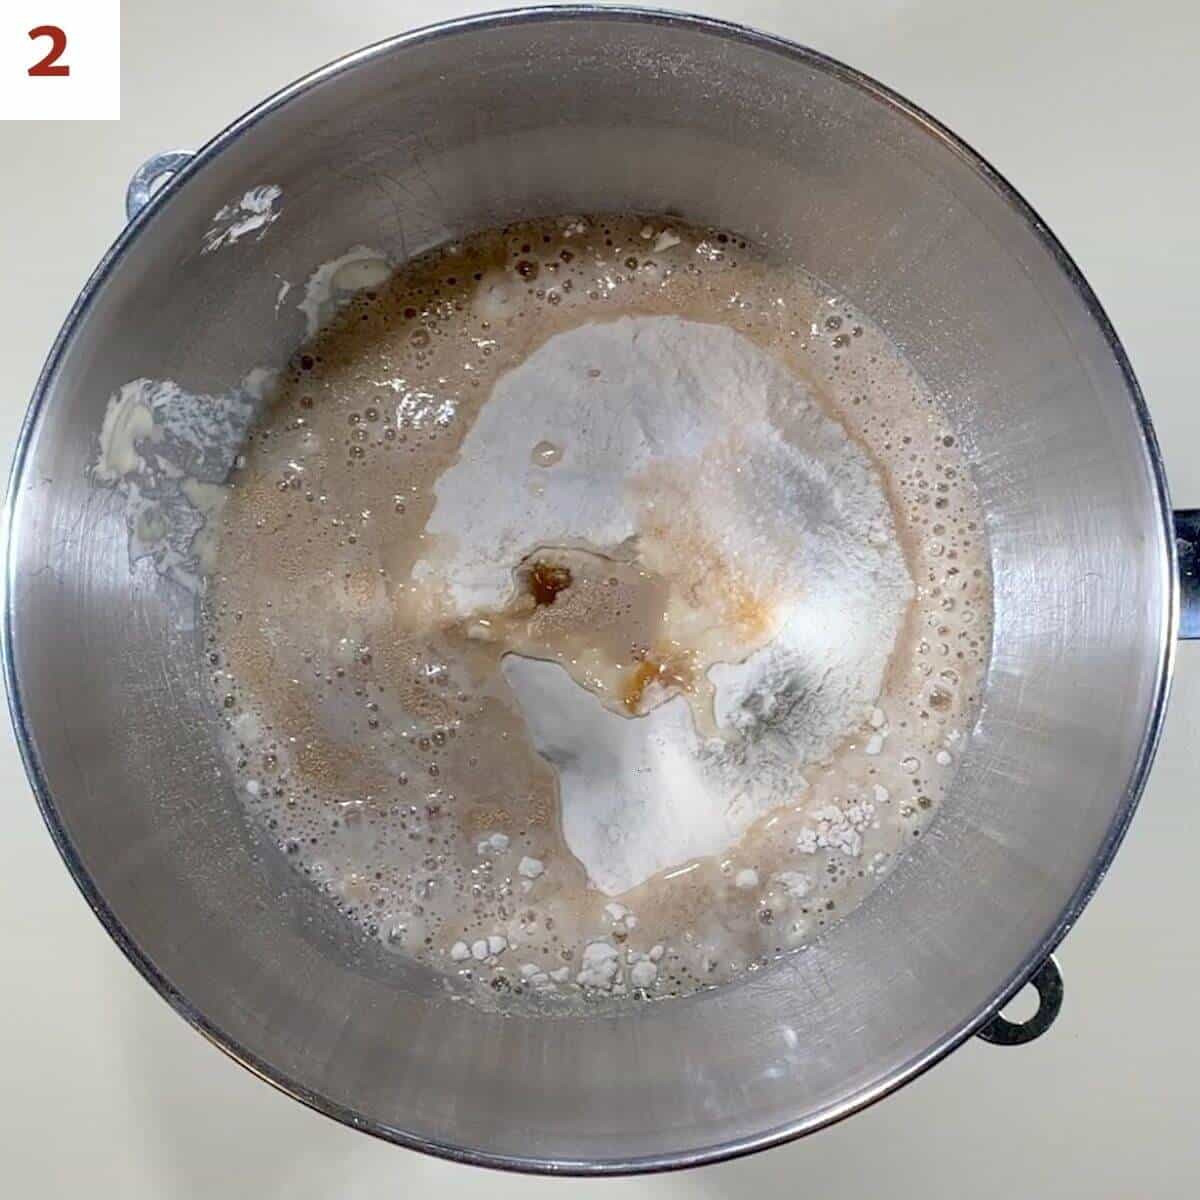
Step 2: Make the bagel dough
In the bowl of a stand mixer fitted with a dough hook attachment, combine the flour, sourdough starter discard, brown sugar, yeast (if you didn't prove the yeast earlier), and salt. Pour in the water (or the water/yeast mixture) into the bowl (photo 2).
Beat on low speed for 2 minutes, then knead for 4 to 5 minutes. Add in additional flour or water in one tablespoon increments to get the dough to the right texture. The amount of flour or water in your dough will depend on the humidity of your kitchen and the hydration of your starter. As you mix your dough, you might need to add more flour or water in one tablespoon increments to get the dough to the right consistency.
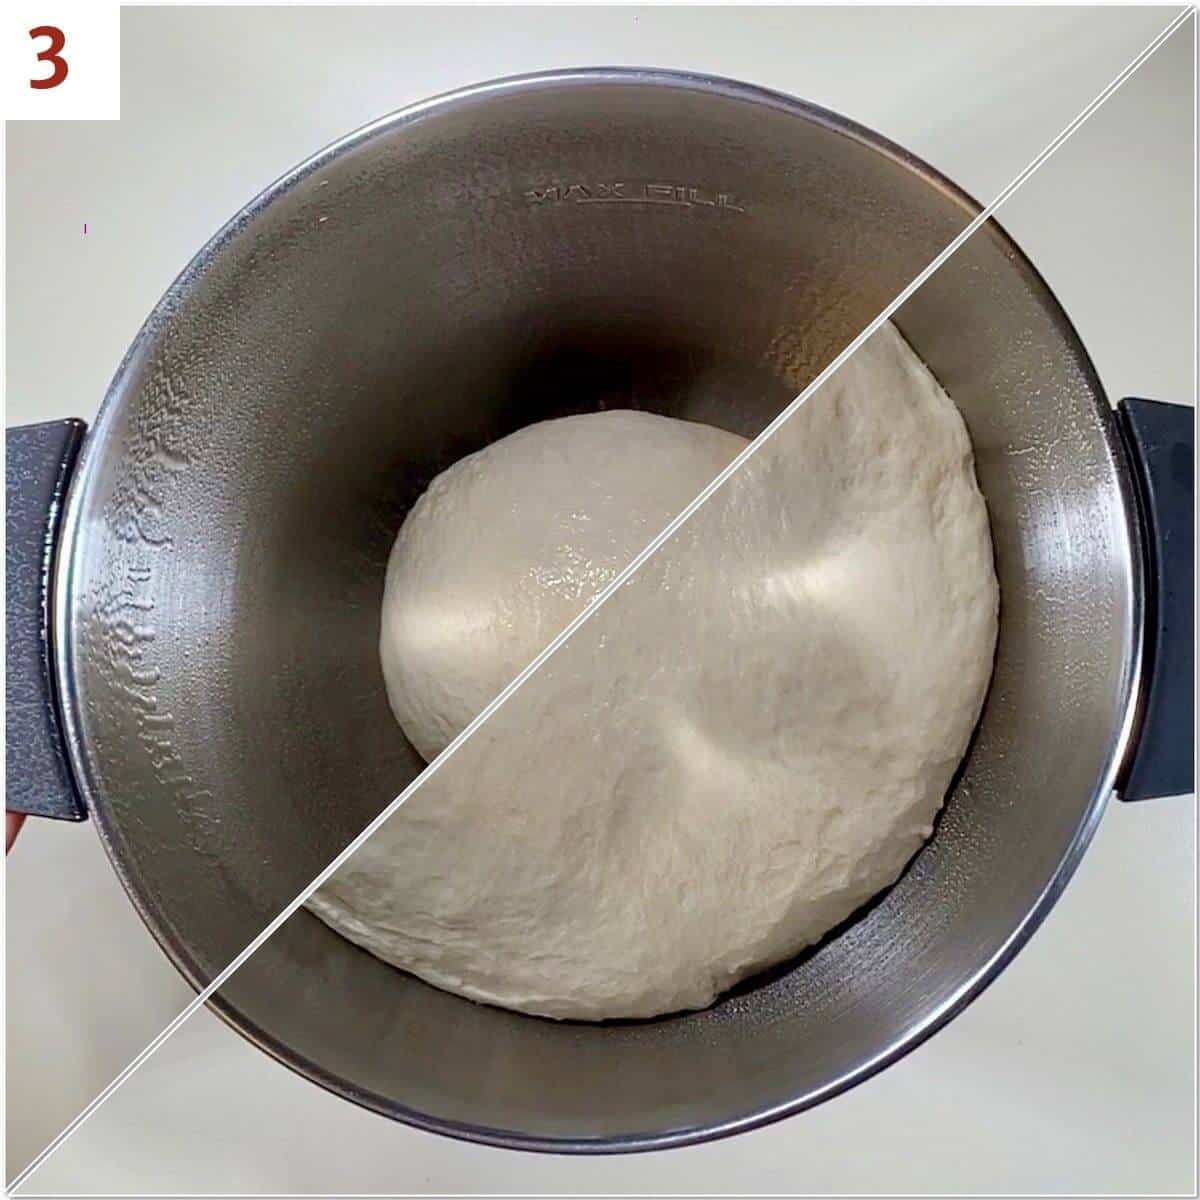
Once you've got the dough to a smooth and slightly sticky texture that springs back up when lightly pressed, it's time to let it rise.
Lightly grease a large bowl with oil. Place the dough in the bowl, turning it to coat all sides. Cover the bowl with a clean kitchen towel or plastic wrap, and allow the dough to rise at room temperature for 60 to 90 minutes or until double in size (photo 3). The inside of the oven with just the light on works well.
Step 3: Shape the bagel dough
After making the bagel dough and letting it rise, divide the dough into 8 equal pieces and shape each piece into a ball.
There are two ways to shape the balls of dough:
- Roll method: Roll the bagels into a rope about 8-inches long, then press the ends together to form a ring.
- Poke method: Flatten the ball into a thick disk, then press your index finger through the center of each ball to make a hole about 1½ to 2 inches in diameter (photo 4).
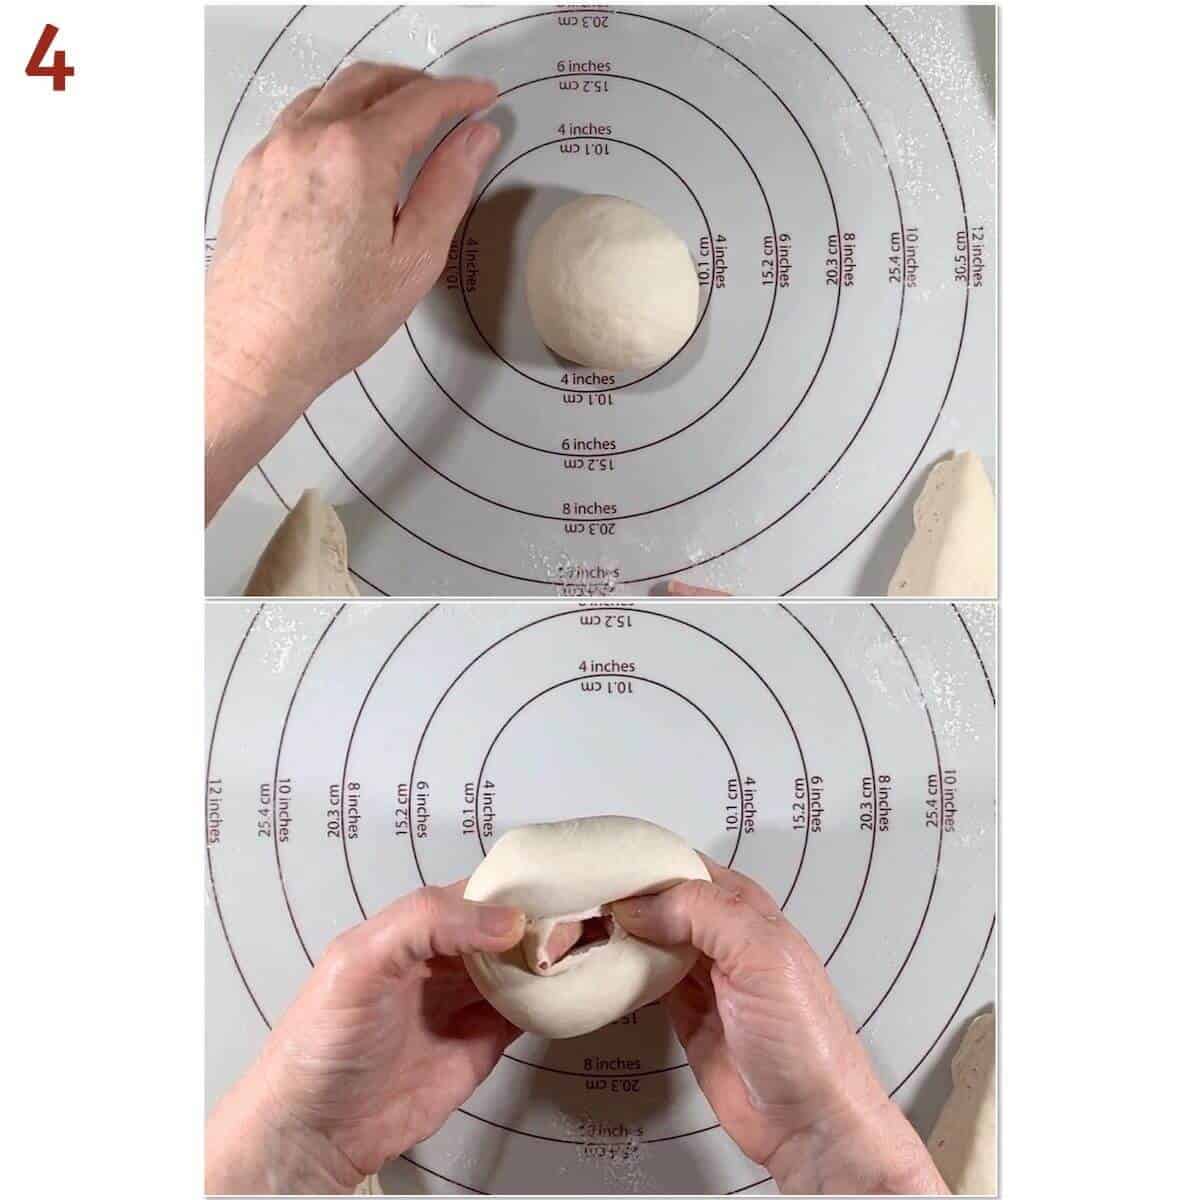
Widen the hole to about 1- to 2-inches in diameter (photo 5). It's a similar process to making Jerusalem Bagels, just with not such a big hole.
Regardless of which method you choose, loosely cover the shaped bagels with a kitchen towel and rest for a few minutes as you prepare the water bath.

Step 4: Boil the bagels
Fill a 4- to 8-quart stock pot with 2 quarts of water and whisk in the honey. Bring the water to a boil, then reduce the heat to medium-high.
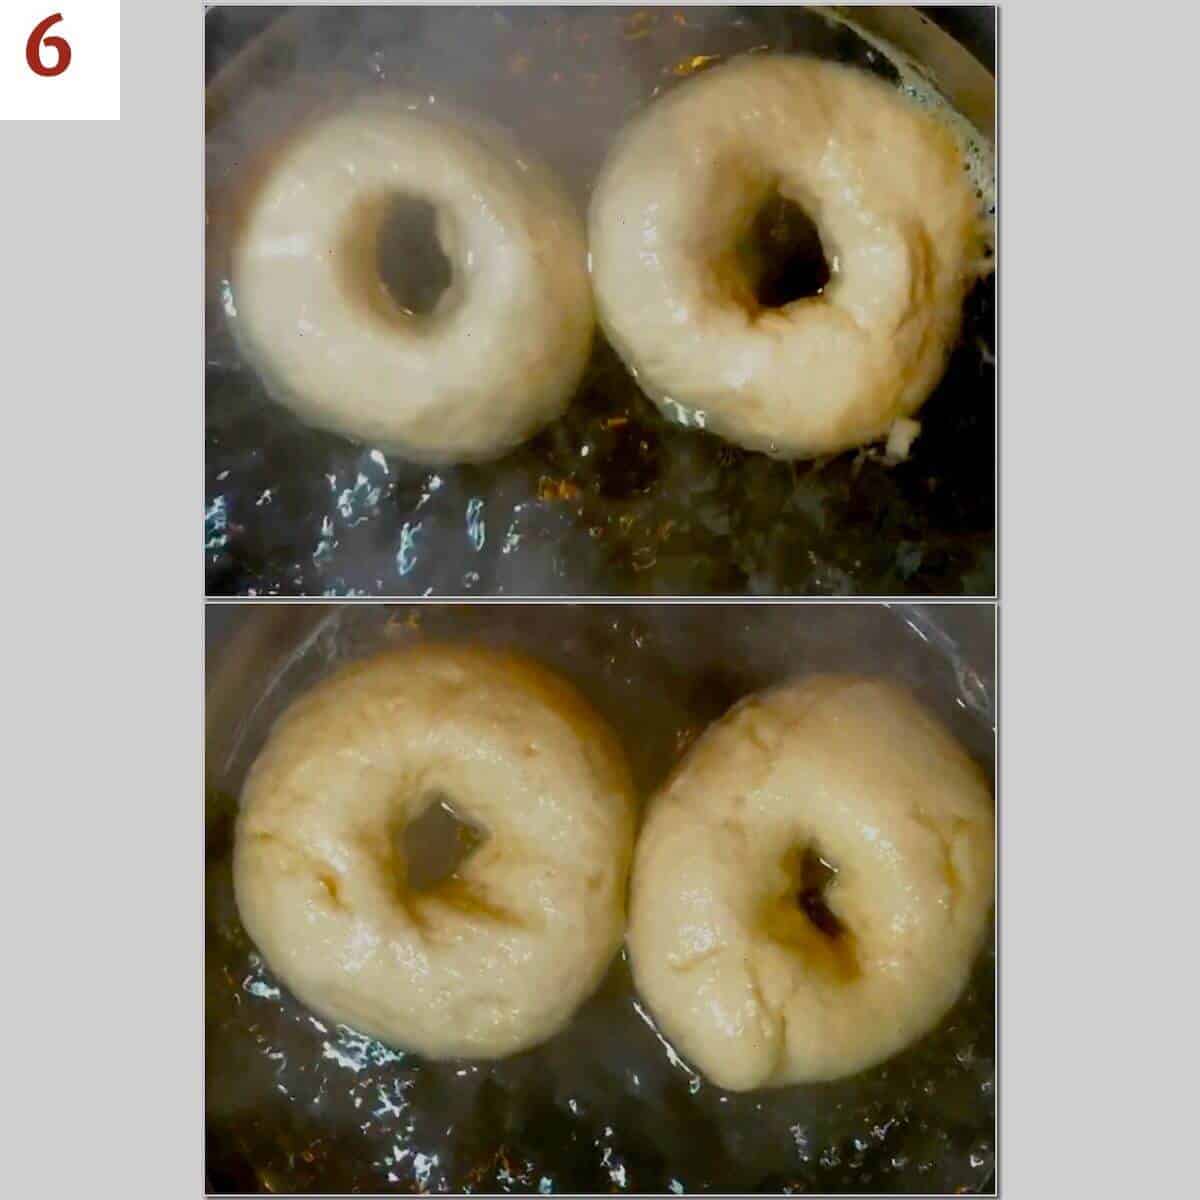
Drop the bagels in, 2 to 4 at a time, making sure they have enough room to float around. Cook the bagels for 1 minute on each side, or 2 minutes per side if you want a chewier bagel (photo 6). This step pre-cooks the dough, giving the bagel its characteristic chewiness.
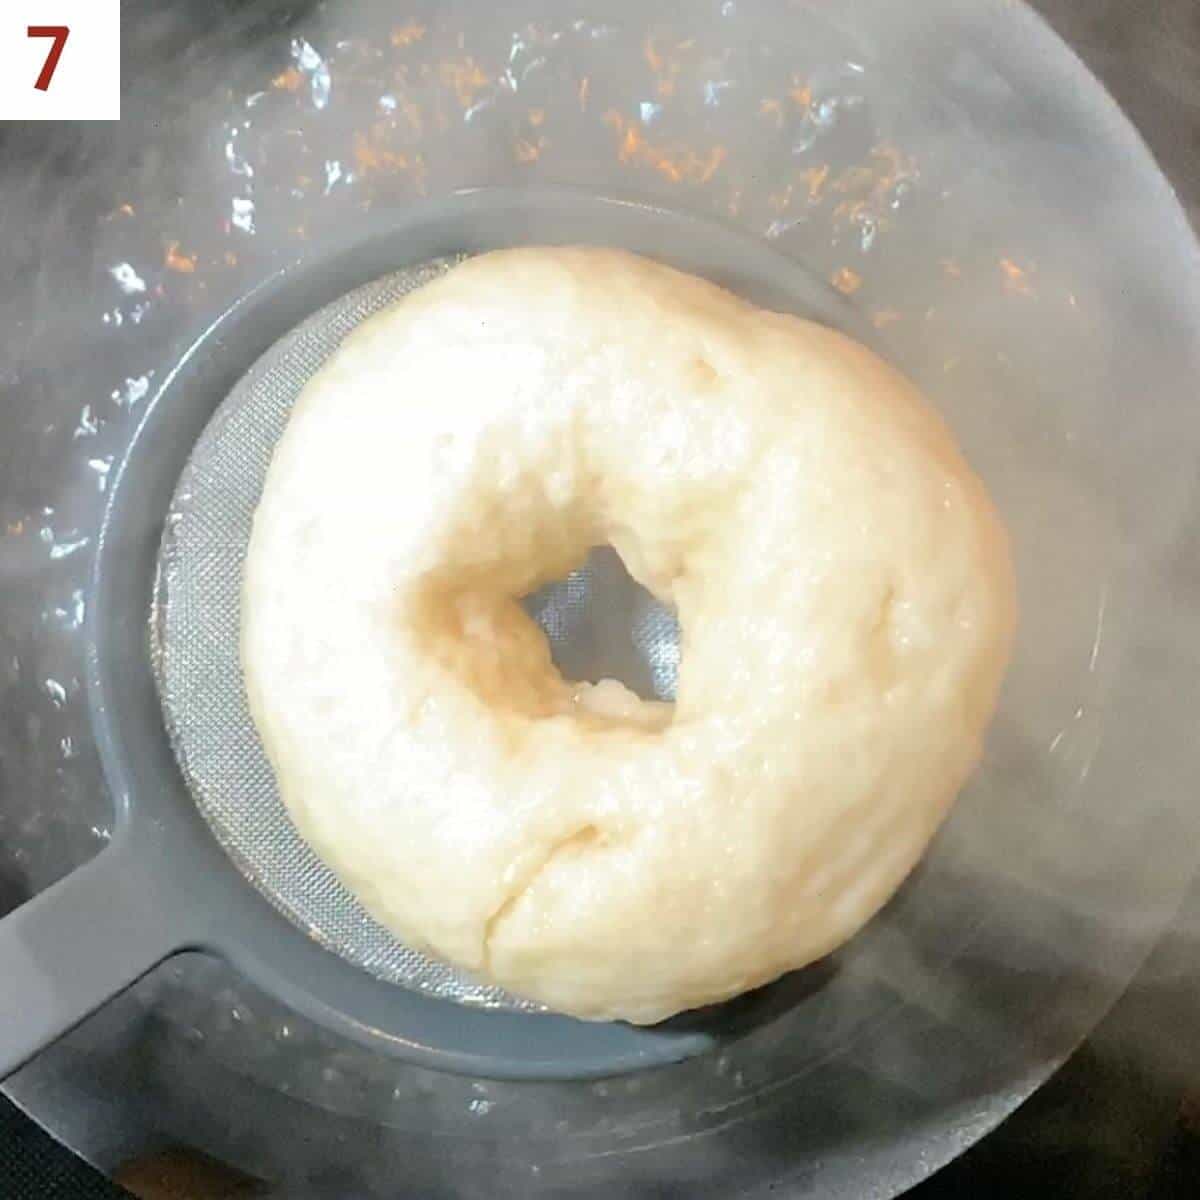
Remove the bagels and quickly dry them on a paper towel before transferring to a half sheet baking pan lined with a Silpat silicone mat or parchment paper (photo 7). When the bagels are cool enough to handle, gently reshape them if needed.
Step 5: Bake the bagels
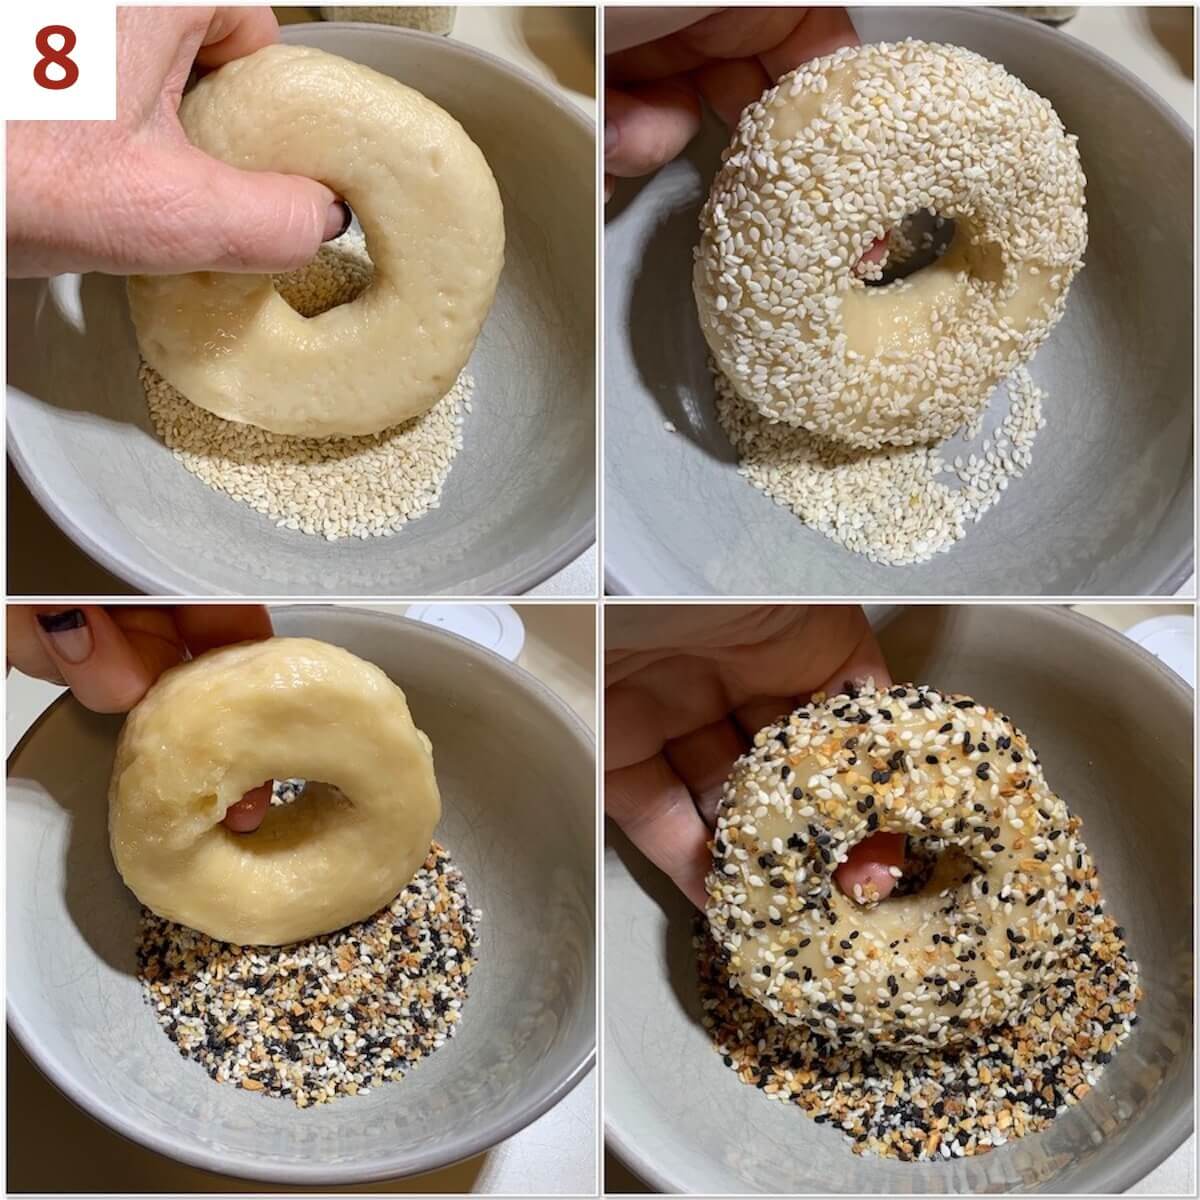
Using a pastry brush, brush the egg wash on top and around the sides of each bagel. Dip the bagel in any toppings, if desired (photo 8). Place 4 bagels onto each lined baking pan.
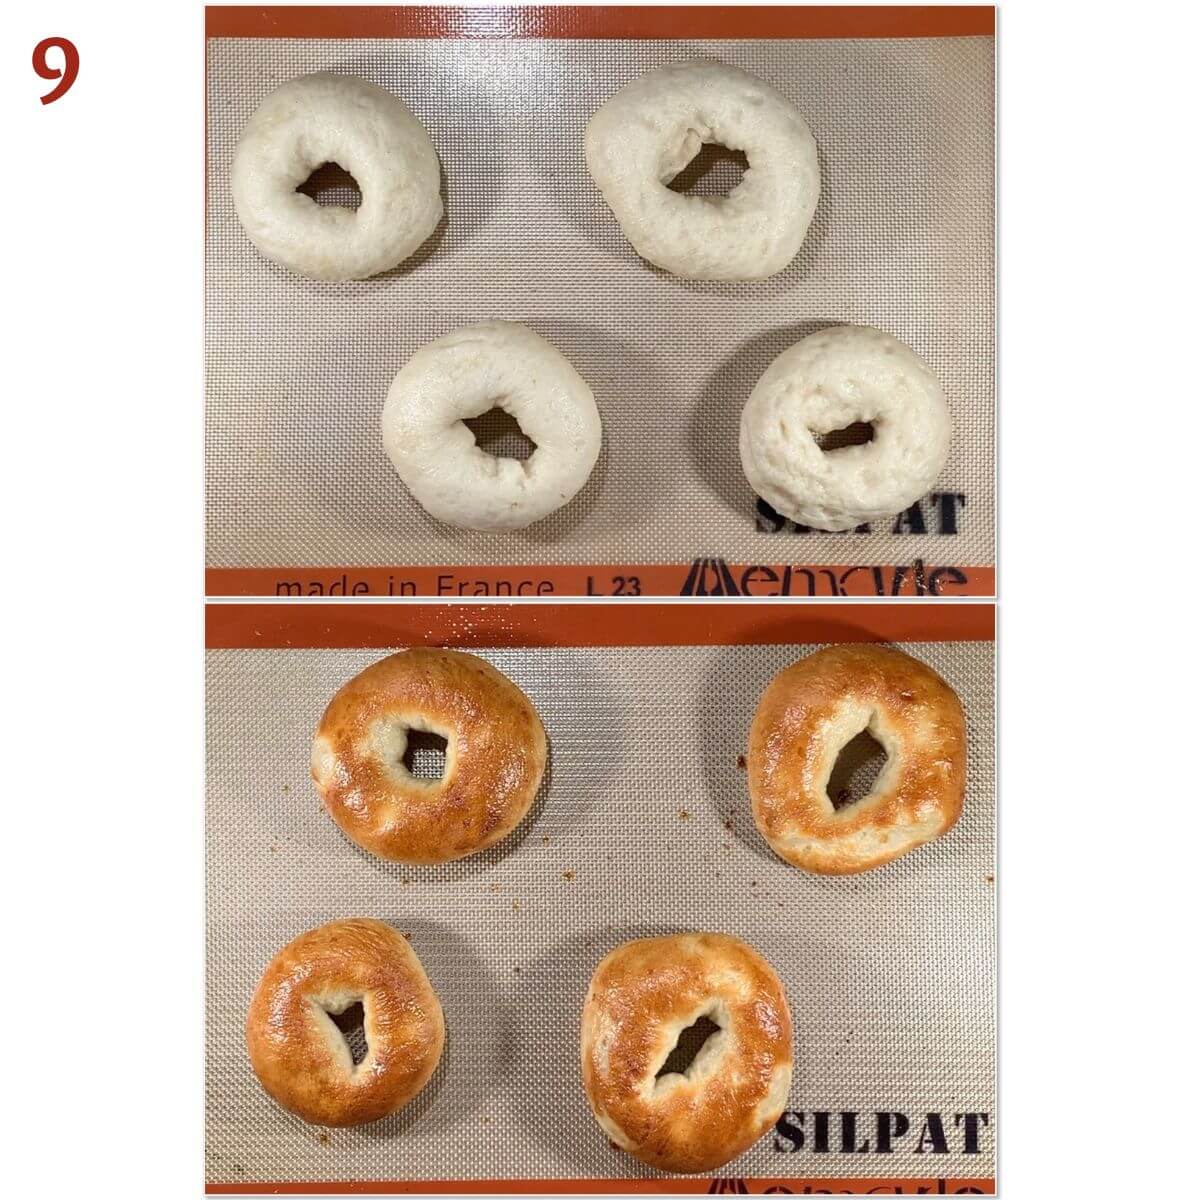
Bake at 425°F for 20 to 25 minutes, rotating the pan halfway through. You want the bagels to be a dark golden brown (photo 9). Remove from the oven and allow bagels to cool on the baking sheets for 20 minutes, then transfer to a wire rack to cool completely.
Storage and make-ahead instructions
Storage instructions: Store bagels in an airtight container at room temperature for a few days. Refrigerating them isn't recommended because they can dry out.
You can also store the bagels in the freezer for up to 3 months. Thaw overnight in the refrigerator or at room temperature, then warm to your liking.
Make-ahead instructions: You can make the bagel dough the night before you want to bake for an overnight bagel recipe. Prepare the bagel dough as directed. Place the dough in an oiled bowl, leave on the counter for about 30 minutes, then transfer to the refrigerator to rise overnight. This slow rise allows the bagels to develop more flavor.
In the morning, allow the dough to come to room temperature for an hour on the counter before continuing with shaping.
I don't recommend allowing shaped bagels to rise overnight as they may puff up too much in the refrigerator.
Questions asked and answered
Here are some questions you might have...
If you want to store the dough for future baking, wrap the dough tightly in plastic wrap, then in a layer of aluminum foil, after the first rise. Store the dough in an airtight bag in the freezer for up to 3 months. When you're ready to proceed with baking, thaw the dough overnight in the refrigerator, then punch it down again to release any air bubbles. Continue with shaping the bagels.
It's boiling in the water bath that gives bagels (and pretzels) their characteristic texture. That's because boiling starts to cook the outside of the dough, tightening its gluten structure, before baking. When baked, the pre-cooked dough on the outside tightens further while it protects the inside, resulting in a chewy outside and tender inside.
According to the website True Sourdough, 2½ teaspoons of yeast is about the equivalent of 100 grams of active starter.
So in order to keep the proper bread recipe ratio of 5:3 flour to water, replace the yeast with ½ cup (114 grams) of active, fed starter, reduce the amount of flour by about ½ cup (57 grams), and reduce the milk by about ¼ cup (57 grams). The rising time will be longer (about double) for both the first and second rises.
Note: there are some rounding inconsistencies here due to the volume vs. weight measurement conversion.
Didn't find the answer you're looking for?
Ask AI to answer for this specific recipe:
Disclaimer: I am not responsible for the quality of AI information

I hope you like this recipe! Let me know if you have any questions, and don't forget to leave a comment and rating. Thanks!
Slainté! L'chaim! Cheers!
- Tammy
More recipes featuring sourdough discard to try


Good news for sourdough bakers!
Discover a new method to feed your starter with less flour, making your baking both sustainable and scrumptious.
Plus, get my bonus recipe for naturally-leavened sourdough bread using unfed starter for fresh bread any time.
Recipe

Sourdough Discard Bagels
Equipment
- 4- to 8-quart stock pot
Ingredients
For the dough
- 3 cups bread flour, or more as needed
- 1 cup sourdough starter discard, at room temperature, see Recipe Notes
- 1 tablespoon brown sugar, packed, either light or dark
- 2¼ teaspoons instant yeast, or rapid rise, see Recipe Notes
- 2 teaspoons kosher salt
- ¾ to 1 cup water, warmed between 100°F to 110°F, see Recipe Notes
For the water bath
- 2 quarts water
- ¼ cup honey
For the toppings
- 1 large egg white, beaten, for egg wash
- 1 tablespoon water, for egg wash
- toppings, optional, see Recipe Notes
Instructions
- Prepare the dough: For best results, measure out your ingredients with a kitchen scale.In the bowl of a stand mixer fitted with a dough hook attachment, combine 3 cups bread flour, 1 cup sourdough starter discard, 1 tablespoon brown sugar, 2¼ teaspoons instant yeast, and 2 teaspoons kosher salt.
- Pour in ¾ to 1 cup water (starting with the lesser amount). Beat on low speed for 2 minutes, then knead for 4 to 5 minutes until a soft, slightly sticky dough forms. Add in additional flour or water in 1 tablespoon increments to get the dough to the right texture.
- Lightly grease a large bowl with oil. Place the dough in the bowl, turning it to coat all sides. Cover the bowl with a clean kitchen towel or plastic wrap, and allow the dough to rise at room temperature for 60 to 90 minutes or until double in size. The inside of the oven with just the light on works well.
- Shape the bagels: Line two half sheet baking pans with a Silpat Silicone mat or parchment paper. Punch down the dough to release any air bubbles.
- Optional: If you want to store the dough for future baking, wrap the dough tightly in plastic wrap, then in a layer of aluminum foil. Store the dough in an airtight bag in the freezer for up to 3 months. When you're ready to proceed with baking, thaw the dough overnight in the refrigerator, then punch it down again to release any air bubbles. Continue on to the next step.
- Divide the dough into 8 equal pieces, then shape each piece into a ball. There are two ways to shape the balls of dough:
- Roll method: Roll the bagels into a rope about 8-inches long, then press the ends together to form a ring.
- Poke method: Press your index finger through the center of each ball to make a hole about 1½ to 2 inches in diameter.
- Regardless of which method you choose, loosely cover the shaped bagels with a kitchen towel and rest for a few minutes as you prepare the water bath.
- Preheat the oven to 425 °F. In a small bowl, mix 1 large egg white with 1 tablespoon water to make the egg wash.
- Prepare the water bath: Fill a 4- to 8-quart stock pot with 2 quarts water and whisk in ¼ cup honey. Bring the water to a boil, then reduce the heat to medium-high. Drop the bagels in, 2 to 4 at a time, making sure they have enough room to float around. Cook the bagels for 1 minute on each side (2 minutes per side if you want a chewier bagel). Remove from pot and drain slightly. This step pre-cooks the dough, giving the bagel its characteristic chewiness.
- When the bagels are cool enough to handle, gently reshape them if needed. Using a pastry brush, brush the egg wash on top and around the sides of each bagel. Dip the bagel in any toppings, if desired. Place 4 bagels onto each lined baking pan.
- Bake the bagels: Bake for 20 to 25 minutes, rotating the pan halfway through. You want the bagels to be a dark golden brown. Remove from the oven and allow bagels to cool on the baking sheets for 20 minutes, then transfer to a wire rack to cool completely.
- Storage instructions: Store bagels in an airtight container at room temperature for a few days. Refrigerating them isn't recommended because they can dry out. You can also store the bagels in the freezer for up to 3 months. Thaw overnight in the refrigerator or at room temperature, then warm to your liking.
- Make-ahead instructions: You can make the bagel dough the night before you want to bake. Prepare the bagel dough as directed. Place the dough in an oiled bowl, leave on the counter for about 30 minutes, then transfer to the refrigerator to rise overnight. This slow rise allows the bagels to develop more flavor. In the morning, allow the dough to come to room temperature for an hour on the counter before continuing with shaping. I don't recommend allowing shaped bagels to rise overnight as they may puff up too much in the refrigerator.
Notes
- Cheese Bagels (Asiago, Cheddar, etc): Fold in ½ cup of shredded cheese to the dough ingredients right after kneading (like I do when making Sourdough Jalapeño Chedder Bread). Sprinkle the shaped bagels with extra shredded cheese after the egg wash
- Cinnamon Raisin bagels: Add 3 tablespoons granulated sugar, 1 teaspoon ground cinnamon, and 1 teaspoon vanilla extract to the bagel ingredients when making the dough. Fold in ½ cup raisins to the dough after kneading
- Whole wheat bagels: Replace half of the bread flour with whole wheat flour when making the dough
- Everything Bagels: use ⅓ cup Everything bagel seasoning
- Sesame Seed Bagels: use ⅓ cup sesame seeds
- Poppy Seed Bagels: use ⅓ cup poppy seeds
- Salt Bagels: use ⅓ cup coarse salt. These are pretty salty, so feel free to go lighter on the salt


Whitney says
I've made this recipe once already and the bagels were amazing! Making them a second time this evening and wondering what the difference will be if I use fed starter (along with the yeast still, just in case) vs discard. I just revived my starter after months in the fridge and have no discard at the moment. I'm afraid to use just the starter in case it's still weak from it's hibernation but it is rising well.
Thanks!
Tammy Spencer says
Hi Whitney, If your fed starter is rising well but weak, you can use less yeast (maybe 1½ teaspoons?) and monitor the first rise so you don’t overproof the dough. If you want to forgo the yeast altogether, check out the FAQs for tips on how to do that. I’d love to hear how it goes. Happy baking! 😉
p.s. if you’re just getting back into maintaining your starter, check out my e-book on how to do it with less waste!
H Sullivan says
Can you follow the recipe through boiling and then put them in the fridge overnight to bake in the morning?
Tammy Spencer says
That's a good question! You can definitely shape the bagels, then refrigerate them overnight before boiling them - the overnight rise will help develop more flavor. However, boiling them starts the baking process by cooking the outside of the bagel (that's how you get that chewy crust), but the inside is still raw. You might par-bake them (maybe 10 to 15 minutes) just to set the inside after boiling them, then finish baking them later. I haven't tried this myself, so if you do so (either boil & rest or boil, par-bake, & rest), please let me know how it goes. Happy baking!
Charles K. says
Hello,
I have sourdough starter that I use for our sourdough bread stored in the refrigerator which I feed each time I bake.
This recipe calls for the dough to be refrigerated overnight using the sourdough starter, is that necessary being the sourdough starter is already established?
Secondly what temp should the starter be prior to adding into the flour mixture?
Thank you for your assistance, this recipe is exactly what I was looking for.
Tammy Spencer says
Hi Charles, thanks for your questions. The reason I suggest refrigerating the dough overnight is just to retard the rise so the dough can develop more flavor. It's optional, and isn't in relation to the starter being established. The temperature the starter should be when you're mixing the dough is about 70 to 80˚F (approximately room temperature). You can use the starter discard straight from the refrigerator - the dough will just take longer to rise until doubled. I hope you enjoy your bagels, and happy baking! 😉
Charles K. says
Tammy thank you for your quick response and guidance.👍🏼
Your bagel recipe will be used for our next baking adventure with our Grandson being our last project we made soft pretzels.
Tammy Spencer says
You're welcome. Baking with children is such a fun way to spend time together, being tactile and educational at the same time. Enjoy!
Meghan L Donaghy says
If I don’t have a stand mixer can I knead by hand?
Tammy Spencer says
Hi Meghan, Thanks for your question. You can most assuredly knead the dough by hand. You’ll want a smooth, slightly tacky dough. Depending on your strength (and stamina), it’ll probably take about 5 to 10 minutes. Let me know how it goes, and happy baking! 😉
Meghan L Donaghy says
It worked!!
Tammy Spencer says
Excellent! Enjoy 🙂
Anna says
We made these last week and they were a massive hit! Delicious and not too difficult. If I wanted to make the bagels slightly bigger (perhaps making 6, instead of 8, from the 1x recipe), would I change the baking time at all? Thanks!
Tammy Spencer says
Hi Anna, I'm so glad you liked these bagels! In response to your question, I'd probably add about 3 to 5 minutes to the baking time, depending on how much bigger you make the bagels. And if they're not done then, add a couple of minutes at a time until they are. I haven't done this myself, so please share your results if you do. Happy baking! 🙂
Anna says
Thank you!
Kris Bingham says
I’m intrigued—and always have sourdough discard these days. Have you made these with blueberries? Blueberry bagels are a favorite of mine. Any suggestions before I dive in? Thanks!!
Tammy Spencer says
Hi Kris, Thanks for your question. I haven't tried making blueberry bagels, but I suspect the appraoch would be similar to the cinnamon raisins in the comment above. Try combining 1 teaspoons of cinnamon with 1 tablespoon of granulated sugar, then kneading the cinnamon sugar and 3/4 cup of blueberries into the dough after it has together (before the first rise). The extra liquid from the blueberries may make the dough wetter, and you might have to add in additional flour (in 1 tablespoon increments) to get the consistency right. If you try it, please let me know how it goes. 😉
Kris says
Thanks! I will let you know!
Laura says
Thank you so much for this recipe!!! I made them yesterday with the discard after feeding the sourdough! They came out perfect!!! My kids loved them so much, they said they don't want me to buy bagels from the grocery store anymore!! Lol!! I will definitely be using this recipe again!!! Any idea how to make cinnamon raisin bagels with this recipe??!
Tammy Spencer says
Hi Laura, Thanks for your kind words...I'm glad your family likes these bagels! I've never made a cinnamon raisin version, but you might try mixing together 2 teaspoons of cinnamon with 1 tablespoon of granulated sugar, then kneading the cinnamon sugar and 3/4 cup of raisins into the dough after it has together (before the first rise). Let me know how it goes, and happy baking! 😉
Patty says
I'm always trying to figure out what to with my discard. Thank you for figuring out the calculations so that I could use my discard. I used up all my discard in this recipe and the recipe was easy to follow. Bagels are my favorite so this will definitely be my go to discard recipe.
Tammy Spencer says
Hi Patty, I’m so glad you liked the recipe! Sourdough discard adds a nice tang to bagels, and it’s great not having to waste it. Thanks for letting me know! 😉
Ally says
If I want to do the overnight method, do I still have to proof the dough for 60-90 minutes at room temperature before putting it in the fridge? Or do I put the dough in the fridge right after I put it in the oil-coated bowl?
Tammy says
Hi Ally, thanks for your question. Yes, I'd still do the first rise as it really gives the yeast a chance get active before slowing down in the refrigerator. The flavor will really develop during that slow overnight rise. Happy baking! 😉
Joanne says
I have had great success with this recipe. The third time I used the suggestions at Epicurious for the water bath which was part honey, part baking soda, part salt. They are delicious!
Tammy says
I'm so glad you liked the recipe, and you adapted it to fit your preferences. Thanks for sharing! 😉
Theresa Healy says
I followed your grams recipe, as I have a scale, backing into % used for each ingredient. I didn’t have much sourdough discard. Everything from your process, recipe and bake time rocks! We absolutely love’m. No more Noah’s.
Thank you Tammy! #scotchandscones
Kindest Regards, Theresa
Tammy says
Hi Theresa, I’m so glad you were able to adjust the recipe to suit your needs! Thanks for your kind remarks. Happy baking! 😉
Beth Bartel says
I've made these once already and they are great, and so fun to make! Except for burning my arm during boiling water bath, but that's another story...
Question, how the heck do you only end up with one cup of starter discard per week??? I do keep mine in the fridge and take out once a week, but still have lots. I'm a new sourdough baker. Teach me your ways!
Tammy says
Hi Beth, I hope your arm is ok! Regarding the sourdough starter, I have about 2 cups of starter in my crock at any given time. Each week (usually Monday...I set a reminder), I measure out 8 oz (1 cup) of the dormant (unfed) starter, then add in 4 oz of flour (about a cup) and 4 oz of water (1/2 cup) back into the crock. I stir it in then let the crock sit on the counter until the starter is nice and bubbly (i.e. fed). I can then remove some to make a true sourdough bread (and feed the remainder again) or just put the crock back into the refrigerator until the following week.
Meanwhile, I still have that 1 cup of starter discard sitting out. I can use it to immediately make any of the discard recipes I have on the blog (and I have a bunch now!), or put it in the refrigerator with the crock until I'm ready to use it.
I hope this helps. Please let me know if you have any other questions or need something clarified. I'm here to help! 😉
Kristyna Landt says
I love this recipe and have made it twice. Both times, I used half whole wheat with a little spelt and half bread flour. I used 6 g salt and added 1.5 tsp of non diastatic malt powder to the dough, and also used 2 tbsp of the non diastatic malt in the water bath. The last time I made it, i substituted 50 g of active sourdough starter instead of the yeast and subtracted 25 g each of water and flour from the recipe. Both times, the results were perfect!!! This recipe is now a household staple:
Tammy says
Kristyna, that’s wonderful! I love how you’ve adapted this recipe to your preferences. Well done! 😉
Laurie says
Easy to follow! Great instructions!
This, as all of my sourdough baking, comes out a little gummy. What am I doing wrong?
Tammy says
Hi Laurie, if your finished product is coming out gummy, it could mean that you either have too much water in the dough, or you're not getting enough rise from your yeast. If it's the former, then you'll know if your dough is sticky after the first rise...it should be tacky but still bounce back when pressed.
If it's the yeast, then I'd make sure it's is fresh and active. The best way is to "prove" your yeast by sprinkling it over a bit of the warmed water with a tsp of sugar and let it sit for about 5 minutes. If it gets foamy, then the yeast is active. Oh, and make sure your water is not over 110degF (like warm, not hot, bath water). If the water is too hot, it kills the yeast before it has a chance to work.
If you're finished product is still gummy, then write back and we can troubleshoot what's happening. Good luck and happy baking!
Lindsay F says
The dough is coming out quite sticky for me. I am new to baking and the taste is great just having trouble working with the dough. Any advice so that it is less sticky or is that how it should be? Thanks for a great and tasty way to use sourdough discard!
Tammy says
Hi Lindsay, thanks for your question. If the dough is sticky, try adding flour in 1 Tbsp increments until it is tacky but doesn't make a mess on your hands. You can do this by kneading it by hand or in the mixer. The other thing is to let the dough rest for about 20 minutes after you first knead it to let the flour absorb more of the liquid. Remember, baking bread is as much about the environment in your kitchen that day (humidity) and the type of flour you're using as it is about stated amounts. I hope this helps!
Cara says
Such an amazing recipe! I did the overnight method and it turned out amazing. Delicious bagels that taste like they are from a bakery. Super happy with this recipe and I will be making these again.
Tammy says
Hi Cara, I'm so glad you liked this recipe!Thanks for the feedback 🙂
Laceydawn Loeppky says
HI there, I am just wondering if I do the long rise in the fridge overnight, do I need to let it come back to room temp before using the dough the next day?
Tammy says
Hi Laceydawn, thanks for the question. Yes, it's generally better to let your dough sit out on the counter for about an hour if you can. It will be easier to work with if it's not cold. That being said, if you do work with it straight from the fridge, the second rising time will take longer than normal. Either way, there will be extra time involved.
Jean says
Hi Tammy, I’ve tried this recipe a few times and love it, though I feel I should be getting a better rise in the oven. I was reading through comments to see if i could get any pointers and found this comment mentioned a second rise. Is the second rise after the shaping? And how long for? I promise I have read the recipe over multiple times but I just can’t see it, so sorry if it seems obvious. Thank you!
Tammy Spencer says
Hi Jean, there isn't a second rise called for in the recipe, and I find it isn't needed (maybe because the bagels are resting while I heat the water bath). You might allow the dough to rest a bit longer in a warm place after you've shaped the bagels and before the water bath. Let me know if that helps, and happy baking! 😉
Jane says
This recipe is fantastic!!! The bagels came out chewy with just the right amount of bite in the crust and tender on the inside. It was a tad salty for my taste and will decrease the salt on my next go, but otherwise absolutely perfect with excellent instructions. Thank you for a wonderful recipe!
Tammy says
Hi Jane, I'm so glad you liked the bagels! Thanks for your kind words 😉
Carey Ellen Smith says
I'm out of yeast, do you think it will work if I let the dough rise overnight at room temp instead of the fridge?
Tammy says
Hi Carey, thanks for your question. It depends on how active your starter is. If it's fed & vigorous, then you can still retard the dough in the refrigerator after letting it rise in a warm place for a couple of hours (when the dough has doubled). If your starter isn't active, then I'm afraid you'd end up with bagel door stops regardless of where you let the dough rise. Let me know how it goes, and good luck!
Carey Ellen Smith says
Did half the recipe with fed starter, no yeast, but added additional rise time, and fridge overnight. They turned out great!
Tammy says
Excellent! So glad the recipe worked for you, even without yeast 😉
TV Nguyen says
Excellent recipe! I doubled the recipe, with 3 tsp yeast total, and it worked really well!
Tammy says
I'm glad you made the recipe work for you! Thanks for sharing 😉
Tamara says
Have only AP and wheat flour. Will this work??
Tammy says
Hi Tamara, Thanks for asking a great question! Yes, all-purpose flour is fine...the bagels just might be a little less chewy. With whole wheat flour, you might need to adjust the amount of water as it tends to absorb more than AP. Add water as needed by the tablespoon to achieve that smooth dough consistency (see the video for an example of what I mean). Happy baking!
Mimi says
Just wanna say thank you for this recipe! I had so much discard and even one with 50% hydration rye (to enhance the tang of my sourdough). Worked out the math to add in the required bread flour and it turned out beautifully. And the taste of the tang is there too! love love love it!
Tammy says
Hi Mimi, I'm so pleased you like the bagels! Thanks for sharing 🙂
Teresa says
Hi! I just discovered your site and looks great! However, I was looking for a naan recipe, and when I try your link, it goes to bagels. Hahah, which now I also want to try, but not today. Where would I find naan?
scotchscones says
Hi Teresa, thanks for your kind words. I'm not sure what link you followed...could you let me know so that I can fix it? In the meantime, I have a great Sourdough Naan recipe that you can find here. If that doesn't work, copy and paste this URL into your browser: https://www.scotchandscones.com/sourdough-naan-bread/
Happy baking!
Anne says
When I click on several of the links in "more recipes using starter," it sends me to the bagel recipe. It happened with the Naan recipe and the foccacia recipe.
Tammy says
Hi Anne, Thanks for letting me know! I've updated the links, so they all should point to the right page now. If you refresh your page, it should work. Happy baking!
Sally T says
Thanks for the tip. I will try this again.
Sally T says
there does not seem to be enough liquid in this recipe. the dough never formed a ball. I continued to knead to try and get it to ball, but after 30 minutes still just a bowl full of dusty gravel.
scotchscones says
Hi Sally, I'm sorry this recipe didn't work for you. I have found that different sourdough starter discards can have different hydration levels...in mine the flour is fully hydrated, so adding more water tends to be overkill. Also, the humidity level of the day you're baking can also effect how much water the flour can absorb, i.e. if you're baking on a relatively dry day, you might need to add more liquid. All that said, I've updated the recipe to give a range of the amount of water you can add...just start with the lessor amount and add more, a tablespoon at a time, as needed until you get the dough to the right consistency. I hope this helps!
Heather Olsen says
I would suggest going by weight rather than cups since the weight of a cup of flour can vary greatly depending on how packed down the flour is. You can end up adding way more flour than necessary if you go by the number of cups.
Tammy says
I agree with you! My kitchen scale is probably my favorite kitchen tool (besides my knife, of course). This is why I always include the weight measurements on my recipes as much as possible.
Theresa Healy says
I love this bagel recipe! Thank you for sharing the boiling secret too. Btw.. when selecting 2x or 3x the oz and grams don’t change dynamically like the teaspoons and cups measurements.
Tammy Spencer says
Hi Theresa, I'm glad you're happy with this recipe. I've updated it to now include conversions from volume to metric units. Now the recipe will scale both as you flip back between the two. Thanks for pointing this out. Happy baking! 😉
Theresa Healy says
Great comment Heather.