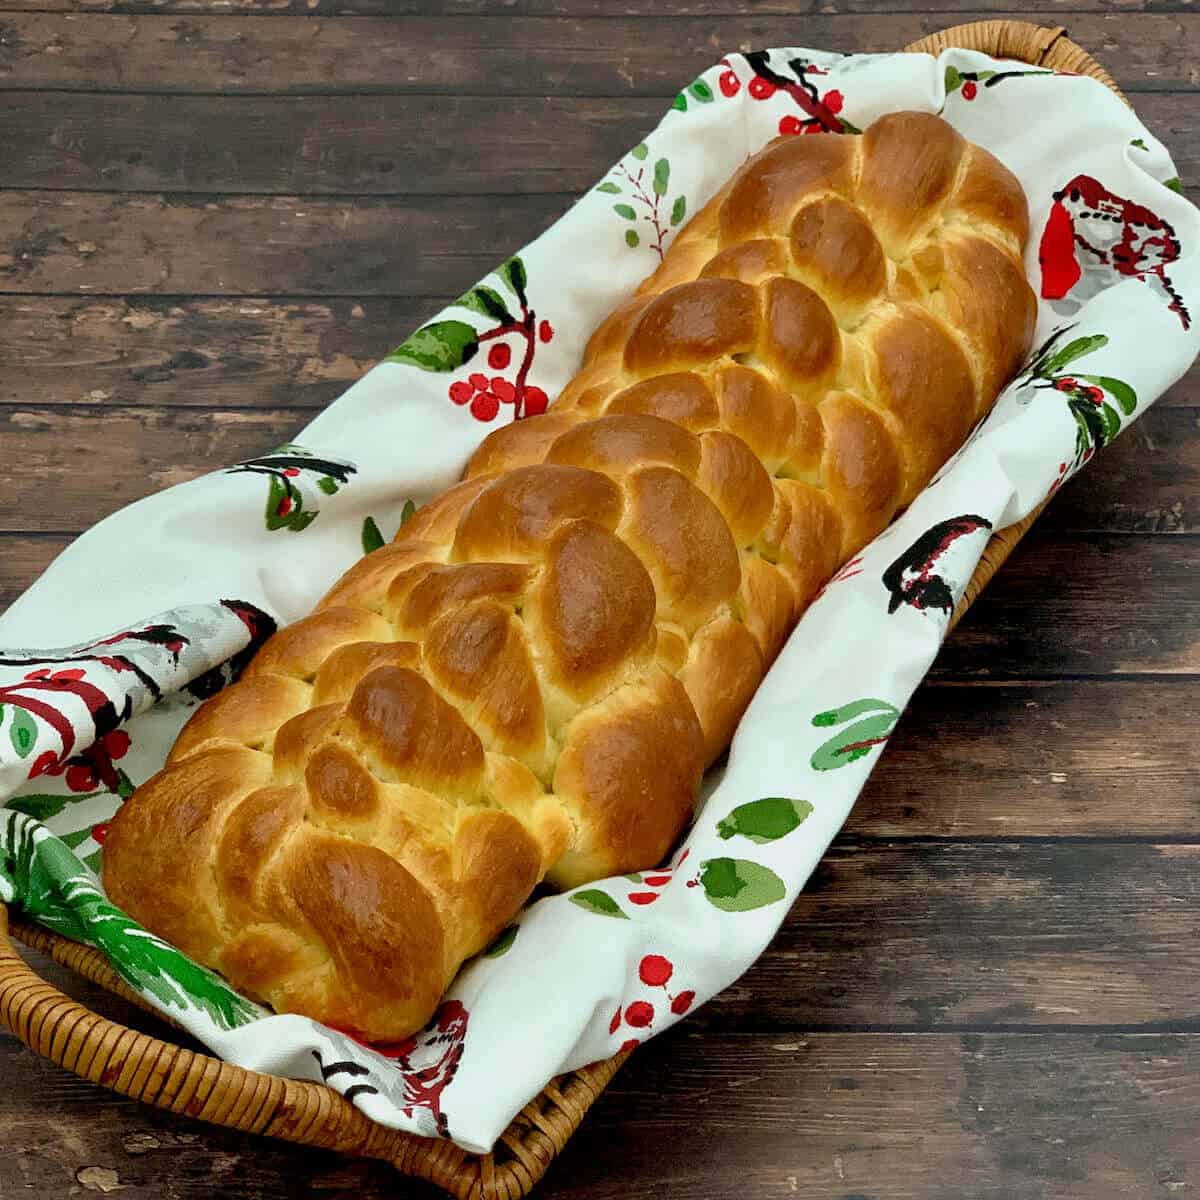
You can make a beautiful eight strand braided challah, both straight and round, just like the pros. Follow these easy step-by-step instructions to make a bakery-worthy challah two ways!
Jump to:
Why these instructions work
- Easy to follow instructions make braiding challah a breeze
- Foolproof recipe provided for the best challah bread...ever!
Whether it’s straight, round, squared off, or in a wreath, bread comes in a variety of shapes.
Most types of bread aren’t associated with a specific shape, but challah, a Jewish egg bread similar to brioche, definitely is one of those. Braided, either straight or round, that’s the shape of challah. It’s instantly recognizable.
Round challah is traditionally served for Rosh Hashanah (the Jewish New Year). Straight challahs are served at many Jewish celebrations, from the weekly Shabbat (Sabbath) meal to weddings and Bar/Bat Mitzvahs. And of course, it's great for making french toast!
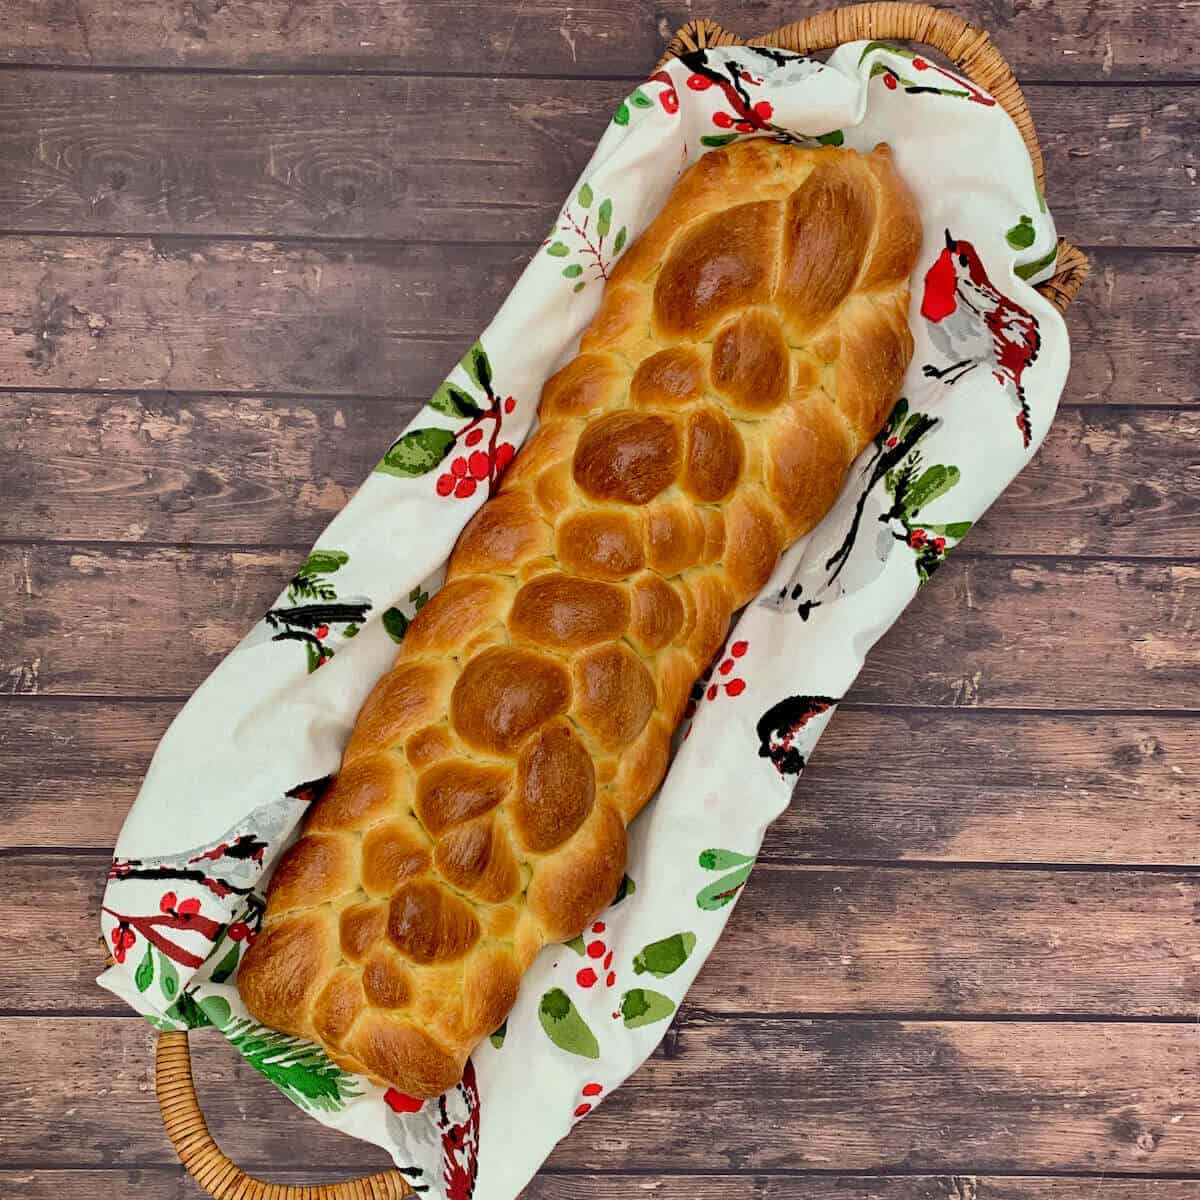
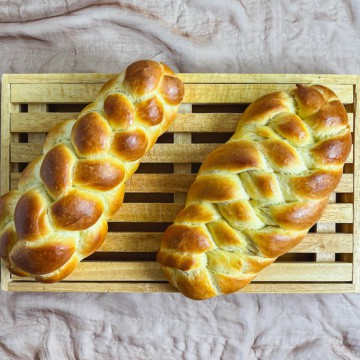
This finished straight eight strand challah looks beautiful, with a shiny exterior and a soft interior. The round eight strand challah looks impressive, but is really quite easy to weave.
Whichever shape you choose, practice with patience and soon you’ll master the patterns for shaping challah dough. You'll impress your family and friends, and you'll have the satisfaction you plaited like a pro with a challah bread worthy of a bakery.
Happy braiding!
Recipe Ingredients
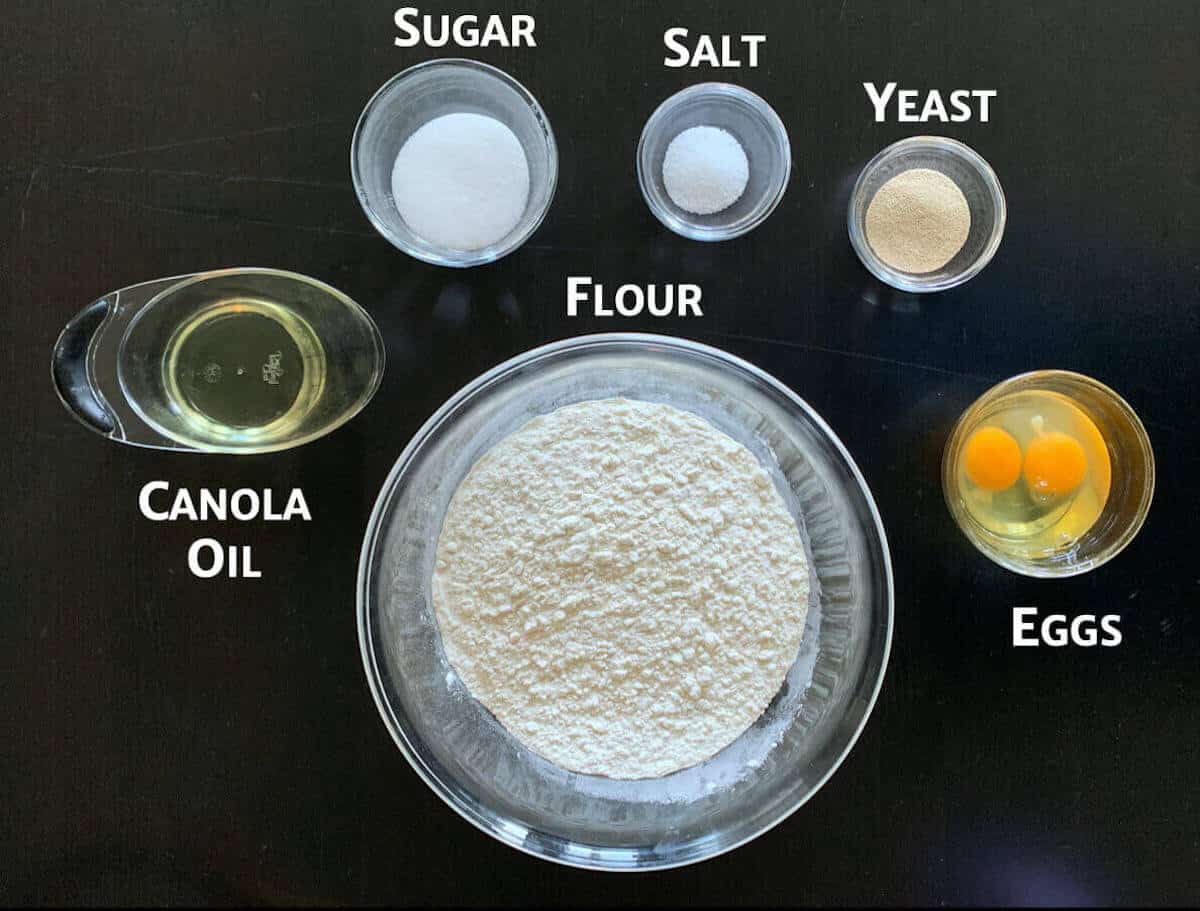
You'll need the following ingredients to make a challah recipe:
Ingredient Notes
As with most bread recipes, you need the basic bread ingredients: flour, water, yeast, and salt.
Eggs: The main difference between a basic bread dough and challah is that challah dough is enriched with eggs, like with a brioche recipe.
Canola oil: Oil is used instead of softened or melted butter to keep the bread dairy-free. That's especially important if you're keeping Kosher and want to serve the challah with a meal featuring meat. Jewish dietary laws forbid the mixing of milk and meat products at the same time.
Sugar: Challah is usually sweetened with sugar or honey for better flavor.
Mix-ins: These can be a fun way to add another flavor component to your challah. Some common mix-ins are raisins and chocolate chips, but you can experiment with other options like nuts, seeds, or chopped dried fruit.
Toppings: Sesame seeds and poppy seeds are common, and cinnamon sugar (1 teaspoon cinnamon mixed with 1 tablespoon granulated sugar) is a fun alternative. You can also go savory with spice mixes like za'atar. Get creative or leave it plain, your choice.
Here's the best homemade challah recipe, hands down. And as the dough rises, let's discuss how to braid it using a 8-strand braid.
How to braid a straight eight strand challah
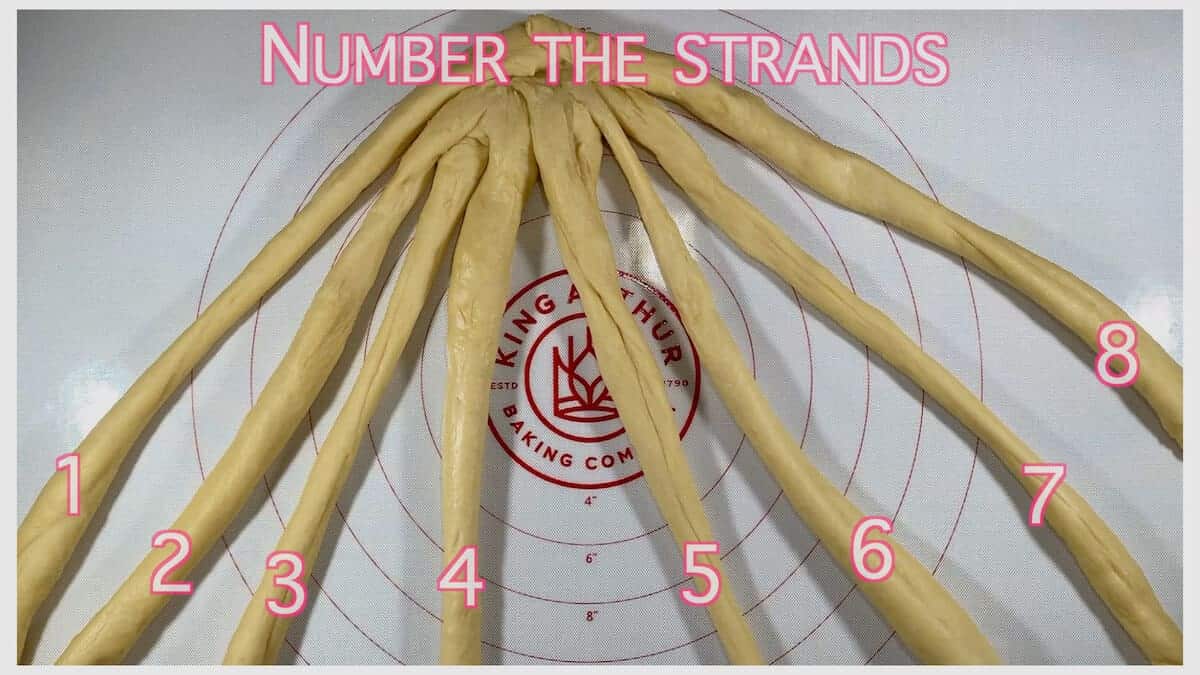
For the following braiding sequence, number the strands of dough 1 to 8 from left to right. Every time you move any strand it will take the new number of its position in the row.
Step 1
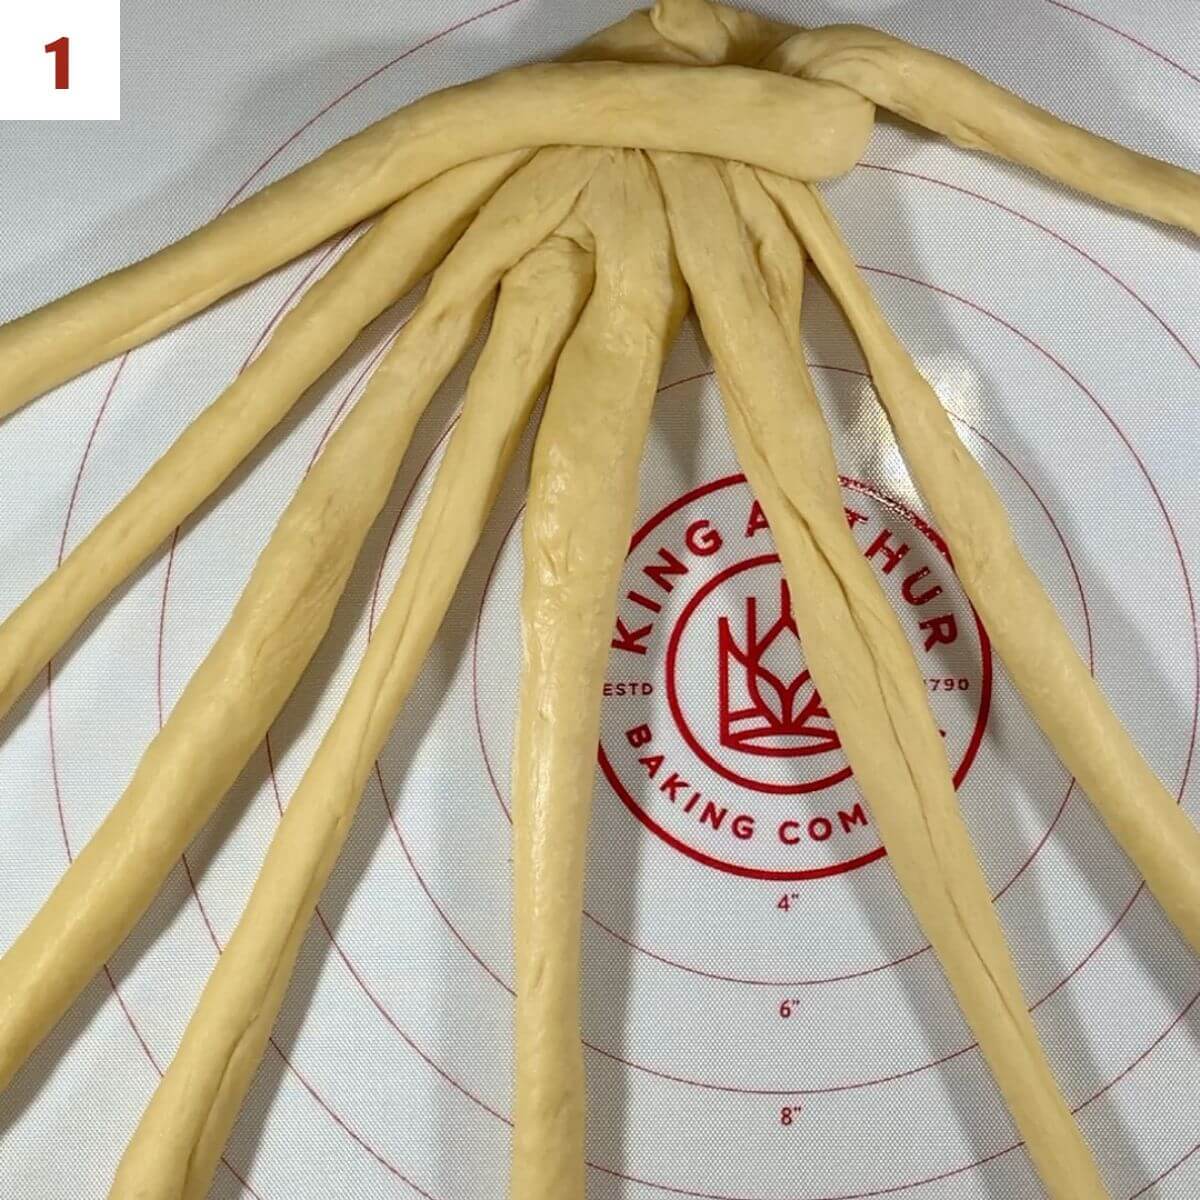
Place strand 8 under strand 7 and over strand 1 (photo 1). This is the only time you'll be doing this step.
Step 2
Place strand 8 over strand 5 (photo 2).
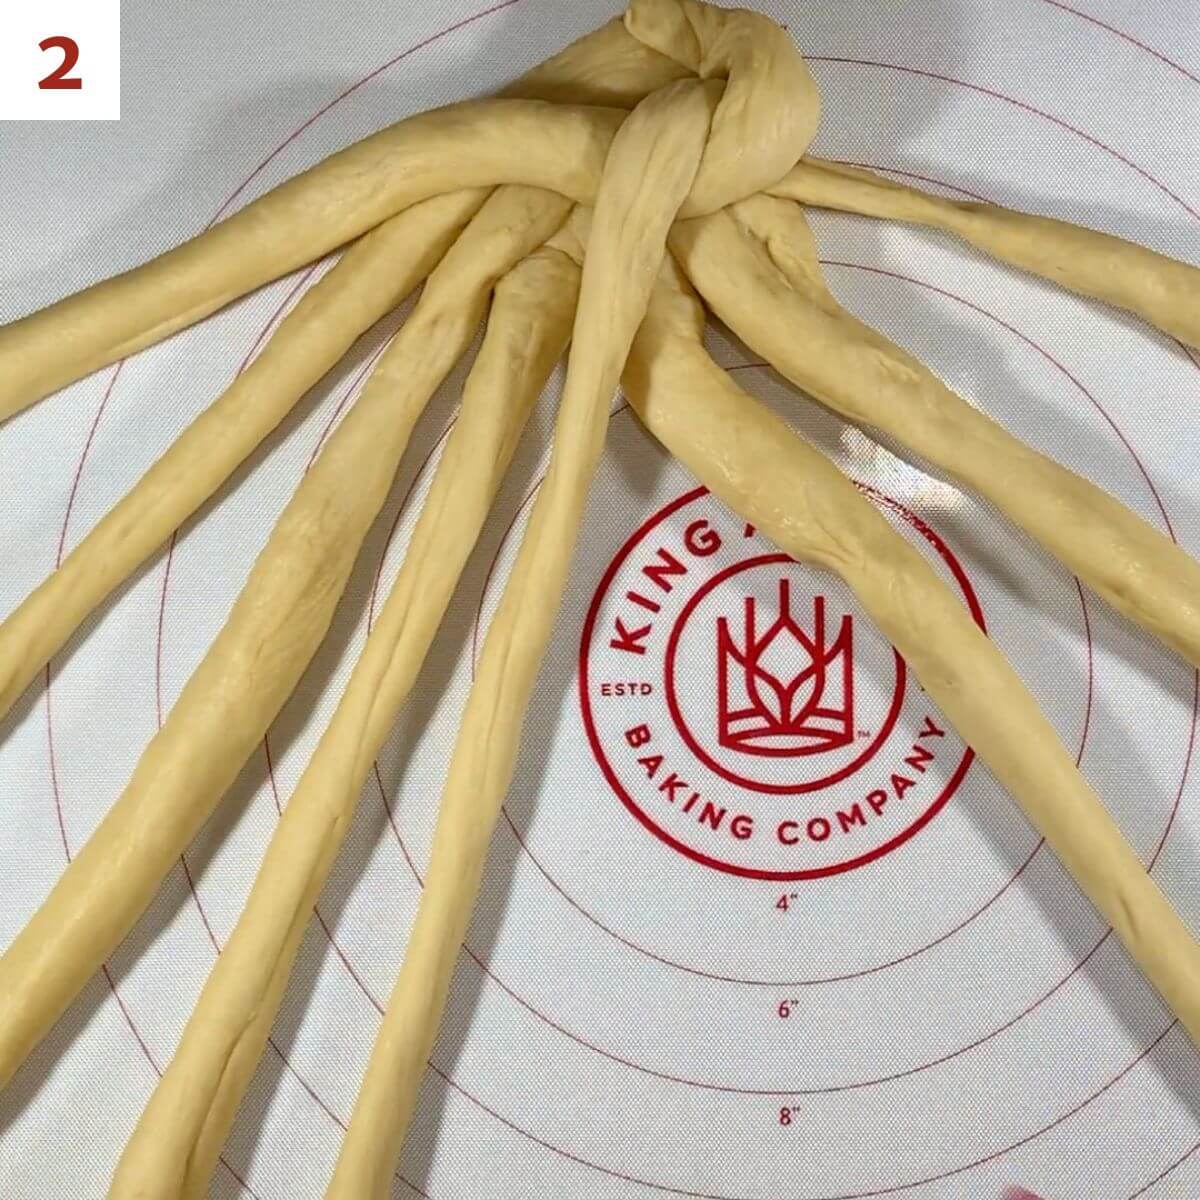
Step 3
Place strand 2 under strand 3 and over strand 8 (photo 3).
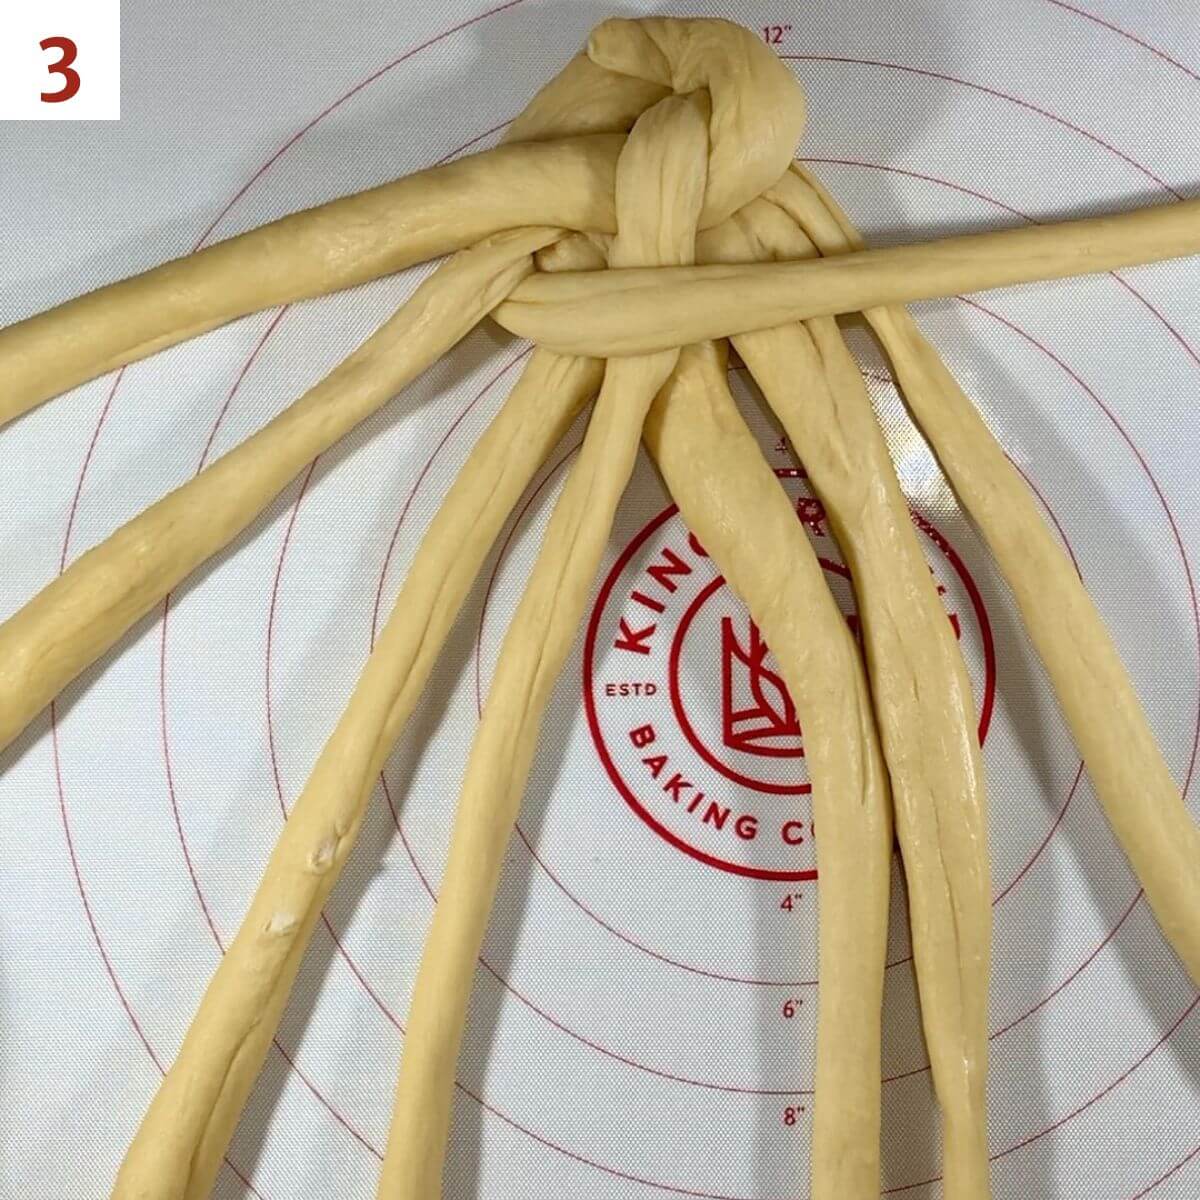
Step 4
Place strand 1 over strand 4 (photo 4).
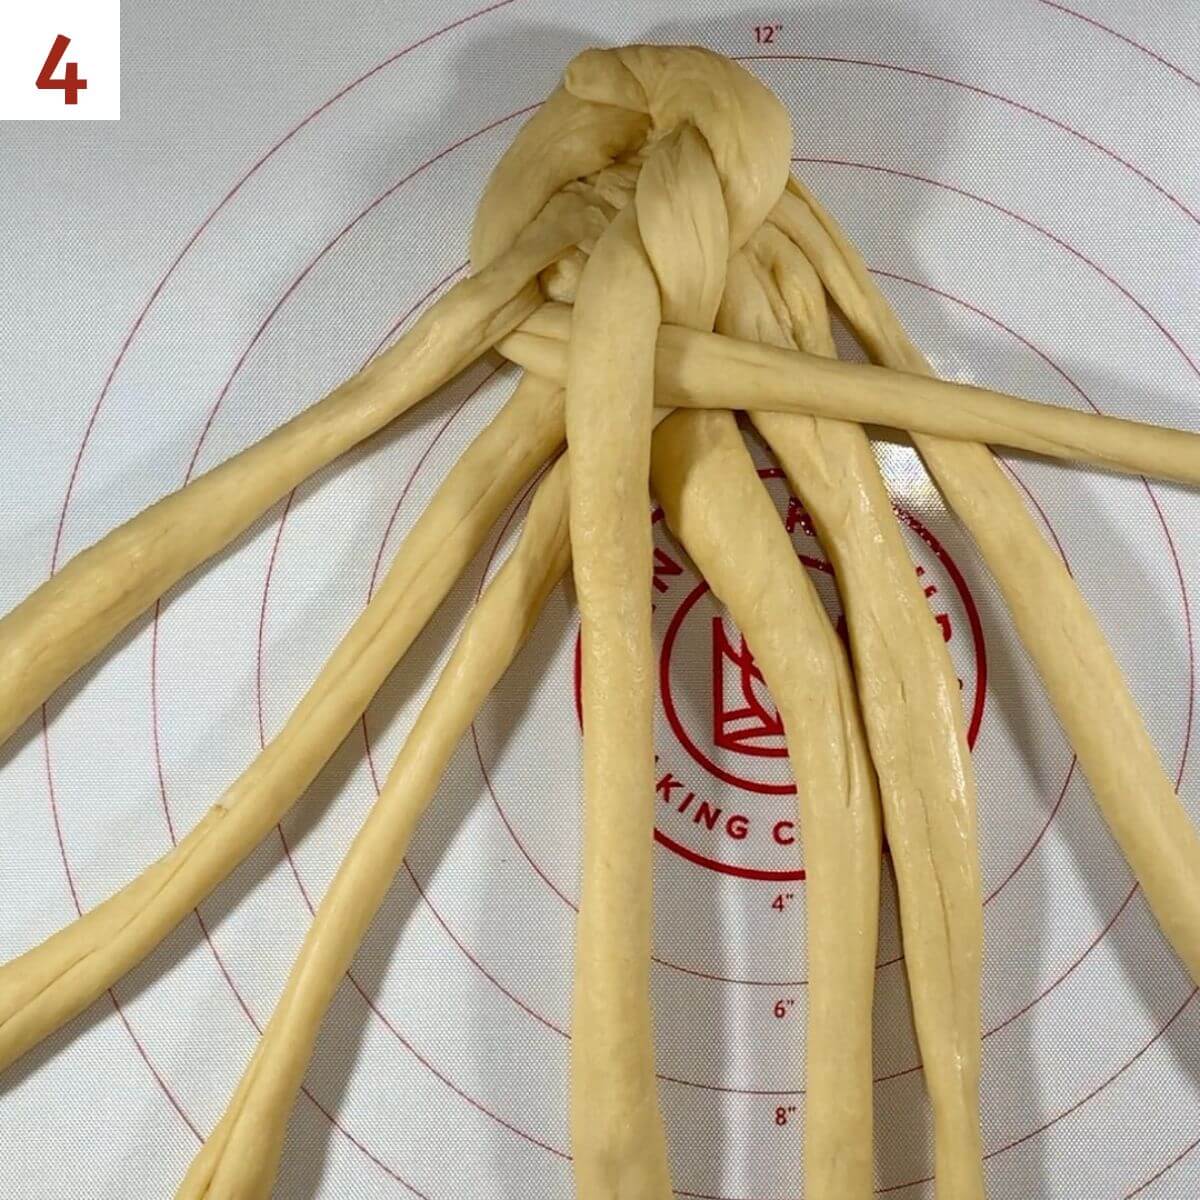
Step 5
Place strand 7 under strand 6 and over strand 1 (photo 5).
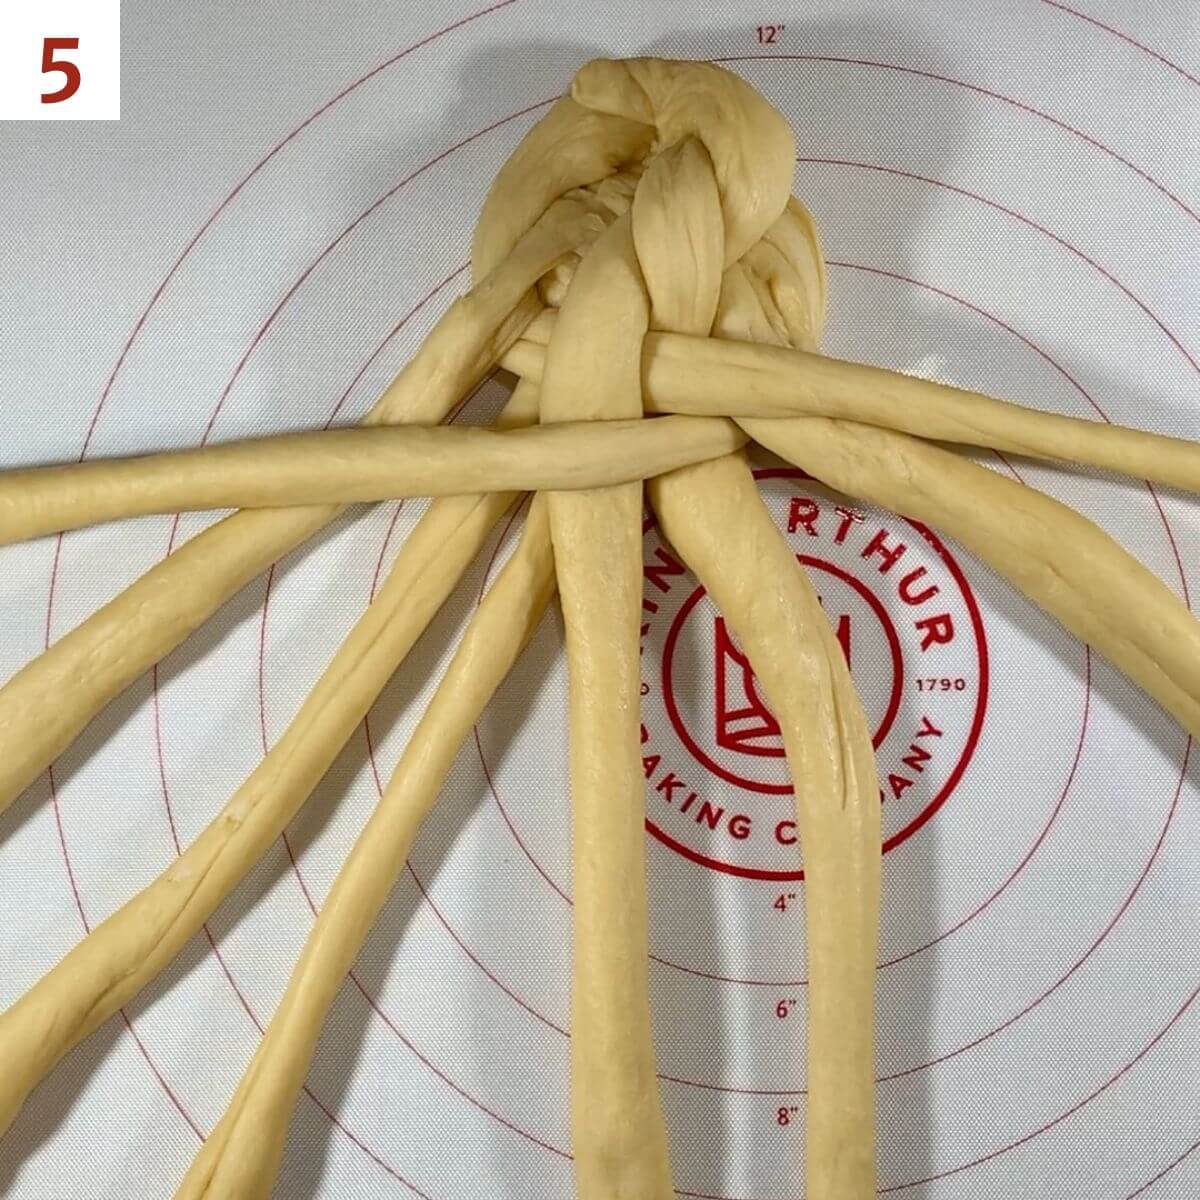
Step 6
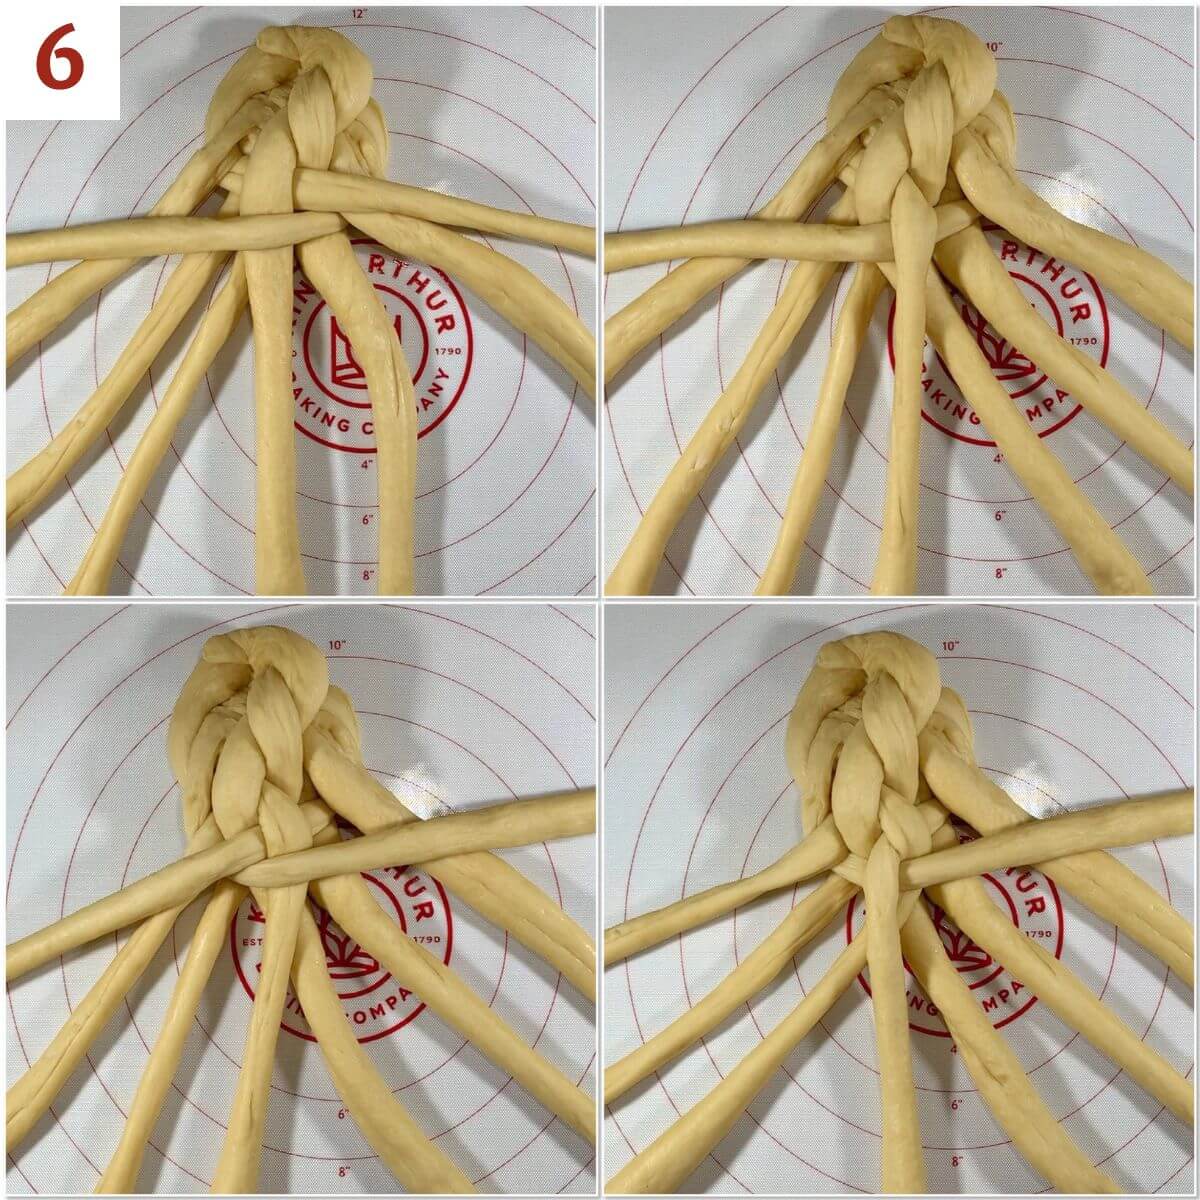
Repeat steps 2 to 5, until all the dough is braided. The collage shows the next round of steps 2 through 5 (photo 6).
Remember, you're not doing Step 1 any more!
Step 7: Tuck the ends under
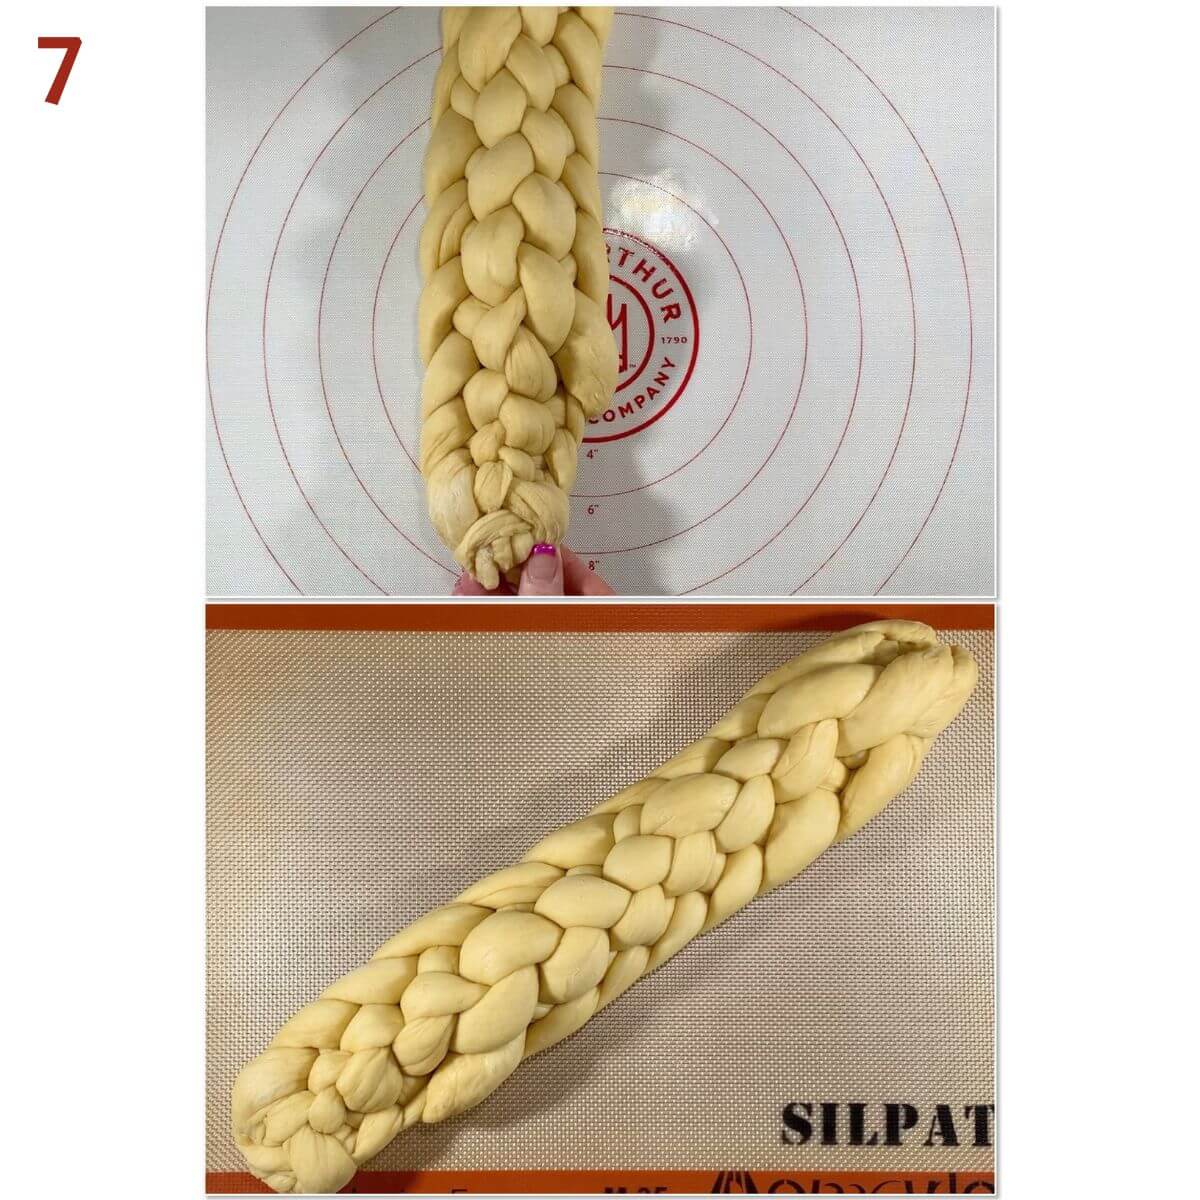
Tuck the ends of the loaf underneath on both ends to give a neat finish. Adjust the braid ends and sides with your hands to make everything even (photo 7).
Transfer the dough to a half sheet baking pan lined with a Silpat silicone mat or parchment paper.
Pay special attention to pinching the ends of the strands together and tucking them under the finished braid. Sometimes despite your best efforts, the ends will come apart while the challah is baking. I call these lobster claws, and while the challah won't look quite as neat, it will still taste fantastic.
Step 8: Let the dough rise
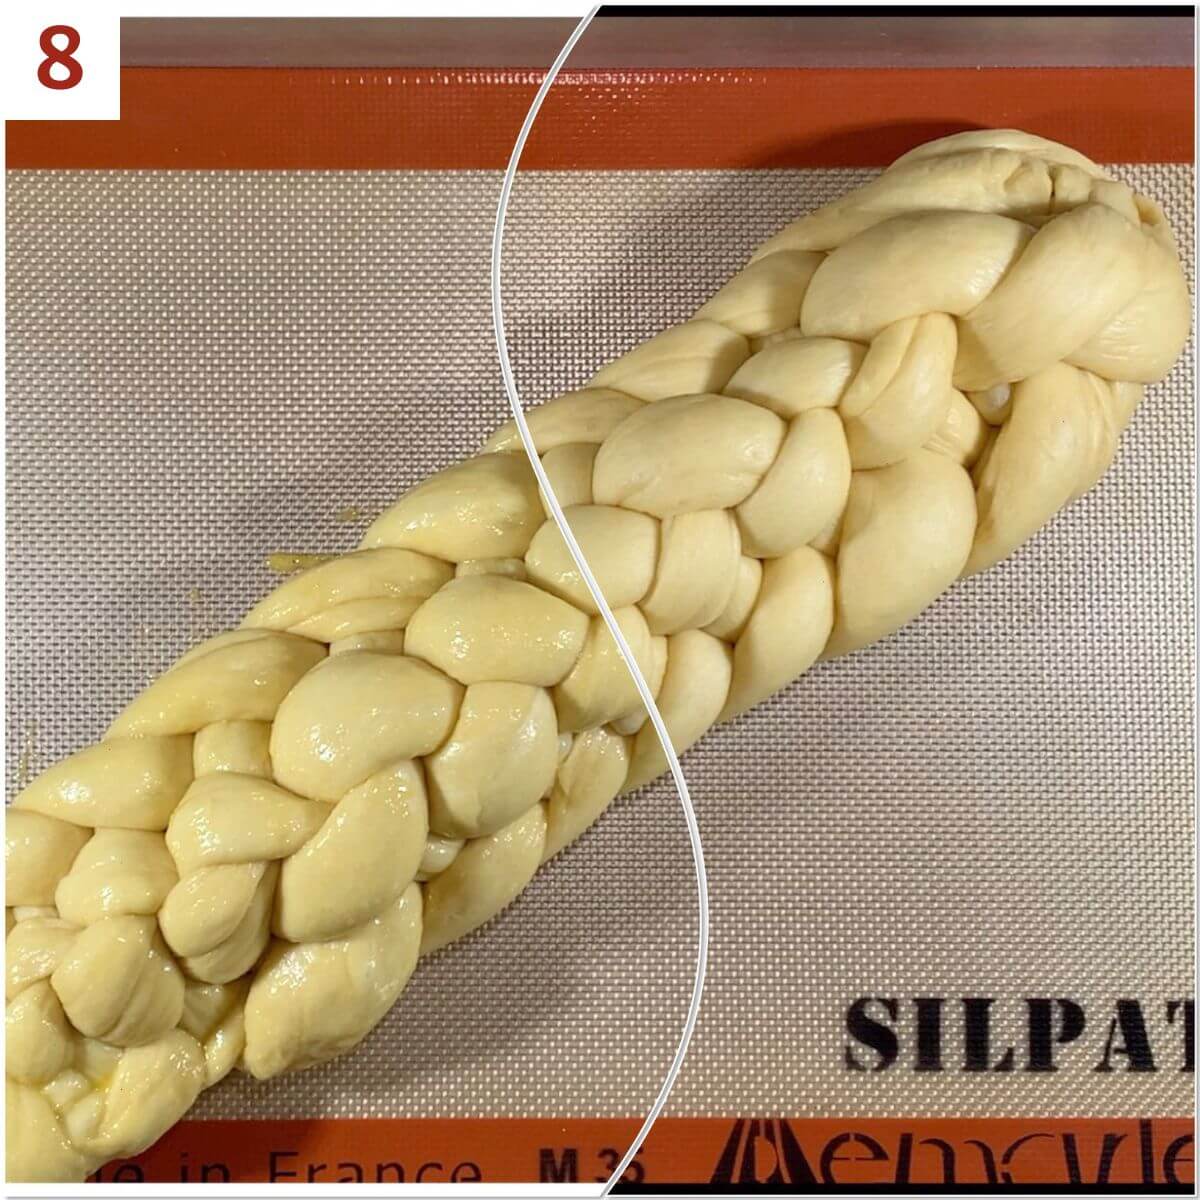
Let the shaped dough rise for 45 minutes in a warm place. You can preheat the oven to 350ºF during this time.
Brush the dough with the egg wash, then sprinkle on any desired toppings (photo 8).
Step 9: Bake the challah
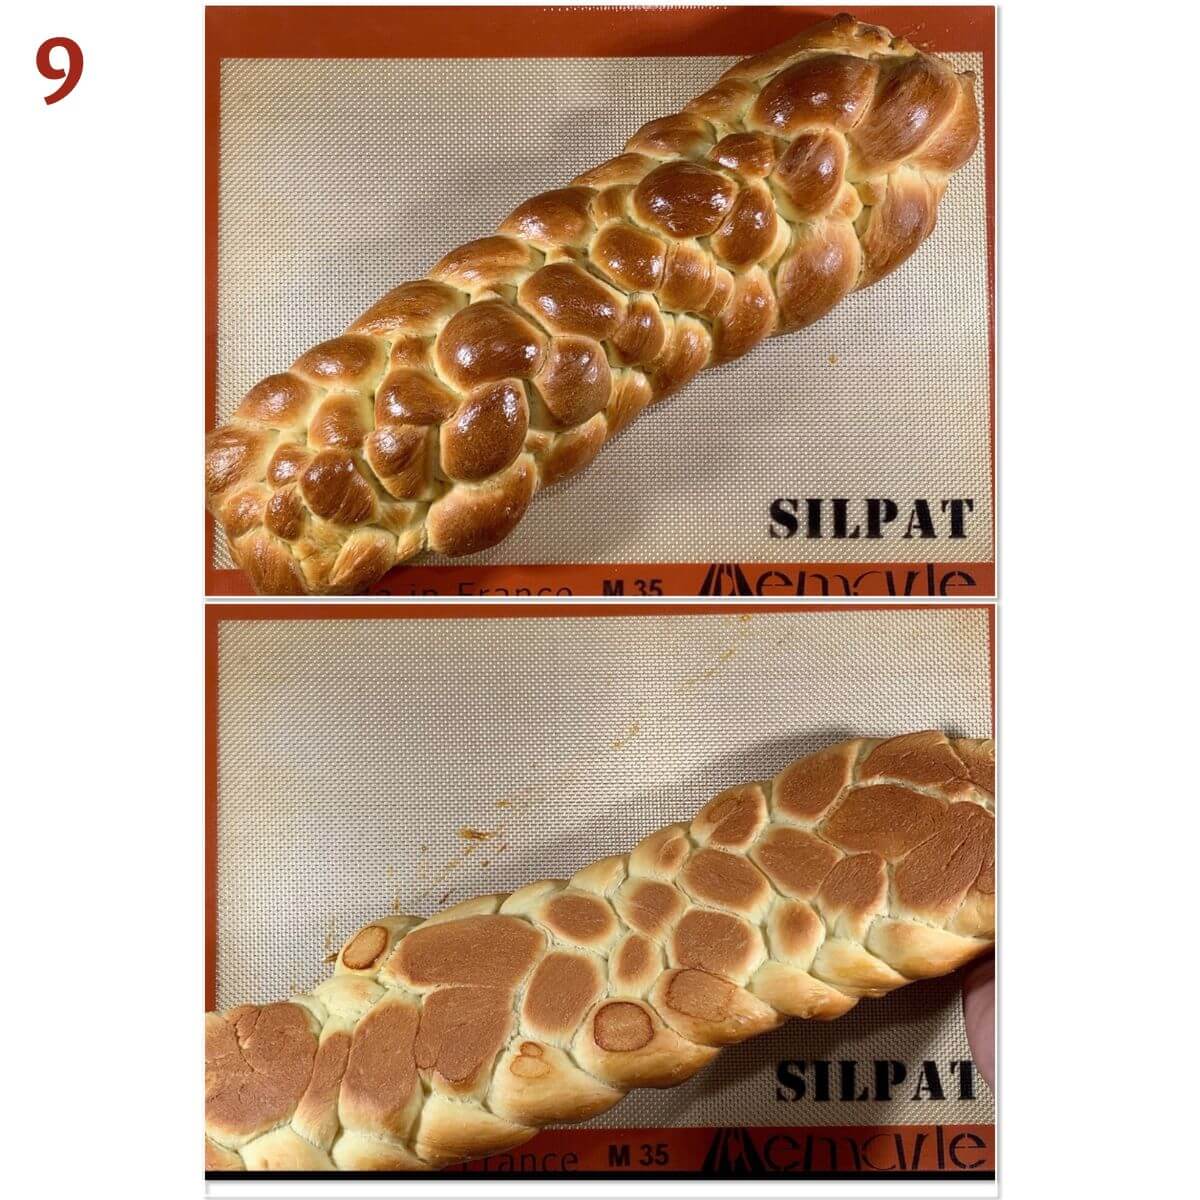
Bake at 350˚F for 25 to 35 minutes, rotating the pan front to back halfway through the baking time. When the loaf is golden brown and it sounds hollow when tapped on the bottom (or reads 190°F on a digital thermometer), remove it from the oven and cool on a wire rack (photo 9).
How to weave a round eight-strand challah
While most of the time challahs are oblong, you can find round challahs for the celebration of Rosh Hashanah, the Jewish New Year (usually in September or October, based on the Jewish lunar calendar).
This double weave round challah uses the same technique as for the four-strand woven round challah, just using four strands side-by-side.
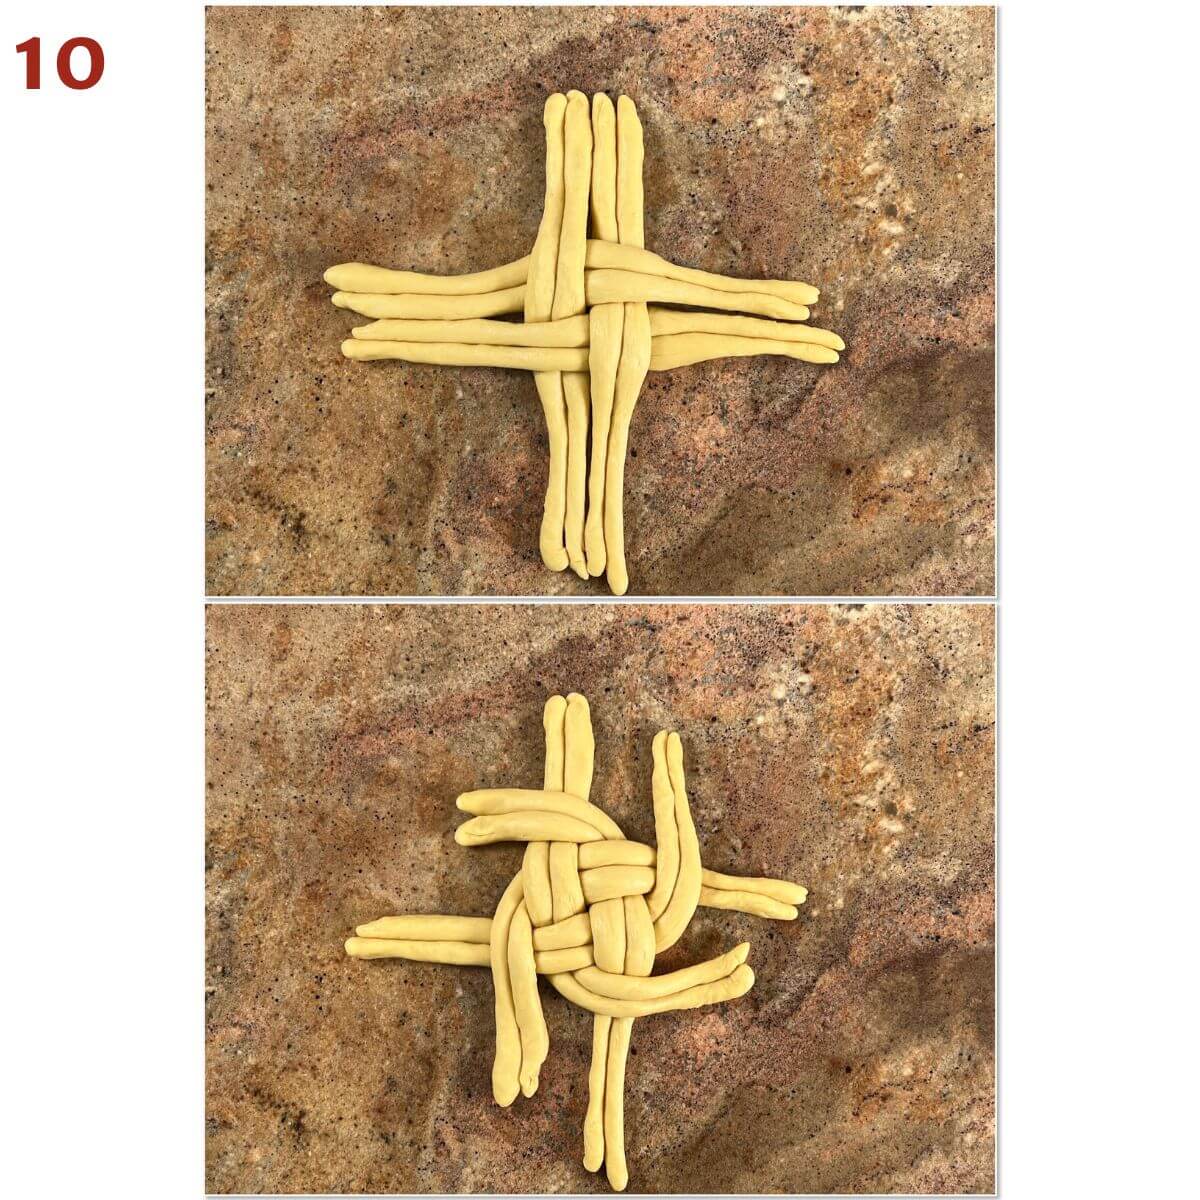
Take the two right vertical strands and weave them under the upper two horizontal strands. Take the two left vertical strand and weave them under the lower two horizontal strands (you now have a pattern akin to a tic-tac-toe board). Push all the strands tightly together in the middle so there’s no space between them.
Starting with the lower two left vertical strands, place them over the strands next to them on the right. Repeat around the circle, going counter-clockwise a total of 4 times (photo 10).
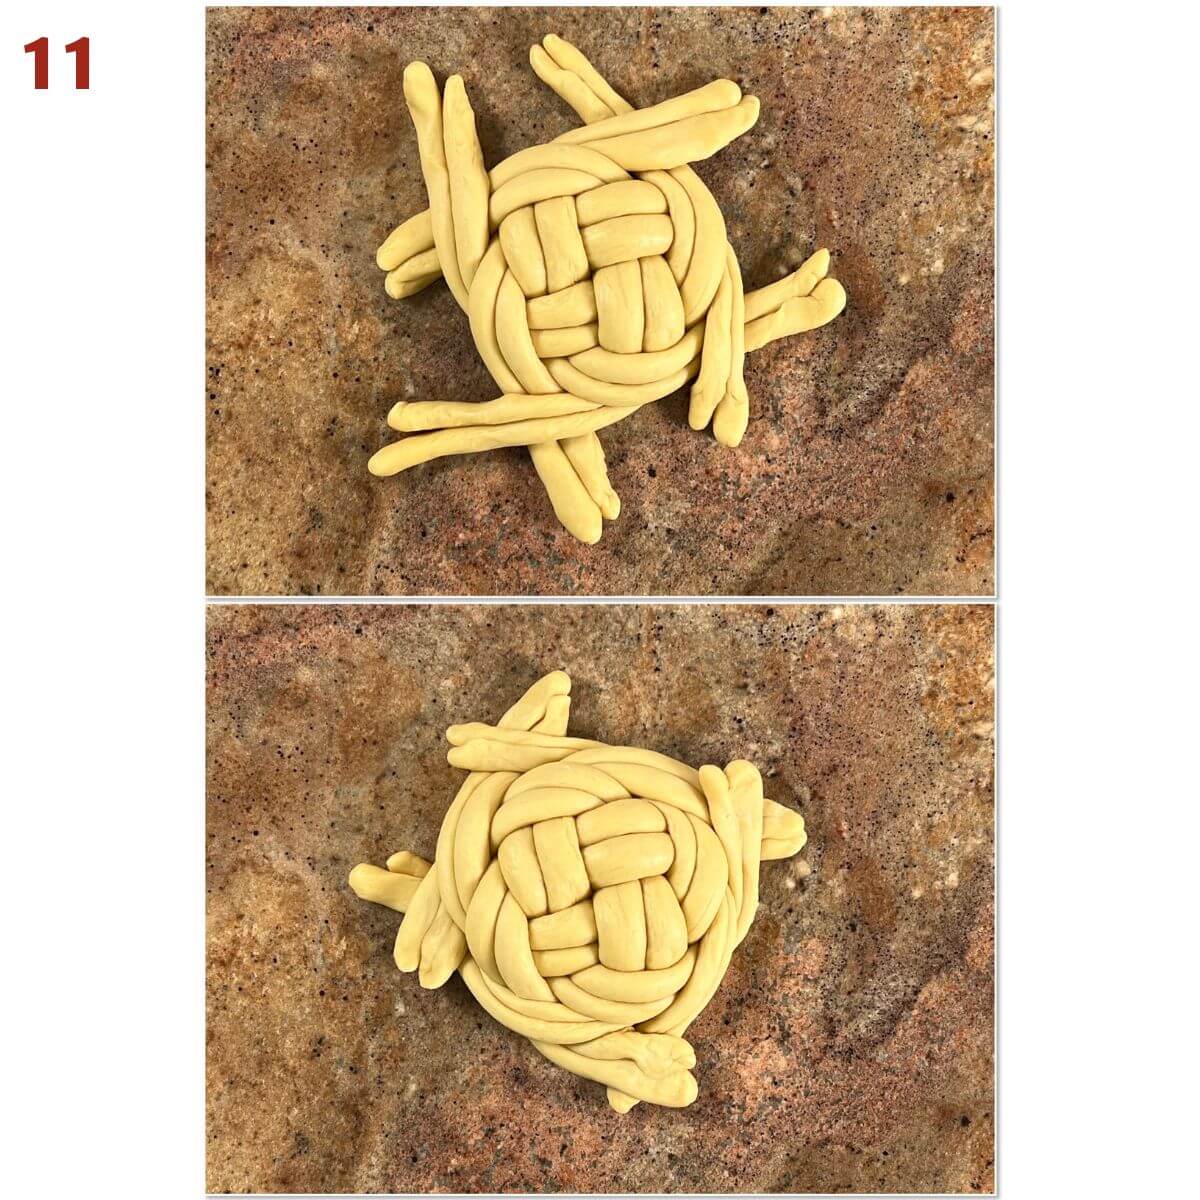
Now do the same thing starting with the lower two right vertical strands, placing the strands over their neighbor on the left, going around the circle clockwise.
Repeat the pattern, traveling counter-clockwise, then clockwise. By now the strands will be too short to continue. (photo 11).
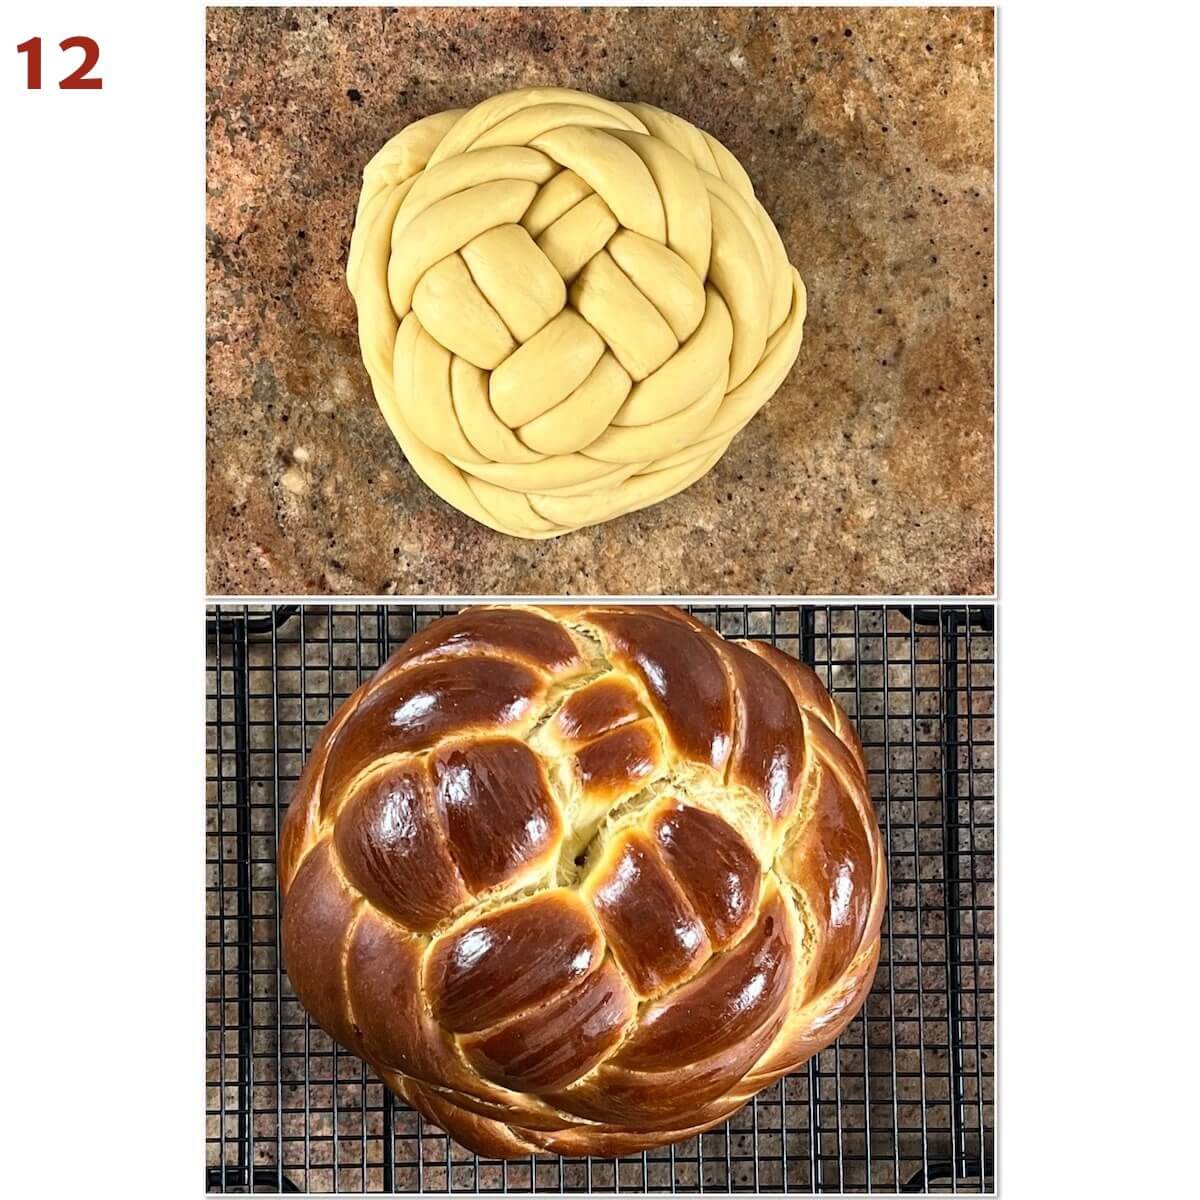
Tuck the ends under and adjust the woven round mass into a circle. Let the dough rest, then brush with an egg wash and bake as normal. The baking time will be extended by about 5 to 10 minutes (photo 12).
Storage instructions
Challah will last for several days on the counter in an airtight container. For longer term storage, freeze the loaf, well wrapped in plastic wrap and placed in an airtight container, for up to 4 to 6 months.
There are many ways to shape challah
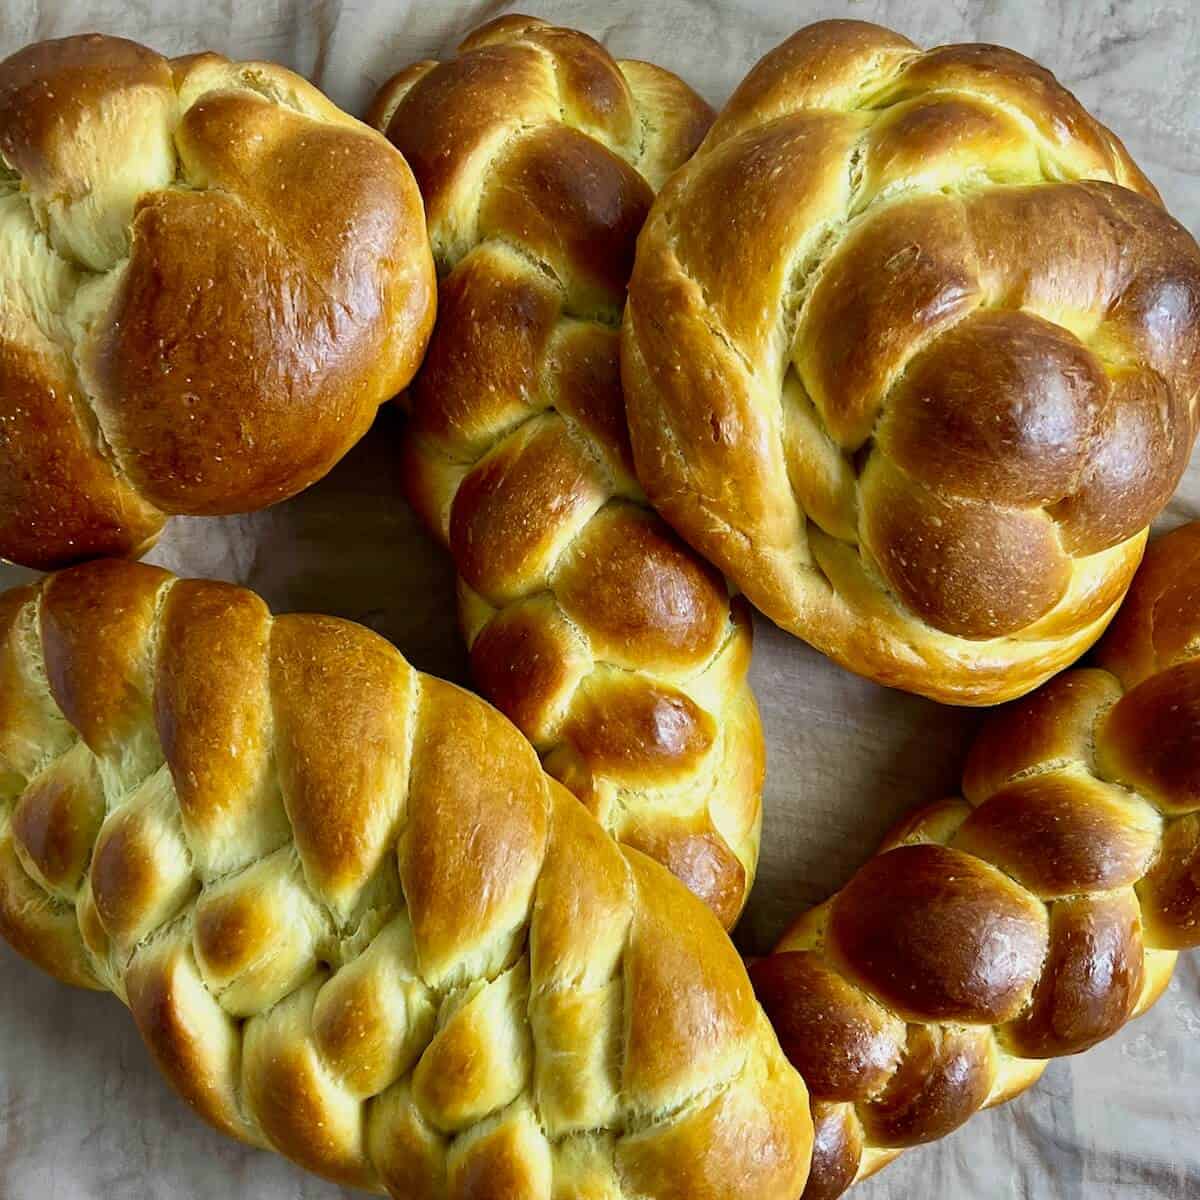
A braided challah, all shiny and golden brown, is a work of art as well as a delicious bread. Slice it neatly, or use the bumps from the braids to tear off a piece!
You can shape your challahs lots of ways. For more braiding inspiration, check out the instructions for braiding challahs with 3 strands (straight or round), 4 strands (straight or round), or 6 strands (straight or flat). Have a go!
Questions asked and answered
Here are some questions you might have...
Used for Shabbat (the Jewish Sabbath), Rosh Hashanah (the Jewish New Year), or for special occasions, challah’s special shape holds traditional meanings.
The internet abounds with websites explaining the many different reasons why braiding challah as an oblong shape is used on the Sabbath and other special occasions.
Those reasons vary based on how observant the individual is. Some sites go deep into Jewish law (having to do with the rituals of the ancient temple). Others look to a more biblical meaning (representing manna from heaven). Still others go for a more secular meaning (creating a shaped bread that can be distinguished from ordinary bread, thus making it safe to eat for the Shabbat meal).
In addition, the round challah used on Rosh Hashanah symbolizes the circular nature of time itself (one year ends, another starts), but even that simple explanation has deeper meanings for people.
In a word, no. You can shape challah dough any way you want. Traditionally, braided challahs are used for the Jewish Sabbath or on holidays, but the dough can be used to make bread for french toast, buns and rolls, and is the basis for babka.
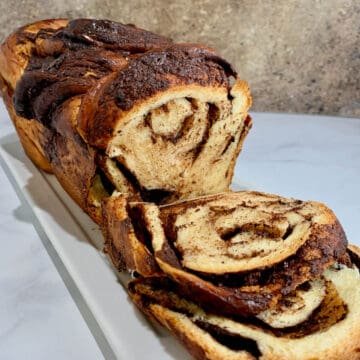
Challah dough is an enriched dough (meaning eggs and a fat is added). Babka dough is also made with eggs, although usually milk and butter are used instead of water and oil. Also, babkas are usually filled with a sweet filling and coiled into a loaf pan, so they are sweeter than challah.
More shaped bread recipes to try
Recipe
Eight Strand Braided Challah
Equipment
Ingredients
- 1 recipe homemade challah dough
- 1 large egg, plus 1 tablespoon water, for egg wash
- toppings, optional, see Recipe Notes
Instructions
- Portion out 8 equal pieces of dough, cutting it with a bench scraper or knife (for the best accuracy, weigh the dough with a kitchen scale). Shape each piece into a long rope. Lay all the ropes side by side on a lightly floured surface and pinch them together at the top.
- For the following braiding sequence, number the strands of dough 1 to 8 from left to right. Every time you move any strand it will take the new number of its position in the row. Watch how to make the braid on the video.
- Place strand 8 under strand 7 and over strand 1. You're only going to do this step once.
- Place strand 8 over strand 5.
- Place strand 2 under strand 3 and over strand 8.
- Place strand 1 over strand 4.
- Place strand 7 under strand 6 and over strand 1.
- Repeat steps 4 to 7, until all the dough is braided.
- Tuck the ends of the loaf underneath on both ends to give a neat finish. Adjust the braid ends and sides with your hands to make everything even.
- Line a half sheet baking pan with a Silpat silicone mat or parchment paper. Transfer the shaped dough to the baking pan, then cover with greased plastic wrap.
- Let the shaped dough rise for 45 minutes in a warm place. Preheat the oven to 350 °F.
- For the egg wash, whisk together the beaten egg with the water. Brush the dough with the egg wash, then sprinkle on any desired toppings.
- Bake the dough for 25 to 35 minutes, rotating the pan front to back halfway through the baking time. When the loaf is golden brown and it sounds hollow when tapped on the bottom (or reads 190 °F on a digital thermometer), remove it from the oven and cool on a wire rack.
- Storage instructions: Challah will last for several days on the counter in an airtight container. For longer term storage, freeze the loaf, well wrapped in plastic wrap and placed in an airtight container, for up to 4 to 6 months.




Comments
No Comments