
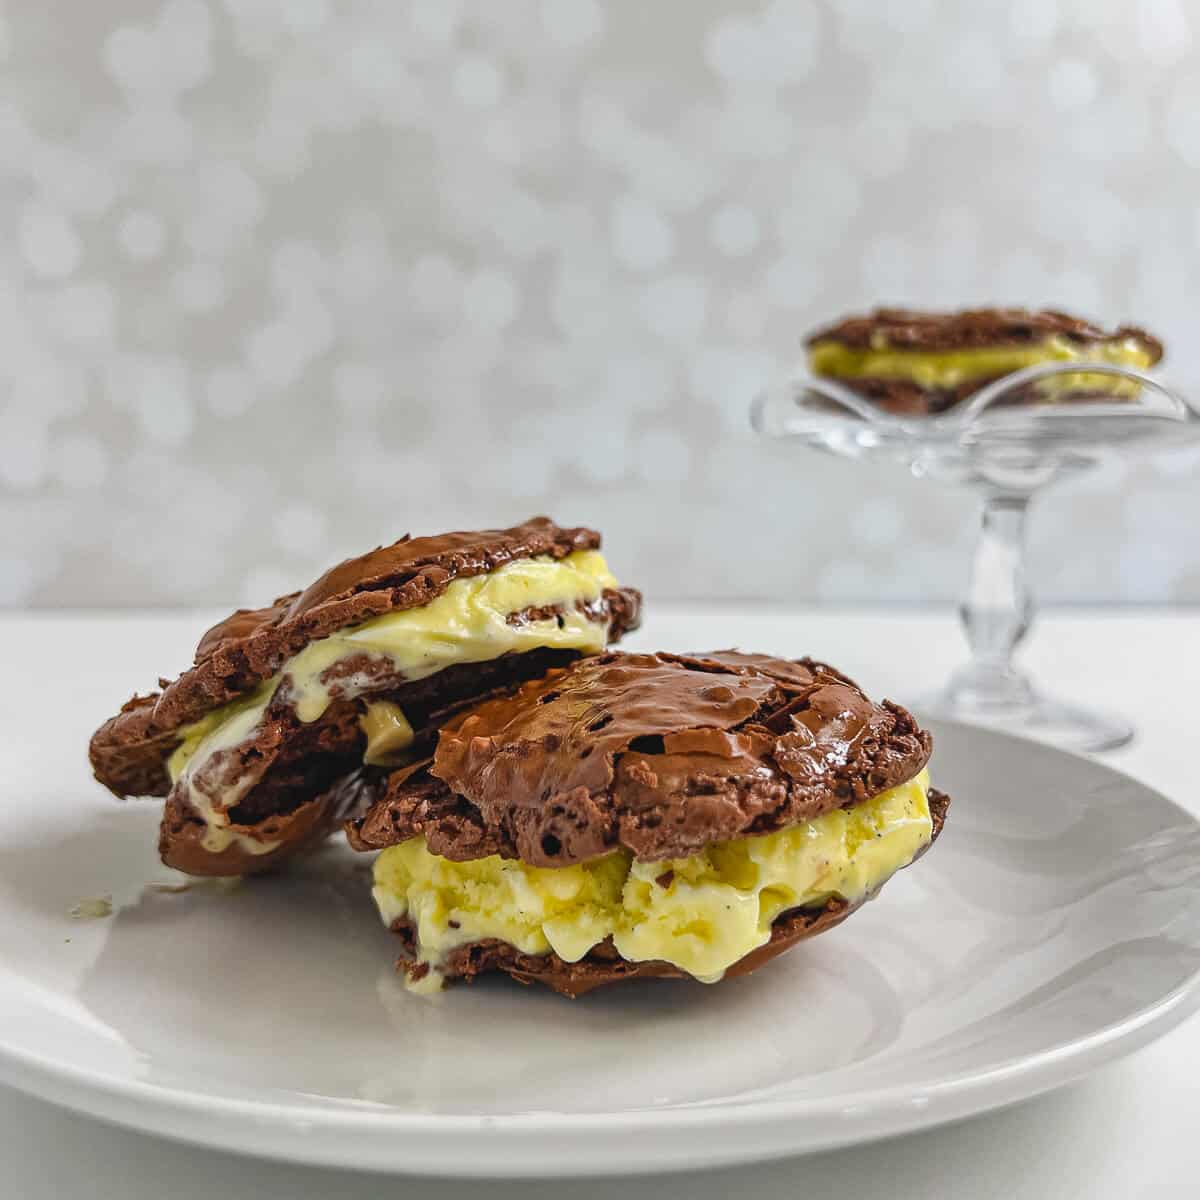
These homemade Gluten-Free Ice Cream Sandwiches pair chewy flourless chocolate cookies with creamy vanilla ice cream for a fun frozen treat. Easy to make ahead and customize with your favorite ice cream flavors, they're perfect for hot summer days and backyard gatherings.

Jump to:
- Quick Recipe Summary ✨
- Why this recipe works
- Recipe Ingredients
- How to make gluten-free ice cream sandwiches
- Storage and make-ahead instructions
- Here's a better way to separate eggs
- Best ice cream flavors for ice cream sandwiches
- Ice cream sandwich troubleshooting
- Questions asked and answered
- More gluten-free recipes to try
- Recipe
- Comments
[July, 2022: I've reworked the recipe and updated this post with new pictures. Enjoy!]
Quick Recipe Summary ✨
Homemade Gluten-Free Ice Cream Sandwiches: Chewy flourless chocolate cookies sandwich creamy vanilla ice cream for a rich chocolatey twist on the classic frozen treat.
Naturally gluten-free cookies: No specialty gluten-free flour blend required. The flourless chocolate cookies bake up with crisp edges and chewy centers that stay delicious even after freezing.
Perfect for make-ahead summer desserts: Keep a batch in the freezer and enjoy a homemade ice cream sandwich whenever the craving strikes.
Active Time: about 30 minutes • Bake Time: about 20 minutes • Freeze Time: about 2 hours • Total Time: about 2 hours 50 minutes
Difficulty Level: ⭐⭐ Easy to Moderate. The cookies are simple to make, and a little freezer time makes assembly easy and mess-free.
Yield: 8 ice cream sandwiches • Freezer friendly: Assembled ice cream sandwiches will keep for up to 2 weeks • Make-ahead friendly: Bake the cookies up to 3 days ahead or freeze the baked cookies for up to 1 month before assembling.
👉 Follow the detailed instructions, assembly tips, and troubleshooting guide below to make homemade gluten-free ice cream sandwiches with chewy chocolate cookies and creamy ice cream every time.
SUMMARIZE & SAVE THIS CONTENT ON
Why this recipe works
- Flourless chocolate cookies have a fudgy, brownie-like texture that stays pleasantly chewy straight from the freezer
- Cocoa powder provides rich chocolate flavor that pairs beautifully with creamy vanilla ice cream
- The cookies are sturdy enough to hold the filling without crumbling when you take a bite
- Homemade sandwiches let you customize the ice cream flavor and mix-ins to suit your tastes
- Freezing the assembled sandwiches helps the cookies and ice cream meld together into a classic ice cream sandwich texture
Ice cream sandwiches take me back to childhood. Memories of softened vanilla ice cream smooshing out between chocolate wafers and dripping down my arm takes me back to when the biggest worry I had was making sure I ate it all before it melted.
Now I can make my own chocolate cookies for homemade ice cream sandwiches, plus I can make the best vanilla ice cream to fill them.
Rather than having the traditional soft chocolate wafer, I use flourless chocolate walnut cookies (without the walnuts). They have a crunchy exterior and a chewy interior that provides a nice texture experience for this gluten-free ice cream sandwich.
These homemade ice cream sandwiches have a richer chocolate flavor than the store-bought version thanks to the flourless chocolate cookies. The cookies are crisp around the edges, chewy in the center, and pair beautifully with creamy vanilla ice cream.
Plus, the flourless cookies hold everything together without sticking to your hands (which sometimes happens with store-bought sandwiches). The result is a frozen treat that's both nostalgic and a little more grown-up.
It's time to make new summertime memories!
[ ** bites into a ice cream sandwich ** ]
Recipe Ingredients
You'll need the following ingredients to make this gluten free ice cream sandwich recipe:
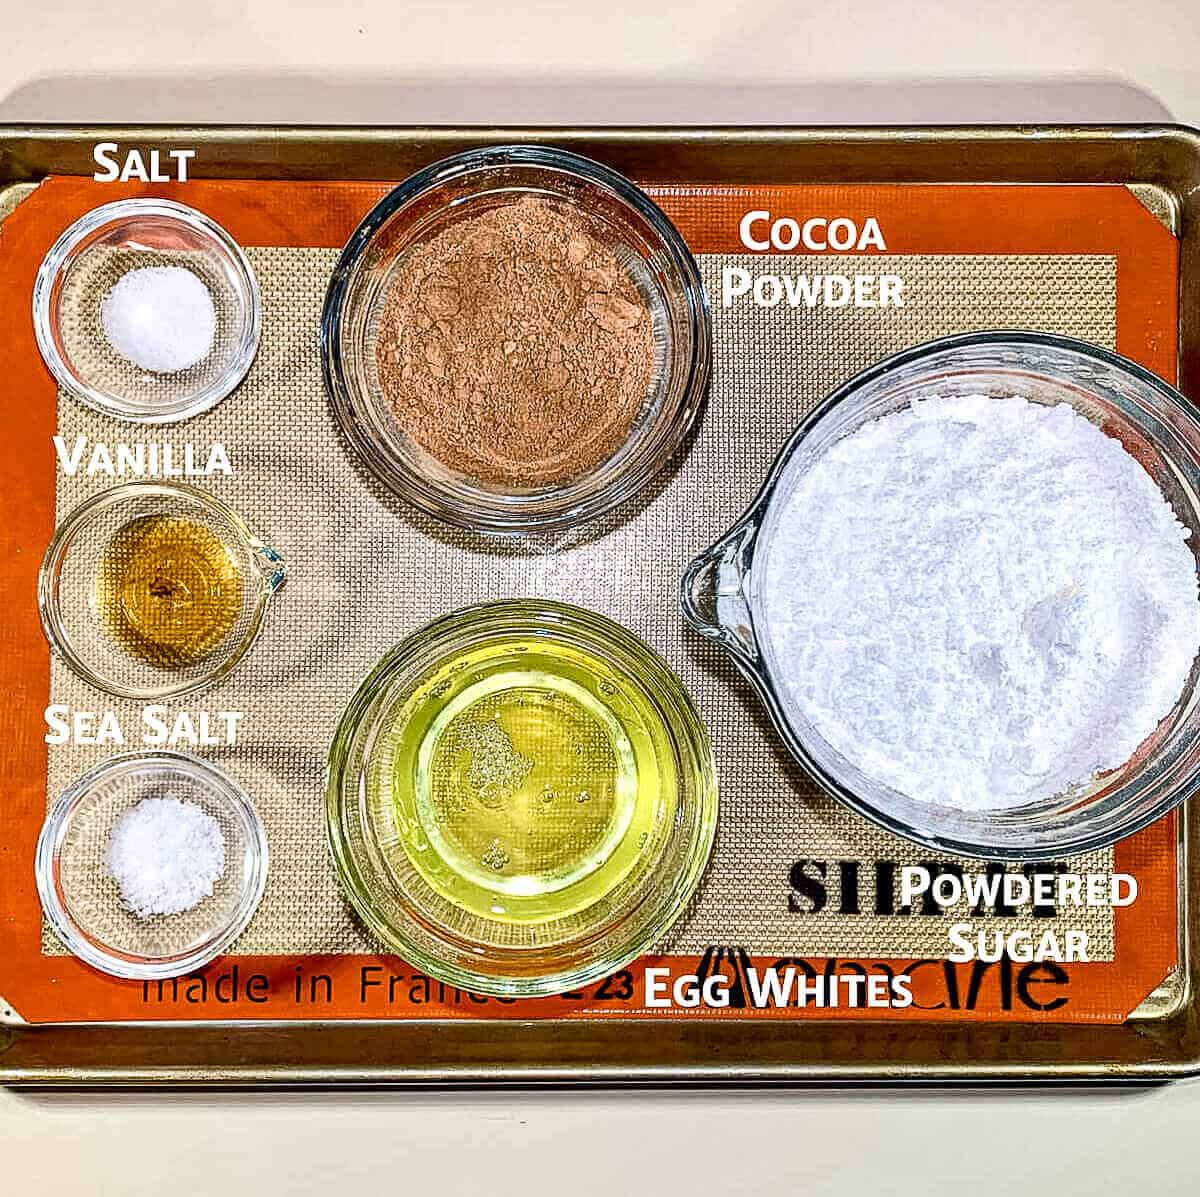
Ingredient Notes
The ingredients for a flourless chocolate cookie recipe are basic and are usually at hand. No special trips to the store are required. The cookies come together quickly. No mixer is needed since there's no butter to cream.
Cocoa powder: Any type of cocoa powder (natural or Dutch process can be used). For a deeper chocolate flavor, use dark chocolate cocoa powder.
Egg whites: Since we're not making a meringue, you don't have to be as careful separating the egg whites from the egg yolks - a little yolk won't hurt the cookie dough.
Ice cream: Store-bought ice cream is fine, but for a truly homemade ice cream sandwich, make your own vanilla ice cream. You can use any flavor ice cream you wish.
See the recipe card for a full list of ingredients and measurements.
How to make gluten-free ice cream sandwiches
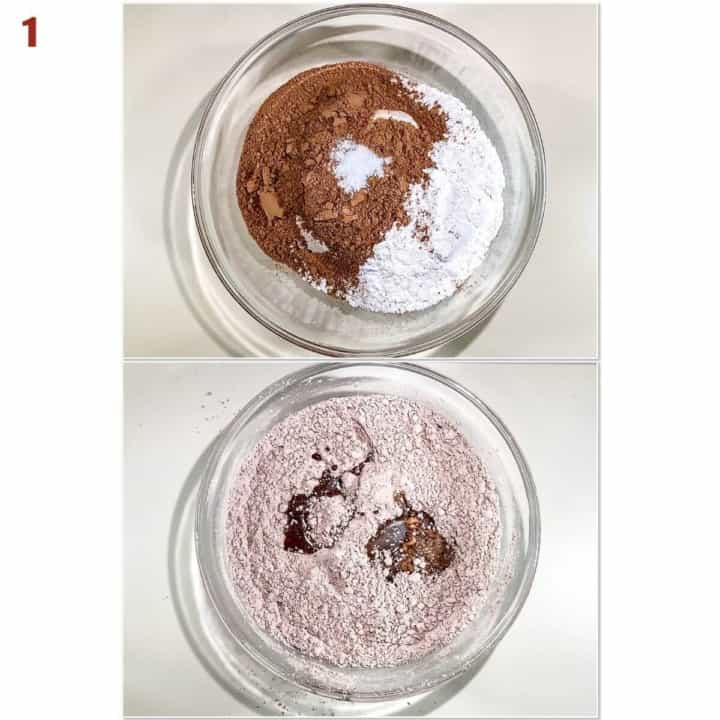
Step 1: Make the flourless cookie batter
Sift the powdered sugar and cocoa powder into a large bowl, then add the salt and whisk to combine.
Mix in the egg whites and vanilla extract until the batter is just moistened (photo 1). Don't over-mix the batter or it will stiffen. We're not trying to whip these egg whites as we would for a meringue.
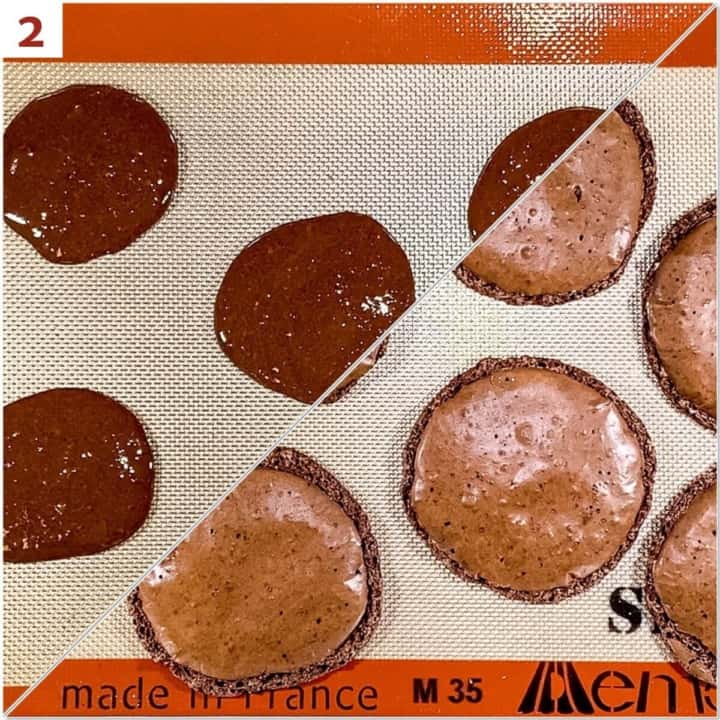
Step 2: Bake the cookies
Prepare two half sheet baking pans by lining them with a Silpat silicone mat or parchment paper. If you're using parchment paper, spray it with baking spray to ensure the cookies don't stick (yes, spray the parchment paper!).
Portion out two tablespoons of batter using a medium cookie scoop.
The batter is runny and should form into a circular shape easily. Give the cookies space to spread on the pan.
Let the batter dry
If you can spare the time, let the batter rest at room temperature on their baking pans for 30 to 60 minutes to dry before baking. Like with French Macarons, allowing the batter to dry out on the pan before baking gives them just the right amount of lift needed. If you don't have the 30 to 60 minutes needed, the cookies will be flatter but still useable.
Bake the cookies at 325˚F for 20 minutes, until the tops are glossy and lightly cracked, shifting the pans from front to back and top to bottom halfway through to ensure even baking (photo 2).
If desired, finish the cookies with a sprinkle of sea salt after the cookies come out of the oven.
Cool the cookies completely before moving them
Let the cookies cool completely on the baking pan before attempting to move them because they are fragile. If the cookies are warm at all, they might stick to the parchment and break apart on you. They'll be tasty, but unusable for ice cream sandwiches.
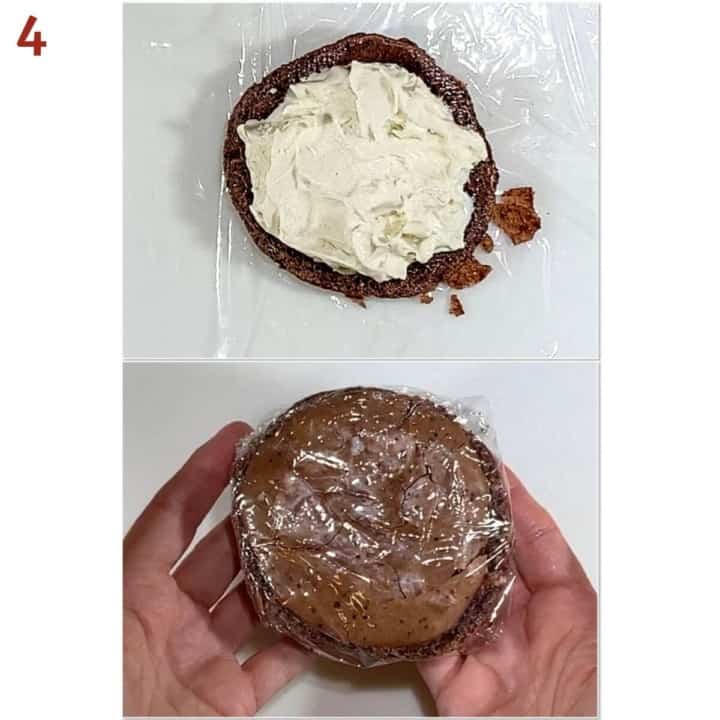
Step 3: Assemble the ice cream sandwiches
Lay a square of plastic wrap on the counter. Place one cookie upside down so the flat side is facing you. Gently place one ¼-cup scoop of ice cream (about 45 grams) in the center of the cookie (photo 3).

Why use plastic wrap?
Laying the first cookie on plastic wrap means you can wrap the sandwich before moving it. The wrap also helps hold the sandwiches together while the ice cream is still soft while freezing, and protects the crispy cookie exterior in the freezer.
Use a spreader to smooth the ice cream to the edges. Remember, flourless chocolate cookies are fragile on the outside so go slow and be gentle!
Place another cookie on top right side up.
Wrap the ice cream sandwich with the plastic and gently smoosh the two cookies together (photo 4).
Freeze the packaged ice cream sandwiches until they're firm, about an hour .
Dress up for a party
For a fun & festive look, roll the completed sandwiches in mini chocolate chips or sprinkles before freezing. Now they're ready for a party!
Storage and make-ahead instructions
Storage instructions: The assembled ice cream sandwiches, wrapped tightly with plastic wrap in an airtight bag, will keep in the freezer for a week or two.
Make-ahead instructions: The baked cookies stored in an airtight container for up to 3 days. You can freeze the cooled cookies in an airtight bag for 1 month.
You can also portion out the raw dough onto a baking pan, then freeze them until firm. Store in an airtight bag for up to 3 months. Bake them directly from the freezer (no need to thaw them first), just add about 1 to 2 minutes more of baking time.
Here's a better way to separate eggs
In regards to the egg whites, there are many ways to separate eggs. Usually I just dunk my hand into the bowl and fish out the yolks.
When I have a few to catch (and I want to be accurate), I use an egg separator. If you're careful how you break the eggs, this tool makes quick work of keeping the yolk whole. Then they're ready for another use like lemon curd, pudding, or maybe Boston Cream Pie.
Because you aren't making a meringue with the whites, it's ok if a little bit of the yolk gets in there. But if you are needing to whip up those whites into meringue, like when making macarons, then you have to be extra careful that no yolks break at all.
Luckily here we're ok.

Best ice cream flavors for ice cream sandwiches
You can use any flavor ice cream that suits your fancy. Using store-bought ice cream is fine, You can even use dairy-free ice cream for gluten-free dairy-free ice cream sandwiches.
I prefer the traditional combination of chocolate-cookies-and-vanilla-ice-cream, but coffee or cookies & cream are fun as well.
For a truly homemade treat, make your own homemade ice cream! I have some great homemade ice cream and gelato flavor to choose from:
- French Vanilla Ice Cream
- Chocolate Marshmallow Ice Cream (with mint and cookie crumbs)
- Fresh Strawberry Ice Cream (no eggs needed)
- Salted Caramel Swirl Gelato
- Double Chocolate Mint Chocolate Chip Gelato
Whatever you choose, it will be delicious!
Ice cream sandwich troubleshooting
Here are some issues you might encounter when making homemade ice cream sandwiches:
- My cookies cracked while assembling: Flourless chocolate cookies are delicate around the edges. Let the ice cream soften slightly and spread it gently instead of pressing the cookies together.
- My ice cream melted too quickly: Work with only a few cookies at a time and return assembled sandwiches to the freezer immediately.
- My cookies stuck to the parchment: The cookies may not have cooled completely. Let them cool fully before attempting to remove them.
- My sandwiches are too hard to bite: Let them sit at room temperature for 3 to 5 minutes before serving so the ice cream and cookies soften slightly.
Questions asked and answered
Here are some questions you might have...
Most traditional ice cream sandwiches are not gluten-free because the chocolate wafers contain wheat flour. However, homemade gluten-free ice cream sandwiches are easy to make using flourless chocolate cookies or gluten-free chocolate wafers.
Yes. While the flourless chocolate cookies give these sandwiches their signature chewy texture, you can use your favorite gluten-free chocolate cookies as a shortcut. Choose cookies that are sturdy enough to hold the ice cream without crumbling.
Flourless chocolate cookies develop a delicate crisp exterior with a chewy center. Make sure to let them cool completely before removing them from the baking sheet, and handle them gently when assembling the sandwiches.
Instead of wheat flour, these cookies rely on egg whites, cocoa powder, and powdered sugar for their structure. As long as the ingredients are certified gluten-free, the cookies are naturally gluten-free.
Yes. This gluten-free cookie recipe are made without walnuts, unlike many flourless chocolate cookie recipes. Just double-check that your ice cream and any toppings used are nut-free as well.
Didn't find the answer you're looking for?
Ask AI to answer for this specific recipe:
Disclaimer: I am not responsible for the quality of AI information

I hope you like this recipe! Let me know if you have any questions, and don't forget to leave a comment and rating. Thanks!
Slainté! L'chaim! Cheers!
- Tammy
More gluten-free recipes to try

Recipe

Homemade Gluten-Free Ice Cream Sandwiches
Equipment
- ice cream scoop
- spreader
Ingredients
- 3 cups powdered sugar
- ⅔ cup cocoa powder, natural or dutch-process
- ½ teaspoon kosher salt
- 4 large egg whites, at room temperature
- 1 tablespoon pure vanilla extract
- sea salt flakes, optional
- 1½ cups vanilla ice cream, softened, see Recipe Notes
Instructions
- Position two racks in the upper and lower thirds of the oven and preheat temperature to 325 °F.
- Line two half sheet baking pans with a Silpat silicone mat or parchment paper. If you're using parchment paper, spray it with baking spray to ensure the cookies don't stick. (Yes, spray the parchment paper!)
- Make the cookies: Sift 3 cups powdered sugar and ⅔ cup cocoa powder into a large bowl, then add ½ teaspoon kosher salt and whisk to combine.
- Mix in 4 large egg whites and 1 tablespoon pure vanilla extract until the batter is just moistened. Don't over-mix the batter or it will stiffen (we're not trying to whip these egg whites as we would for a meringue).
- Scoop two tablespoons of the batter onto the baking pans in evenly spaced circles using a medium cookie scoop. If you can spare the time, let the batter rest at room temperature on their trays for 30 to 60 minutes to dry before baking.
- Bake the cookies for 20 minutes until the tops are glossy and lightly cracked, shifting the pans from front to back and top to bottom halfway through to ensure even baking.
- If desired, finish the cookies with a sprinkle of sea salt flakes after the cookies come out of the oven. Let the cookies cool completely before removing them from the pan.
- Assemble the ice cream sandwiches: Allow 1½ cups vanilla ice cream to soften at room temperature, about 5 to 10 minutes.
- Lay a square of plastic wrap on the counter. Place one cookie upside down so the flat side is facing you. Gently place one ¼-cup scoop of ice cream (about 45 grams) in the center of the cookie and use a spreader to smooth the ice cream to the edges. Remember, flourless chocolate cookies are fragile on the outside so go slow and be gentle!
- Place another cookie on top right side up. Wrap the ice cream sandwich with the plastic and gently smoosh the two cookies together. Repeat with the rest of the cookies.
- Wrap the assembled sandwich in the plastic wrap and and freeze until firm, about an hour. Enjoy!
- Storage instructions: The assembled ice cream sandwiches, wrapped tightly with plastic wrap in an airtight bag, will keep in the freezer for a week or two.
- Make-ahead instructions: The baked cookies stored in an airtight container for up to 3 days. You can freeze the cooled cookies in an airtight bag for 1 month.You can also portion out the raw dough onto a baking pan, then freeze them until firm. Store in an airtight bag for up to 3 months. Bake them directly from the freezer (no need to thaw them first), just add about 1 to 2 minutes more of baking time.


Comments
No Comments