
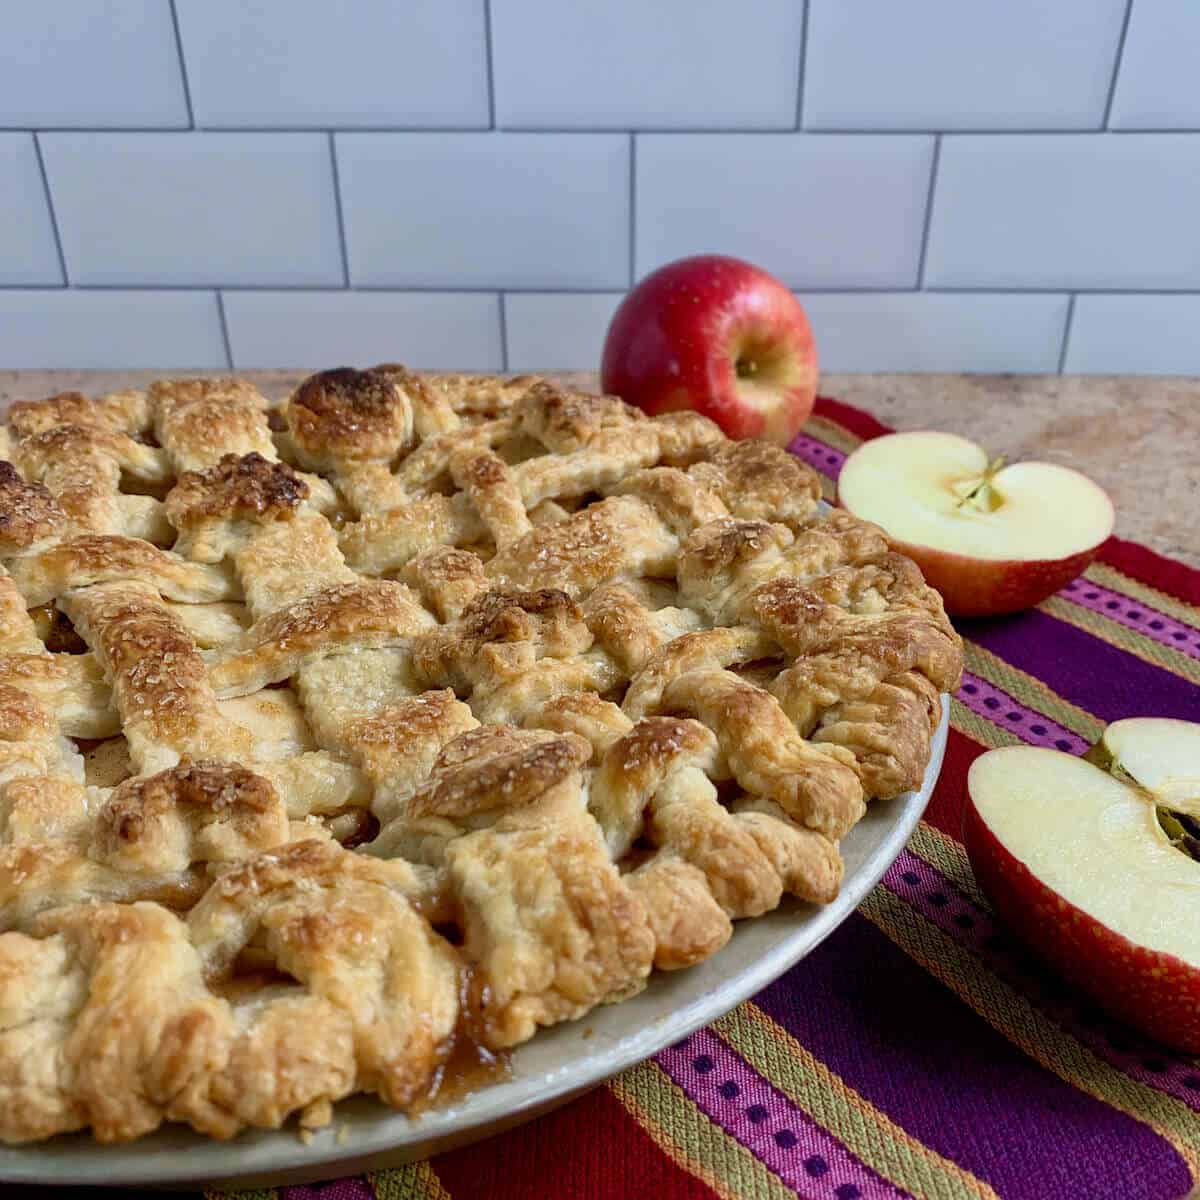
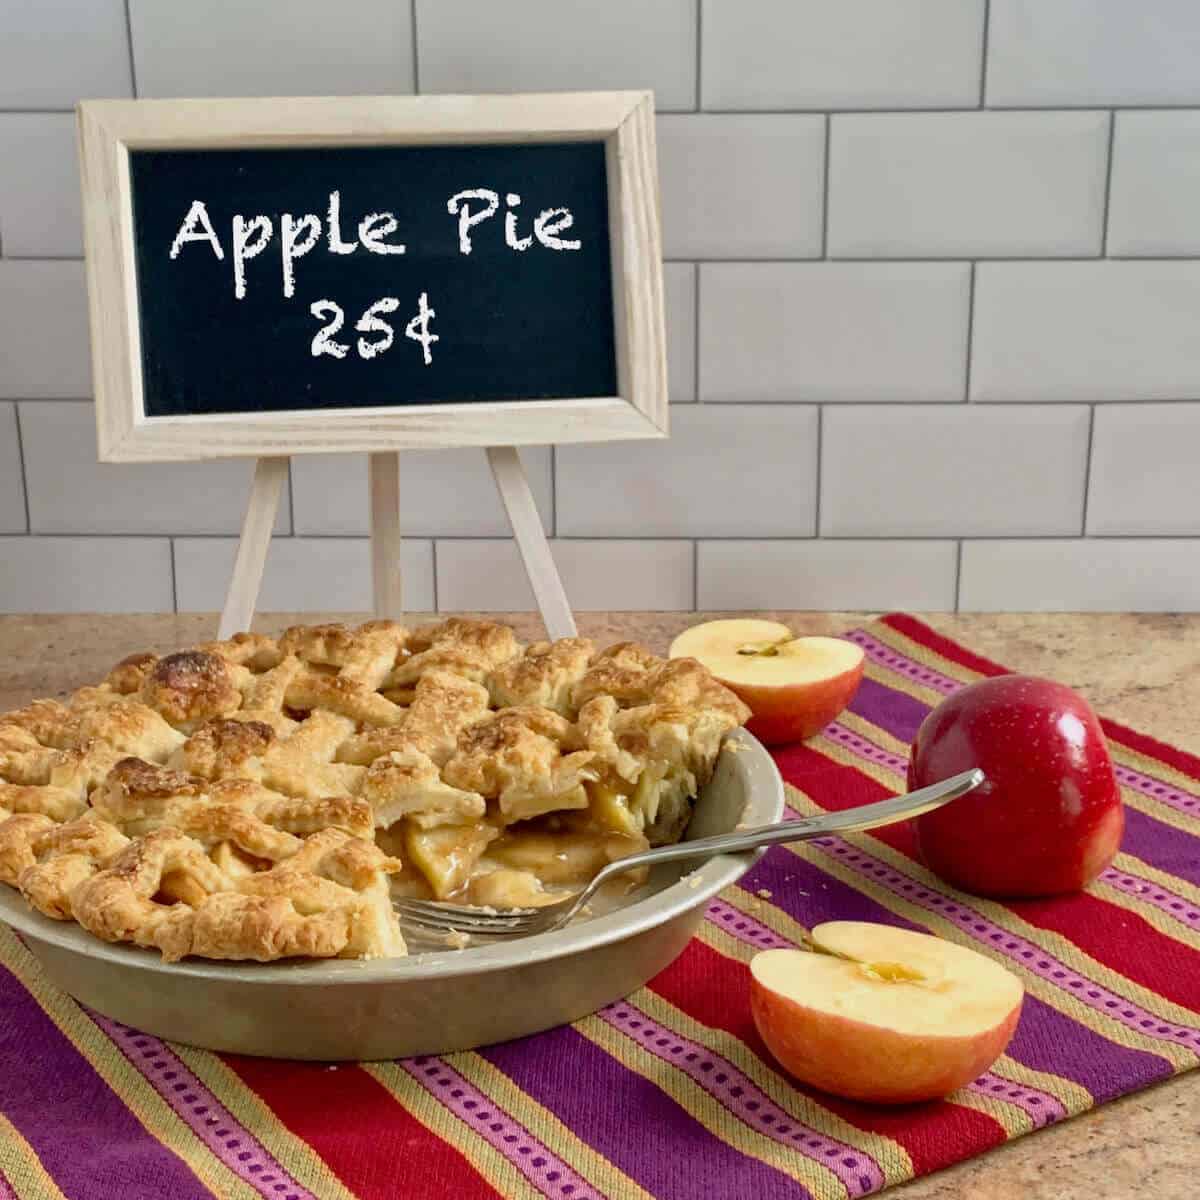
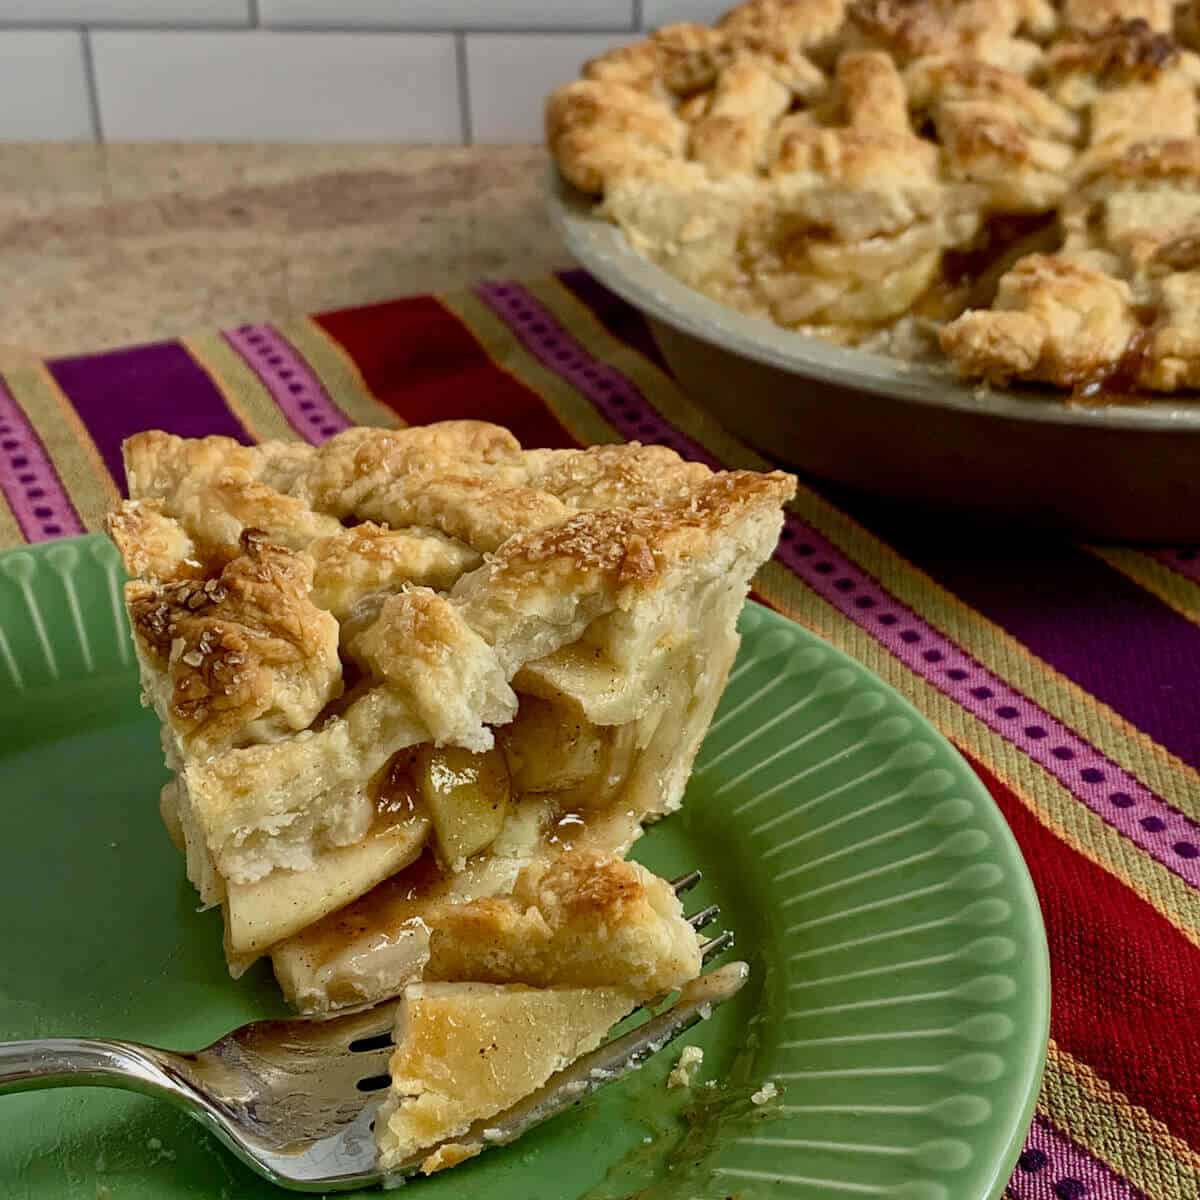
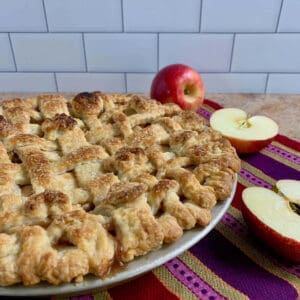
Move over bland apple pie, here's a pretty lattice apple pie bursting with intense apple flavor! The secret is including boiled apple cider and a blend of spices in the filling. This apple pie recipe is an all-around winner!
Jump to:
Why this recipe works
- Boiled apple cider gives this lattice apple pie an extra boost of apple flavor
- Using a blend of apple pie spices gives the filling a more complex flavor than cinnamon alone
- Weaving a lattice top makes the pie pretty while allowing steam to escape, and is easier to do than you think!
It's Fall, and that means baking pies. Pumpkin pies, pecan pies, and the combo, Praline Pumpkin Pie.
However, nothing says Fall more than a delicious apple pie. All those wonderful varieties of Autumn apples available just beg to be baked into pie.
But sometimes those pies fall short with their bland apple filling. You know, no apple flavor, or maybe a pinch of cinnamon flavor in the background.
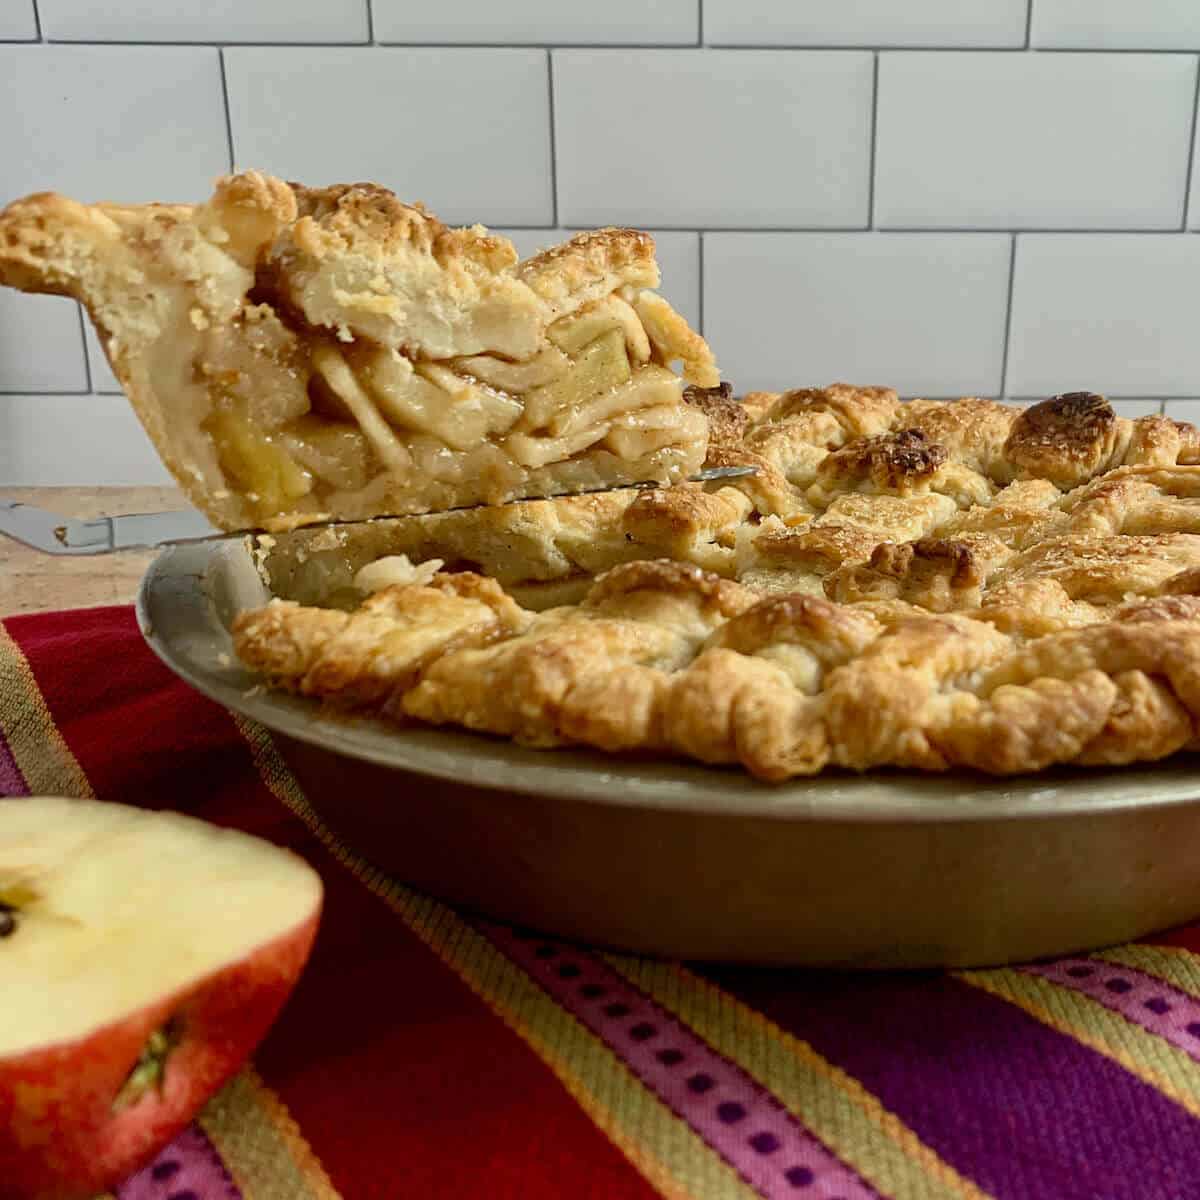
Have no fear, I'm here to save you from boring apple pie! This pretty lattice apple pie recipe features my favorite secret apple ingredient, boiled apple cider. Add in a mix of your own apple pie spice for a flavor kick and an all-butter crust, and you've got a winning apple pie recipe at hand!
And the taste? Robust apple flavor from the boiled cider, and the spice mix gives a distinctive kick that cinnamon alone can't provide. The all-butter crust is tender and flaky, a perfect counterpoint to the spicy filling.
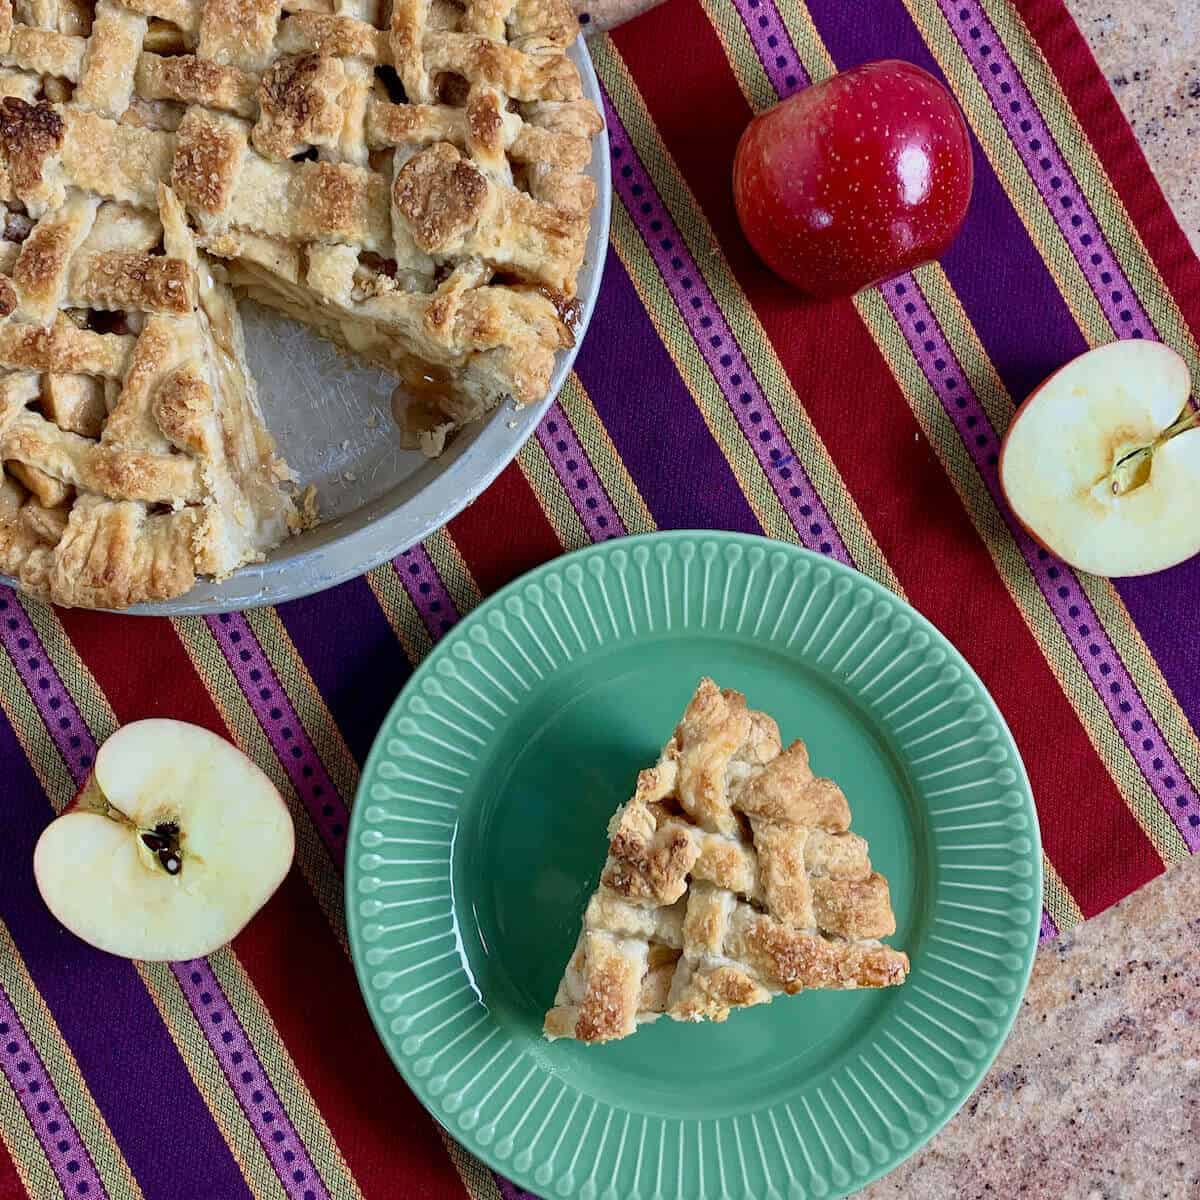
Served warmed, all a lattice apple pie needs is a scoop of vanilla ice cream to complete the picture!
⭐⭐⭐⭐⭐
Truly delicious!
- Shira
Recipe Ingredients
You'll need the following ingredients to make this apple pie recipe:
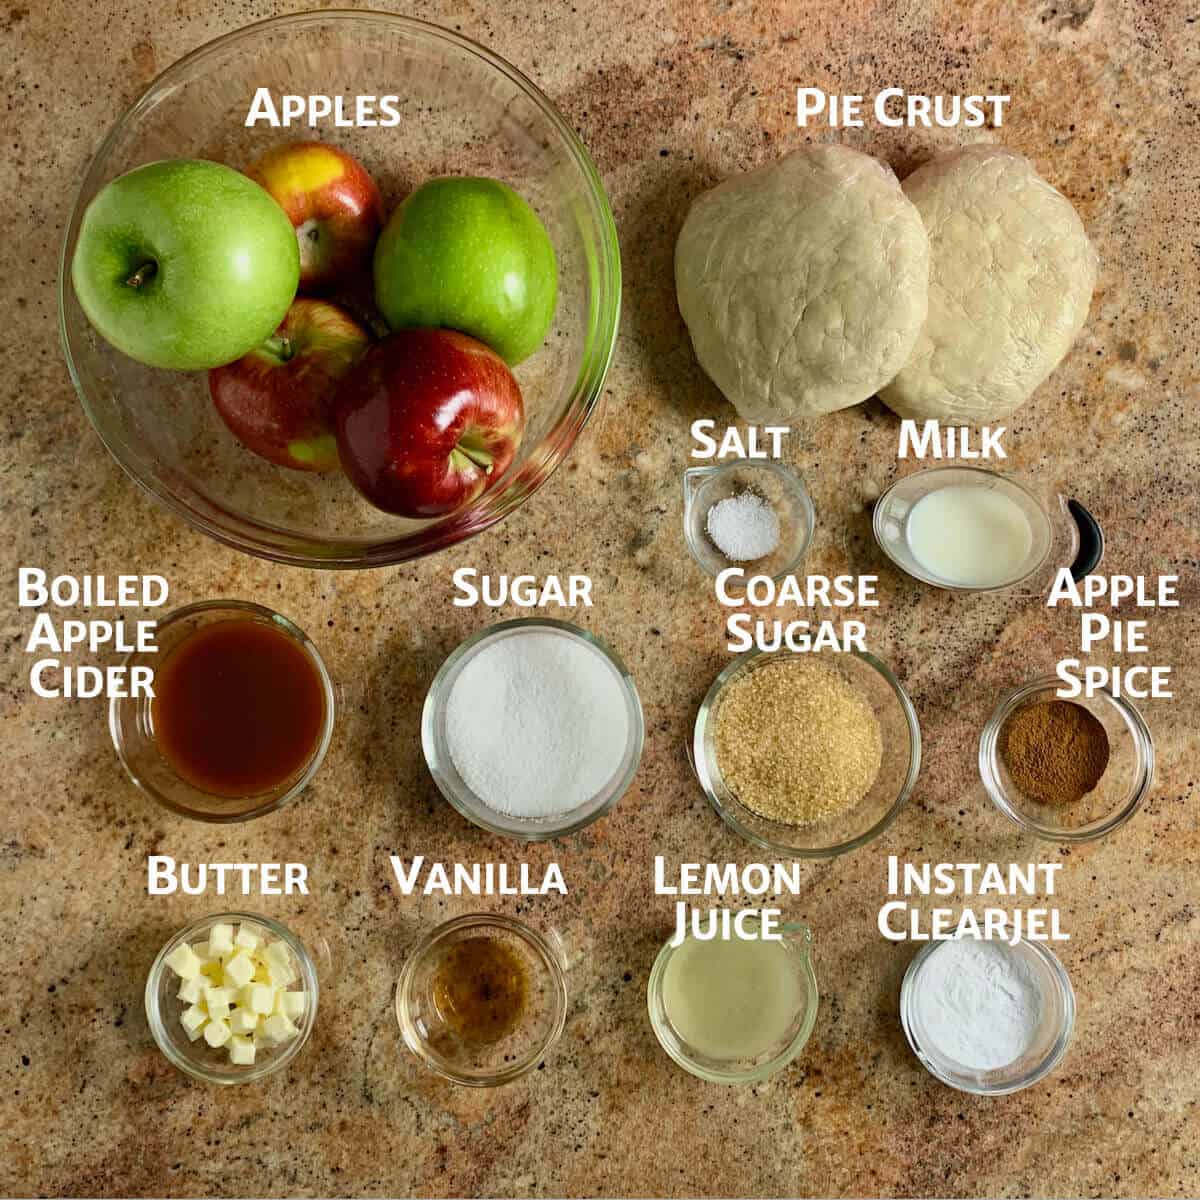
Ingredient Notes
Apples: What type of apples to use? Your favorite baking apples, of course! You want to use apples (either solo or in combinations) that will be sweet and tart but won't turn to mush when baking. I use Granny Smith and Empire, and Epicurious suggests Honeycrisp and Braeburn apples. Need more inspiration? Check out The very best pie apples from King Arthur Baking.
Boiled apple cider: What really takes this apple pie from good to great is the boiled apple cider. This product concentrates all the apple goodness in the cider, and using it intensifies the overall apple flavor of the pie. You can buy it ready made, but making it at home is super simple. All you need is fresh apple cider and some time.
If boiled cider isn't available, you can always use thawed frozen apple juice concentrate as a substitute.
Apple spice mix: Making your own apple pie spice mix blend of cinnamon, nutmeg, and cardamom gives this pie complex spice notes. If you prefer, you can use 1½ teaspoons of store bought apple pie spice instead.
Thickener: Instant ClearJel is a thickener that helps keep the filling from being overly wet. You can also use ¼ cup flour or 2 tablespoons cornstarch instead.
Pie crust: You'll need a pie crust for a double crust pie. My favorite is my all-butter pie crust, using a double crust 12 : 8 : 4 recipe ratio of flour, butter, and water (by weight), and sweetened with 2 to 3 tablespoons granulated sugar. You can, of course, use any type of homemade or store-bought pie dough you prefer.
See the recipe card for a full list of ingredients and measurements.
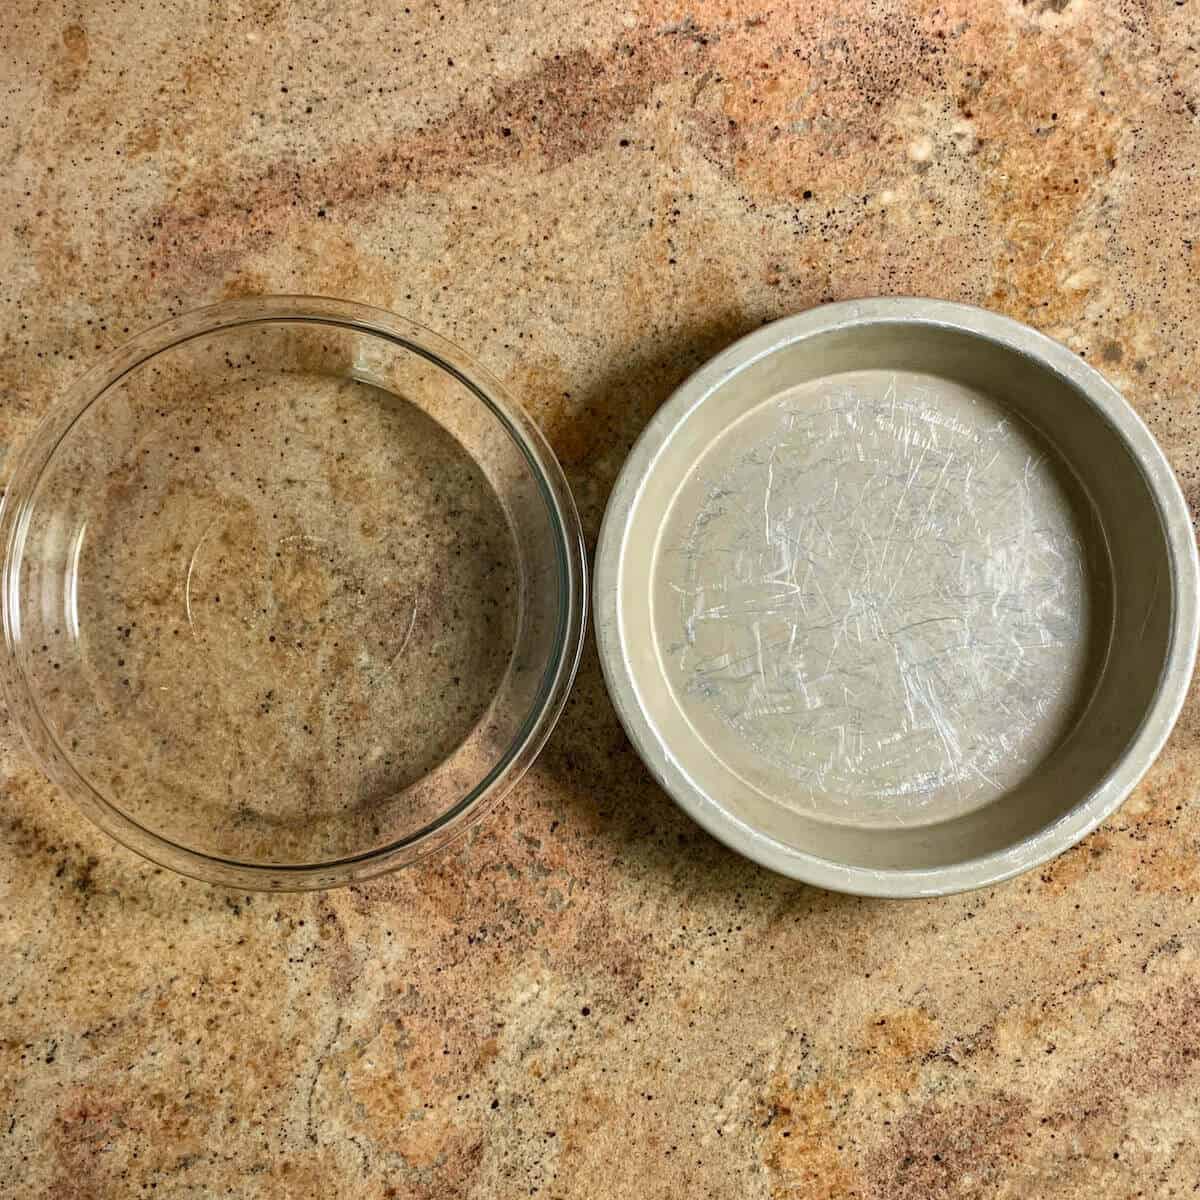
Selecting the right pie pan
Ah the great debate...glass vs. metal? Which pie pan to use?
A glass pie pan is great because its clear bottom allows the radiant heat from the oven to bake the bottom of the pie, especially if you're baking at lower temperatures. Also, it's easy to see that the pie crust is done.
The downsides are that glass dishes take longer to reach the oven temperature allowing a juicy filling to soak the bottom. Plus, they can't go directly from the freezer to the oven because they're not designed to withstand that kind of thermal shock and can break.
A metal pie pan conducts heat better than glass, especially at high temperatures, so it can go from cold to hot quickly without thermal shock issues. That's why starting the pie at a higher temperature works for this apple pie. On the downside, you can't see if the crust is fully baked as you can with glass.
If you do choose to bake in a glass pie pan, don't grease the pan, and reduce the oven temperature by 25°F.
How to make the best apple pie
Step 1: Prepare the pie crust
Prepare pie dough for a double crust pie. Divide the dough in half and chill, wrapped in plastic, until ready to use.
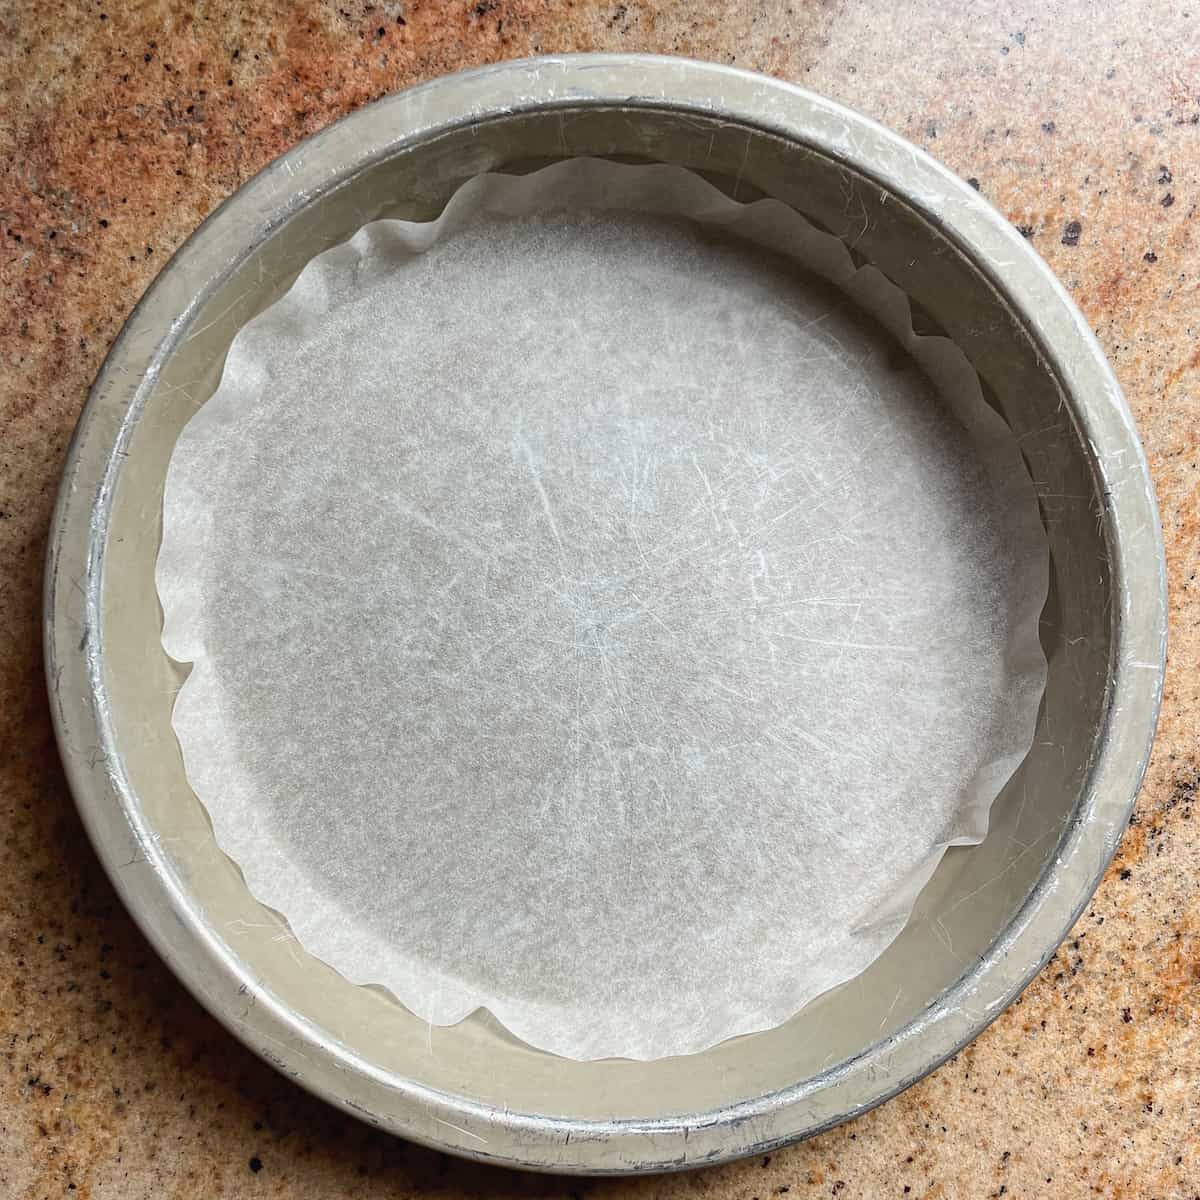
If you plan on freezing the whole unbaked pie, see these instructions. Otherwise, roll out one of the dough portions and ease it into a 9-inch pie pan (see the discussion below on choosing the type of pie pan to use). Gently settle the dough into the pan and trim the overhang to about 1-inch, setting aside any scraps. Chill the pie shell and the remaining dough while you make the filling.
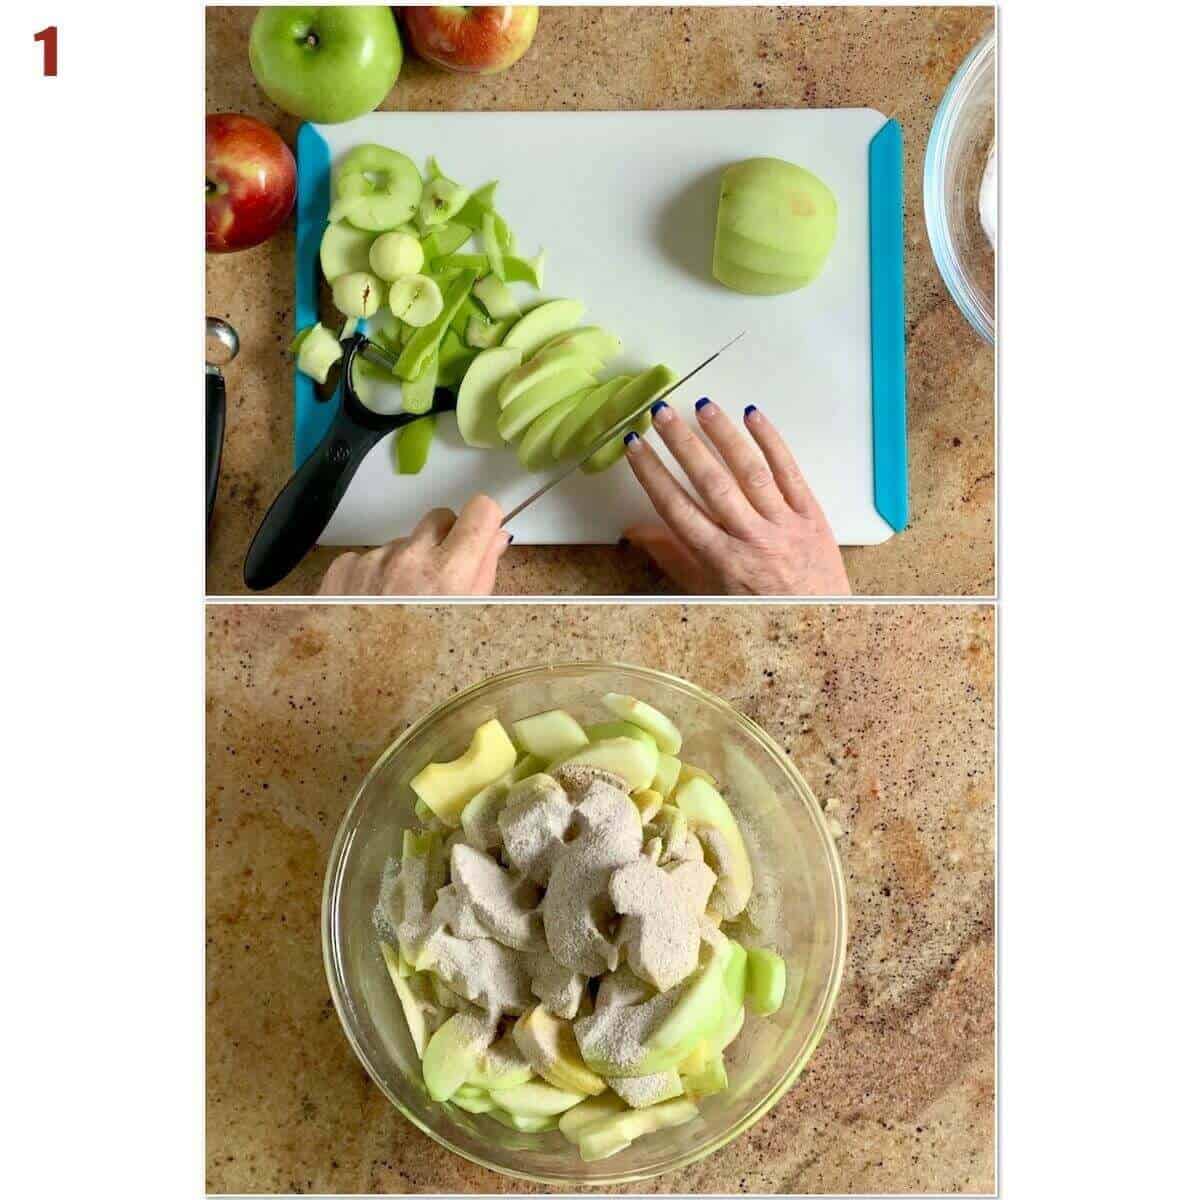
Step 2: Slice the apples
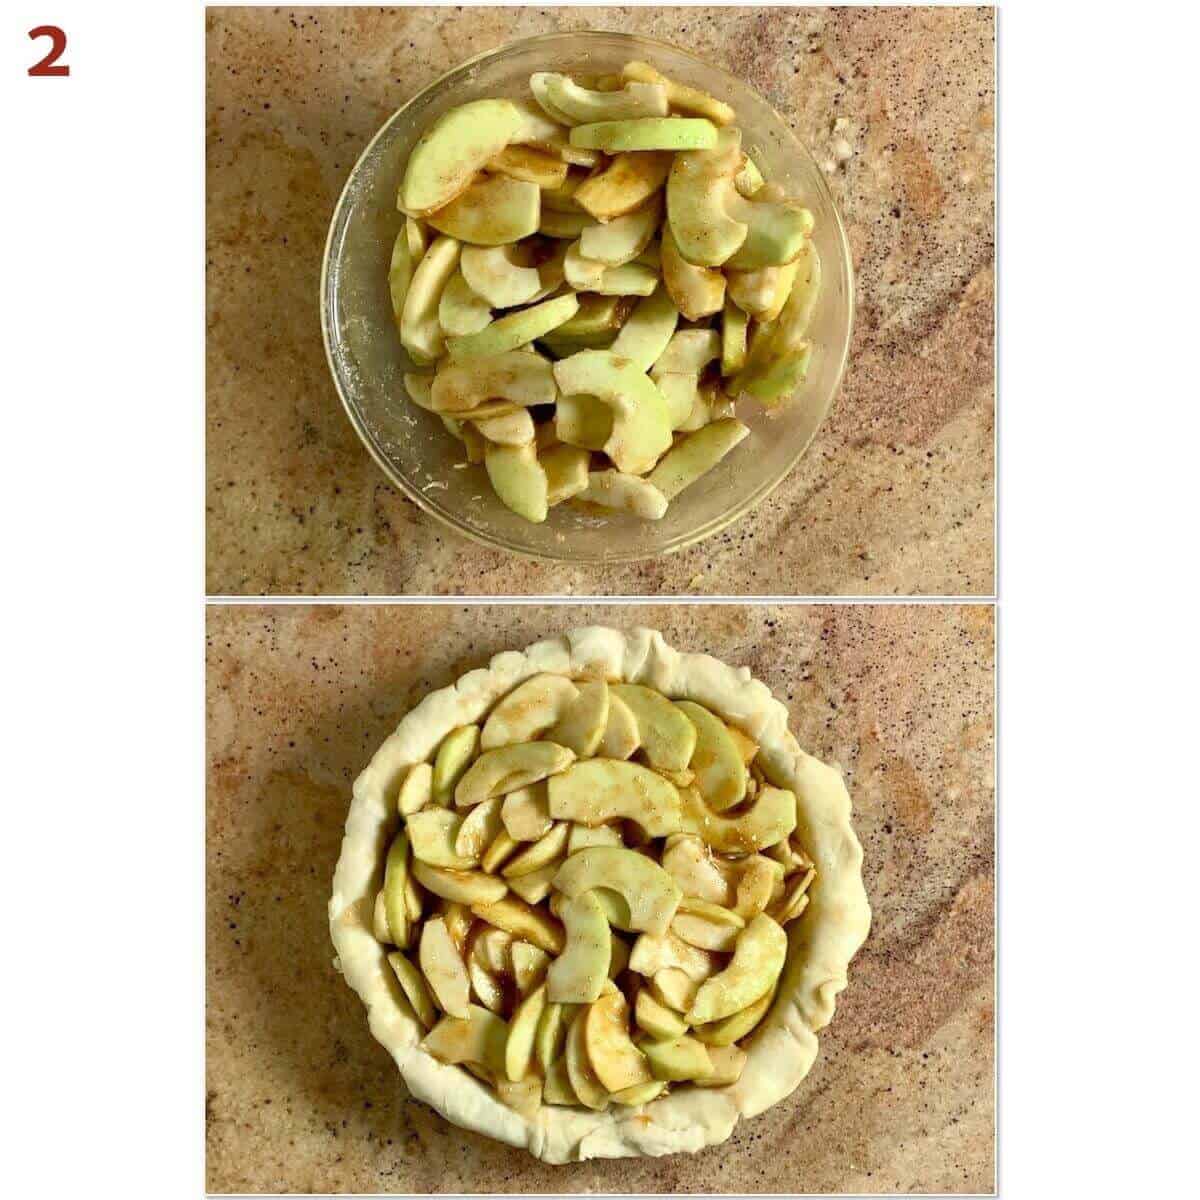
Peel, core, and slice the apples into ¼-inch thick wedges. Place apples in a large bowl and stir in the lemon juice to coat. Whisk together the sugar, Instant ClearJel (or your thickener of choice), spices, and salt, then sprinkle the mixture over the apple slices (photo 1).
If you have an apple peeler/corer/slicer, you can prep the apples in a single step. Otherwise, a serrated peeler will make quick work of peeling the apples, and a melon baller is a good way to scoop out the core. Using a mandolin slicer speeds up the slicing and insures uniform pieces. Just be careful with the sharp blade, and make sure you use the food guard!
Step 3: Fill the pie shell
Fold in the boiled cider (or apple juice concentrate) and the vanilla extract, then transfer the pie filling to your chilled bottom crust (photo 2).
Distribute the butter cubes over the top of the apples, then return the pie to the refrigerator while you prepare the lattice.
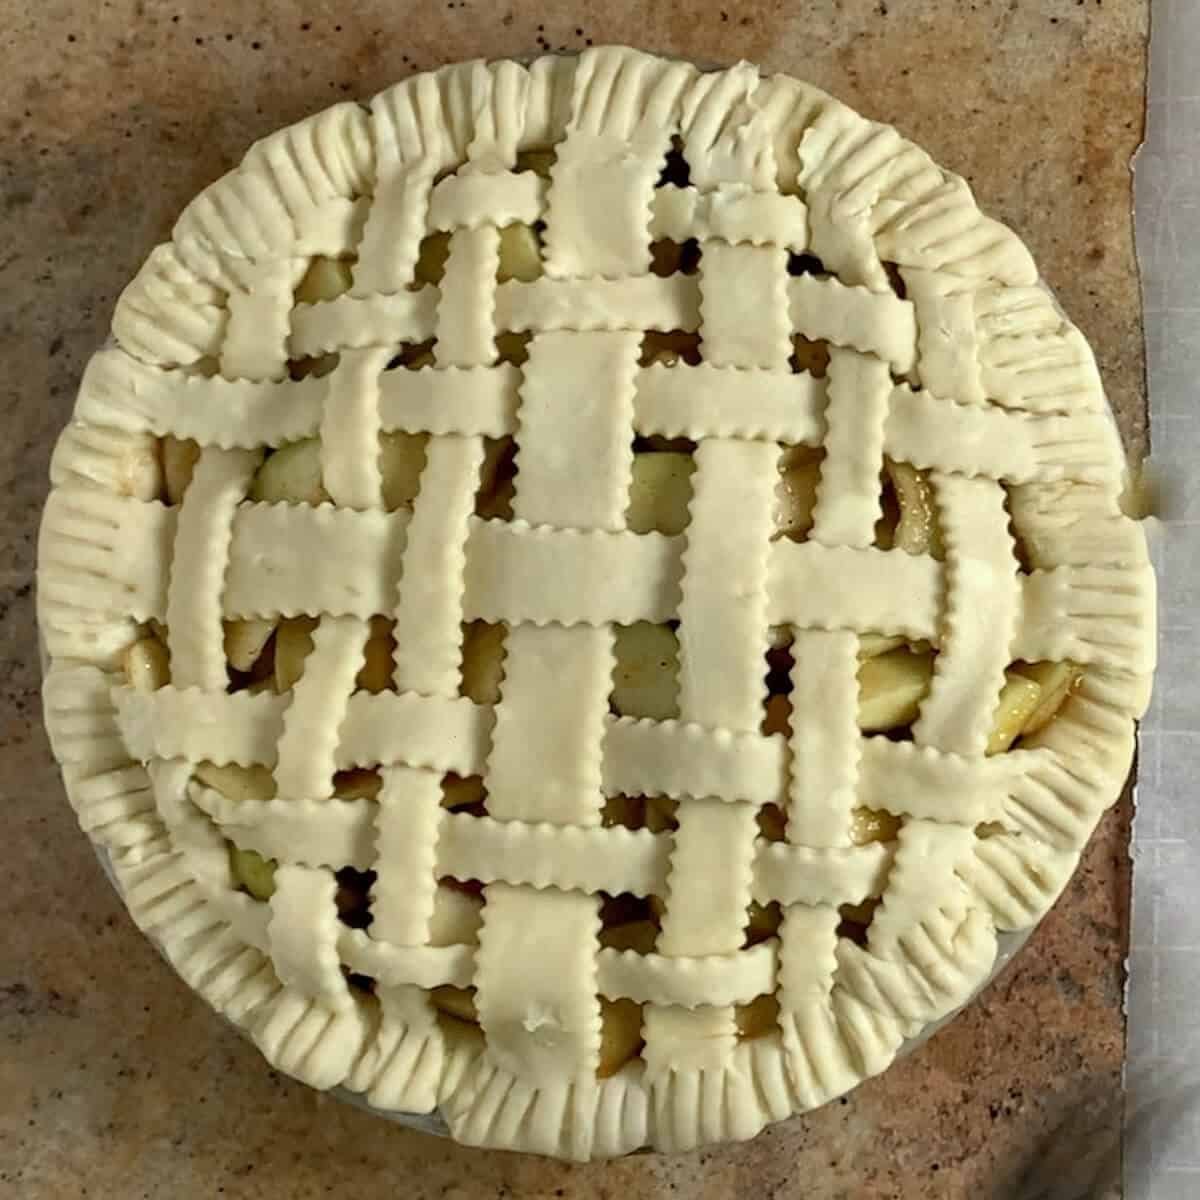
Step 4: Weave the lattice top
Roll out the second dough disc on a floured surface into a 12-inch circle. Using a pastry wheel, pizza cutter, or sharp knife, cut the rolled-out dough into strips 1- to 2-inches wide, or to your desired width.
Remove the pie from the refrigerator and make a lattice crust by weaving the dough strips over and under each other, pulling back alternating strips to make the weave. See how to make a lattice pie crust for step-by-step instructions and pictures.
Step 5: Crimp the edges and glaze the top
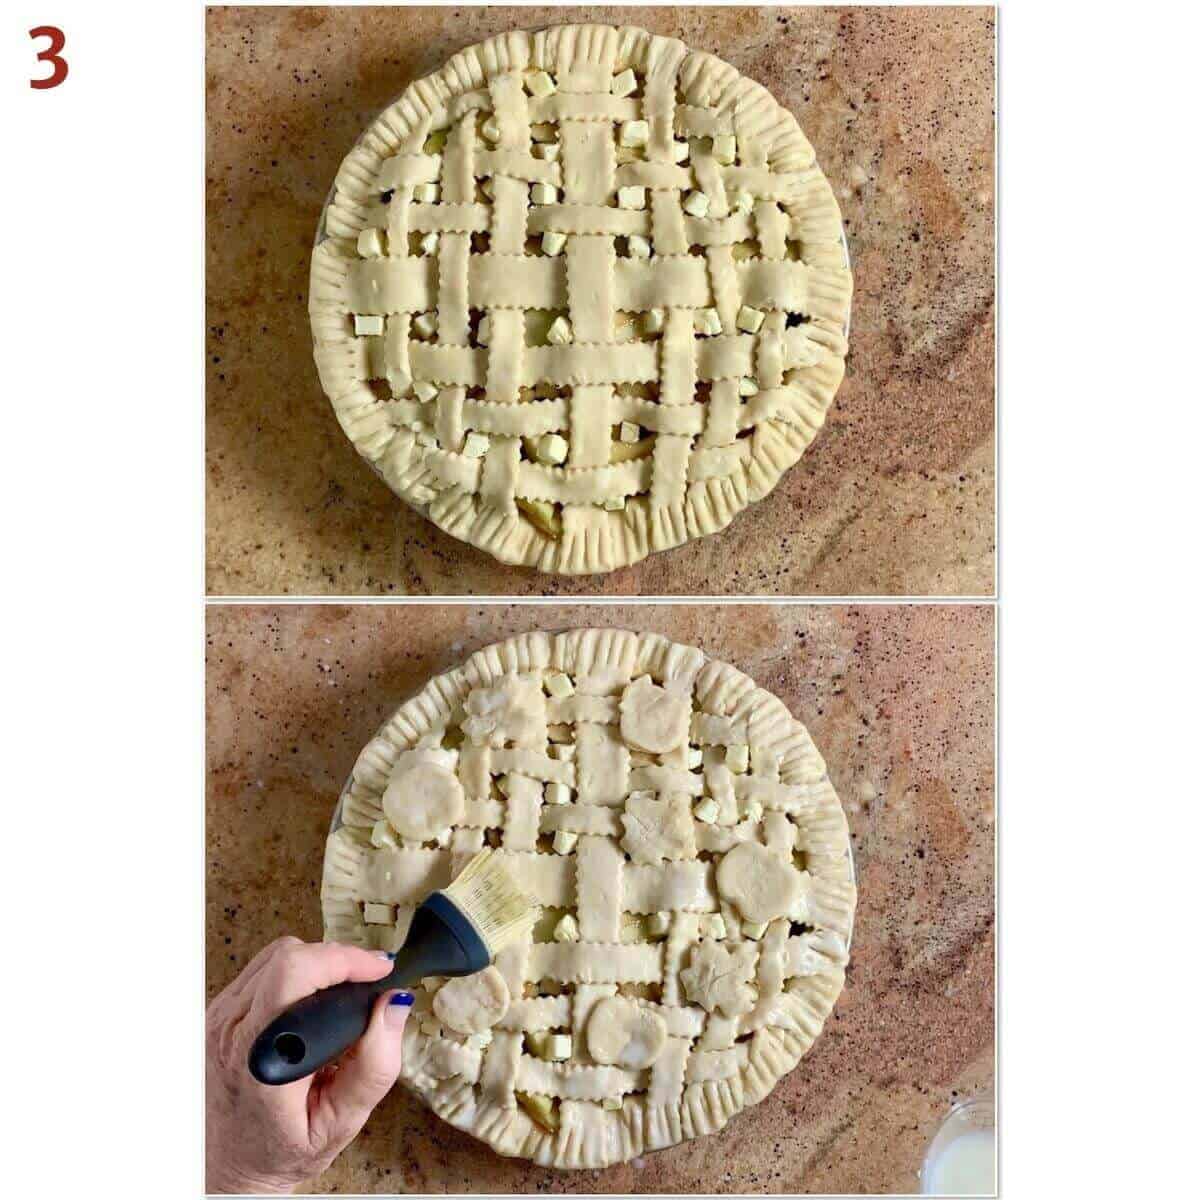
Press the edges of the strips into the bottom pie crust edges to seal, then tuck the overhang under itself and press down to create the edge. Smooth around the edges for a neater appearance, then crimp the edges with a fork or your method of crimping. You can use any dough scraps to roll out and cut decorative shapes.
To create a shiny glaze on the finished crust, brush the lattice and edges with milk or an egg wash with a pastry brush. If you made decorations, place them on top of the lattice and glaze them as well (photo 3). For added crunch, sprinkle the pie with coarse sugar.
Step 6: Bake the pie
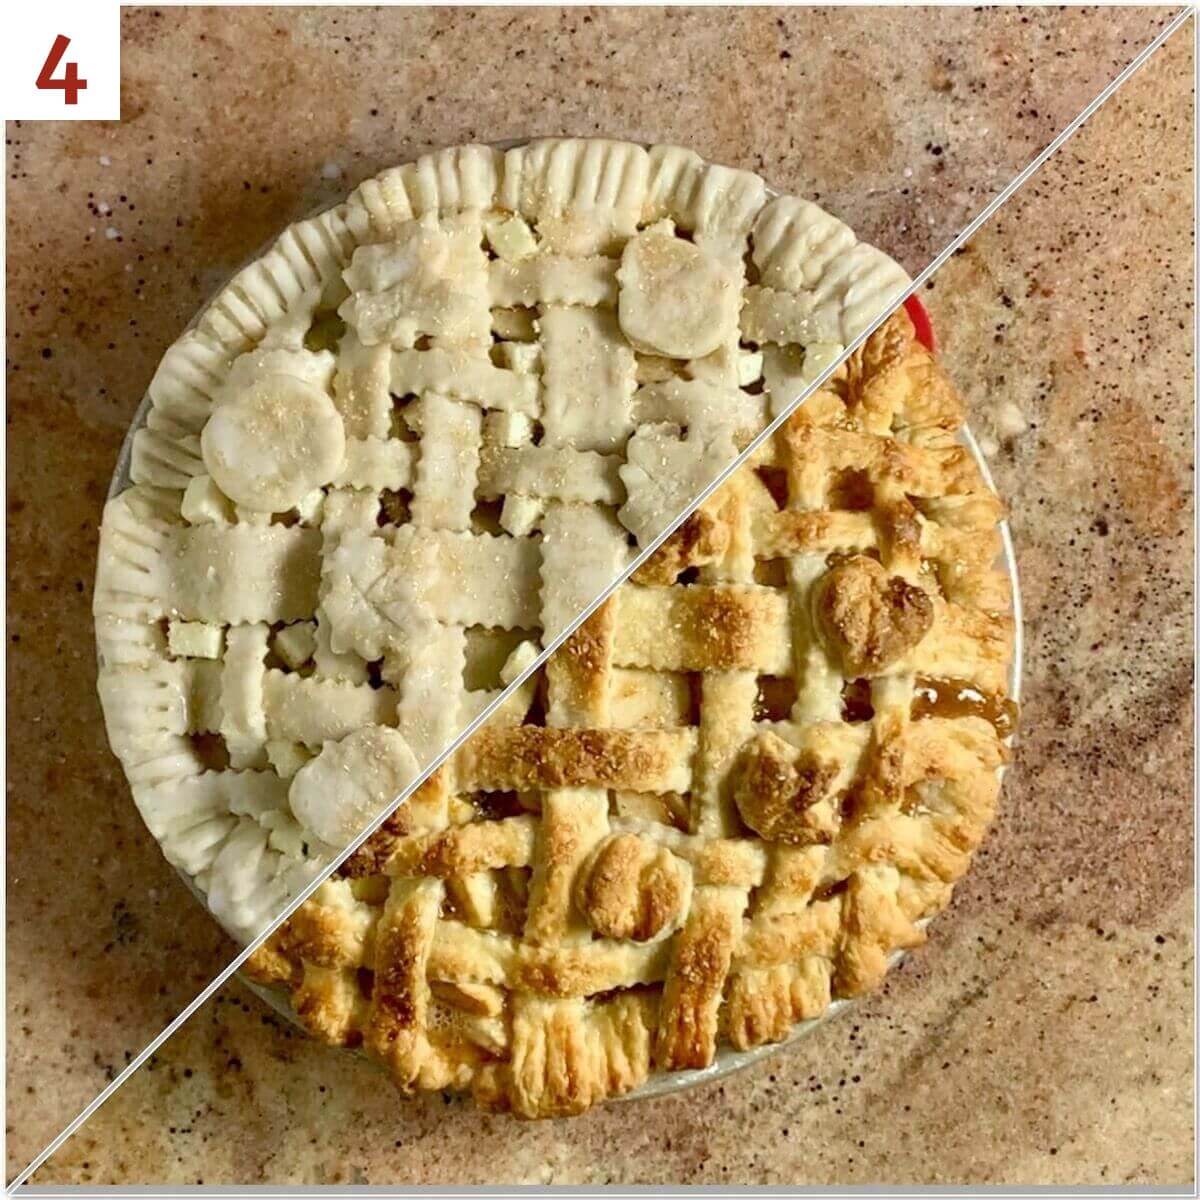
Place a half sheet baking pan lined with a Silpat silicone mat or parchment paper on the lowest oven rack in the oven as it preheats. Place the pie on the preheated baking pan and bake at 425°F for 20 minutes until the crust begins to turn golden (photo 4). Cover the edges of the pie with a pie shield or foil to keep them from browning too quickly, if necessary.
Rotate the baking pan, move it to the center rack, and reduce the oven to 375°F. Continue baking for 40 to 45 minutes more until the crust is golden brown and you can see the thickened juices bubbling.
Step 7: Cool before slicing
Remove the pie from the oven and allow it to cool completely on a wire rack for 3 to 4 hours to allow juices to set before slicing. You don't want those juices all over your plate instead of in your pie, so be patient.
Storage and make-ahead instructions
Storage instructions: Store the pie for a day or so at room temperature. Alternatively, cover and refrigerate it for up to 5 days, or wrap it well and freeze for longer storage.
Make-ahead instructions: Homemade pie dough can be made up to 3 days in advance and chilled, or frozen for up to 3 months (thaw overnight in the refrigerator before using).
How to freeze an unbaked fruit pie
Did you know that you can assemble a fruit pie and freeze it to bake later? It's true! I learned about this tip on King Arthur Baking. You can, of course, freeze a pie in its pie pan, well wrapped with plastic wrap and foil, but that ties up your pie pan until that pie is baked. Instead, you can store the frozen pie without its pie pan. Here's how:
- Start by spraying the pie pan with baking spray, then lining the bottom with parchment paper. Proceed with the recipe to prepare the pie.
- When making the filling, add a little extra ClearJel or cornstarch to soak up any extra juices from the pie being frozen.
- Place the assembled, unbaked pie (in its pan) in the freezer, and freeze until solid, about 2 to 3 hours.
- Remove the pie from the freezer. Remove it from the pie pan (you can set the pan in a slightly larger pan of warm water, to thaw the underside just a bit), then peel away the parchment paper.
- Wrap the pie in 2 layers of plastic wrap and a layer of foil, then place back in the freezer.
- The night before you're ready to bake the pie, unwrap it and place it back in its pie pan.
- Defrost the pie overnight in the refrigerator, covered with plastic wrap propped by a couple of toothpicks to keep it from sticking to the top crust.
- Brush the defrosted pie with egg wash and proceed with baking as usual.
You can store the frozen, unbaked pie for several months. Note: this method works for fruit pies (perfect for blueberry pie!), but not egg- or milk-based fillings (like pecan pie or pumpkin pie).
Questions asked and answered
Here are some questions you might have...
The main culprit to a soggy-bottomed pie is moisture. If your filling is too wet, that liquid will soak into the pie crust before it has a chance to set.
For a double crust pie (like fruit pies), make sure the filling doesn't have too much liquid. You can mix a thickener into the filling (like Instant ClearJel, flour, or cornstarch). Another option is to place the filling in a large colander and allow the juices to drain into a bowl. Reduce the drained juices by half in a small saucepan, fold the resulting syrup into the filling, then transfer to a chilled pie shell.
Generally speaking, you don't have to grease the pie pan because the high fat content in the pie dough should keep it from sticking. However, if you want to be doubly sure, you can lightly spray the pie pan with baking spray to make serving the pie easier after it's baked and cooled.
However, if you want to be able to freeze an unbaked fruit pie without having to tie up your pie pan, you will want to spray the pan first and line it with parchment paper before lining it with the bottom crust.
Didn't find the answer you're looking for?
Ask AI to answer for this specific recipe:
Disclaimer: I am not responsible for the quality of AI information

I hope you like this recipe! Let me know if you have any questions, and don't forget to leave a comment and rating. Thanks!
Slainté! L'chaim! Cheers!
- Tammy
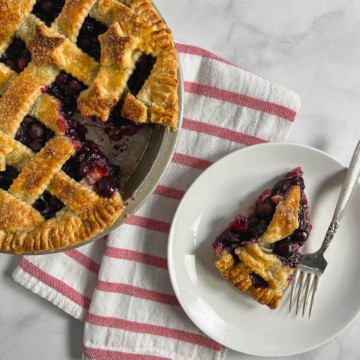
More pie, tart, & cobbler recipes to try
Recipe
Lattice Apple Pie
Equipment
Ingredients
For the crust
- 1 recipe double pie crust, or store bought, see Recipe Notes
For the filling
- 7 to 8 cups apples, peeled, cored, and sliced, about 3 pounds or 4 to 5 large apples, see Recipe Notes
- 2 tablespoons lemon juice
- ½ cup granulated sugar, or to taste
- 1½ tablespoons Instant ClearJel, see Recipe Notes
- 1½ teaspoons apple spice mix, see Recipe Notes
- ¼ teaspoon kosher salt
- ¼ cup boiled apple cider, or thawed apple juice concentrate
- 2 teaspoons pure vanilla extract, optional
- 2 tablespoons unsalted butter, small dice
For the topping
- 2 tablespoons milk, or egg wash (1 egg beaten with 1 tablespoon of water)
- 2 tablespoons coarse sugar
Instructions
- Prepare the crust: Prepare a double crust pie (or use a store-bought double crust pie dough), using a double crust 12 : 8 : 4 recipe ratio of flour, butter, and water (by weight), sweetened with 2 to 3 tablespoons granulated sugar. Divide the dough in half and chill, wrapped in plastic, until ready to use.
- Preheat the oven to 425 °F with racks placed on the bottom rung and in the center of the oven. If desired, lightly spray a 9-inch pie pan (that's at least 1½-inches deep) with baking spray (which will make serving the pie easier after it's baked and cooled).
- On a lightly floured surface, roll out one of the discs into a 12-inch circle, about ¼-inch high (if your pan is 2-inch deep, increase the circle to 13-inches). Transfer the dough to the pie pan by draping the dough loosely around the rolling pin. Gently settle the dough into the pan and trim the overhang to about 1-inch, setting aside any scraps. Chill the pie crust while you make the filling.
- Prepare the filling: Peel, core, and slice 7 to 8 cups apples into ¼-inch thick wedges (see the Recipe Notes for tips on the best way to do this step). Place the apples in a large bowl and stir in 2 tablespoons lemon juice to coat.
- In a small bowl, whisk together ½ cup granulated sugar, 1½ tablespoons Instant ClearJel (or your thickener of choice), 1½ teaspoons apple spice mix, and ¼ teaspoon kosher salt. Sprinkle the mixture over the apple slices, stirring well Fold in the ¼ cup boiled apple cider (or apple juice concentrate) and 2 teaspoons pure vanilla extract, if using.
- If your mixture is especially wet, you can place the apples in a large colander and allow the juices to drain into a bowl while you get ready to assemble the pie.
- Assemble the pie: Remove the pie crust from the refrigerator and spoon in the drained apple mixture. Replace the pie back in the refrigerator.
- If you drained the apples, transfer the liquid into a small sauce pan. Bring it to a boil and reduce until it's thickened and coats the back of a spoon. Pour the syrup over the filling.
- Distribute 2 tablespoons unsalted butter cubes over the top of the apples, then return the pie to the refrigerator while you prepare the lattice.
- Roll out the second dough disc on a floured surface into a 12-inch circle. Using a pastry wheel, pizza cutter, or sharp knife, cut the rolled-out dough into strips 1- to 2-inches wide, or to your desired width.
- Remove the pie from the refrigerator and top it by weaving the dough strips over and under each other, pulling back alternating strips to make the weave (see How to make a lattice pie crust for step-by-step instructions and pictures).
- Press the edges of the strips into the bottom pie crust edges to seal, then tuck the overhang under itself and press down to create the edge. Smooth around the edges for a neater appearance, then crimp the edges with a fork or your method of crimping. You can use any dough scraps to roll out and cut decorative shapes.
- To create a shiny glaze on the finished crust, brush the lattice and edges with 2 tablespoons milk or an egg wash (1 egg beaten with 1 tablespoon water). If you made decorations, place them on top of the lattice and glaze them as well. Sprinkle 2 tablespoons coarse sugar all over the top of the pie for a nice crunch, then place it in the refrigerator for 10 minutes to firm up the crust while the oven finishes heating.
- Place a half sheet baking pan lined with a Silpat silicone mat or parchment paper on the bottom rack to preheat.
- Bake the pie: Place the pie on the preheated baking pan and bake for 20 minutes until the crust begins to turn golden. Rotate the baking pan, move it to the center rack, and reduce the oven to 375 °F. Cover the edges of the pie with a pie shield or foil to keep them from browning too quickly, if necessary. Continue baking for 40 to 45 minutes more until the crust is golden brown and you can see the thickened juices bubbling.
- Remove the pie from the oven and allow it to cool completely on a wire rack for 3 to 4 hours to allow juices to set before slicing. You don't want those juices all over your plate instead of in your pie, so be patient.
- Storage instructions: Store the pie for a day or so at room temperature. Alternatively, cover and refrigerate it for up to 5 days, or wrap it well and freeze for longer storage.
- Make-ahead instructions: Homemade pie dough can be made up to 3 days in advance and chilled, or frozen for up to 3 months (thaw overnight in the refrigerator before using).
Notes
- 4 teaspoons ground cinnamon
- 2 teaspoons ground nutmeg
- ½ teaspoon ginger
- ½ teaspoon allspice or cloves
- ½ teaspoon cardamom


Shira says
Truly delicious!
Tammy Spencer says
Glad you liked it! 🙂