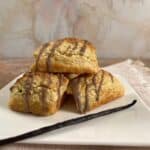
Mini Vanilla Bean Scones
These Mini Vanilla Bean Scones pack all the buttery, flaky goodness of a bakery-style scone into an elegant petite treat. They're full of real vanilla flavor, made even better with a simple vanilla glaze. Enjoy them for brunch, afternoon tea, a coffee break, or whenever you want a little sweet treat!
Servings: 16 mini scones
Calories: 205kcal
Special Equipment
- mini scone pan see Recipe Notes
- box grater if butter is frozen
Ingredients
For the scones
- 2¾ cups (336 grams) all-purpose flour
- ⅓ cup (67 grams) granulated sugar
- 4 teaspoons (16 grams) baking powder
- 1¼ teaspoon (6 grams) kosher salt
- ½ cup (113 ½ grams) unsalted butter, cold, grated or cubed, see Recipe Notes
- ¾ cup (190 grams) heavy cream, plus extra for brushing on top
- 1 (1) large egg, beaten
- 2 teaspoons (2 teaspoons) vanilla bean paste, see Recipe Notes
- coarse sugar, for sprinkling, optional
For the glaze
- ½ cup (60 grams) powdered sugar
- 1 to 2 tablespoons (1 tablespoons) milk
- ½ teaspoon (½ teaspoon) vanilla bean powder, or vanilla bean paste, see Recipe Notes
Instructions
- Preheat the oven to 400 °F. Coat the wells of a mini scone pan pan with baking spray, and use a pastry brush to make sure you get up the walls and into the corners. Set aside. Note: The instructions below are for making the dough by hand. If you want to use the food processor to make the dough, see the instructions in the post above.
- Make the dough: In a large bowl, combine 2¾ cups all-purpose flour, ⅓ cup granulated sugar, 4 teaspoons baking powder, and 1¼ teaspoon kosher salt.
- Toss ½ cup unsalted butter (cold, and grated or cubed) into the flour mixture to coat, then use a pastry blender, two forks, or your hands to work the butter into the flour mixture until coarse, pea-sized crumbs appear. Don't overdo this step as you don't want the butter to warm up and mix completely into the flour.
- In a small bowl, whisk together ¾ cup heavy cream, 1 large egg, and 2 teaspoons vanilla bean paste.
- Slowly add the heavy cream mixture to the flour mixture and mix until the dough just holds together. Using a bowl scraper will help to combine the dough in the bowl without your hands warming up the butter, plus you can see any crumbs at the bottom that still need to be mixed in. The amount of the heavy cream mixture to add depends on the humidity of the day. Squeeze a small amount of dough between your fingers, and add more of heavy cream or flour, 1 tablespoon at a time (2 tablespoons maximum), if it's too crumbly or too wet. Remember, do not over mix the dough - you want to keep that butter cold and separate from the flour.
- Use the bowl scraper to push the dough into a ball in the bowl, then turn the dough out onto a lightly floured surface and shape it into a rough square about 1-inch high.
- Fold the dough in half (using the bench scraper helps) into a rectangle. Flatten the dough with the bench scraper, then refold the short edge and flatten again. Do this "fold and flatten" method a few times. This help to create the flaky layers in the scones.
- Reshape the dough into a square, about 6- x 6-inches. Cover with plastic wrap and refrigerate the dough at least 30 minutes or up to overnight.
- Use a bench scraper to cut the dough into 4 small squares, then cut each square across the diagonal to form 16 small triangles.
- Place the mini scones into the wells of the scone pan, pressing down so the dough is level with the walls of the pan. If necessary, even out the dough portions (somehow I never get even cut triangles).Brush the tops of each scone with heavy cream and sprinkle with coarse sugar.
- Bake for 20 to 23 minutes or until golden brown. Remove from the oven and cool the scones on the baking pan for 5 minutes, then transfer the scones to a cooling rack. Allow to cool for 10 to 15 minutes.
- For the vanilla icing: Whisk ½ cup powdered sugar (sifted), 1 to 2 tablespoons milk, and ½ teaspoon vanilla bean powder in a bowl until smooth. Adjust the consistency by adding 1 teaspoon of milk or more sifted powdered sugar as needed.
- Drizzle the glaze on the scones and allow to set. You can place a Silpat silicone mat or parchment paper under the cooling rack to catch any drips.
- Serve warm or at room temperature. Pair them with homemade berry jam, lemon curd, and clotted cream for a lovely combination. Enjoy!
- Storage Instructions: Scones are best enjoyed right away, though leftover scones keep well at room temperature or in the refrigerator, stored in an airtight container, for about 3 to 5 days. Glazed or plain scones freeze well, in an airtight bag, for up to 3 months. Thaw overnight in the refrigerator then warm to your liking before enjoying.
- Make-ahead instructions: For freshly baked scones anytime, freeze the cut, unbaked scones in a ziplock bag. Take out as many as you want to bake (there's no need to defrost them first), and bake at 375 °F for 20 to 25 minutes. Drizzle on the icing after cooling.
- The recipe as written makes 16 mini scones, and doubles easily if you're baking for a brunch, shower, holiday gathering, or afternoon tea. Prepare and shape the dough as directed, then bake in batches or freeze the extra unbaked scones so you can bake them fresh later.
Recipe Notes
How you cut up your butter isn't as important as keeping it cold. Either grate frozen butter on a box grater, or cut the chilled butter into small ½-inch cubes. Either way will work.
Vanilla bean paste is a convenient bridge between pure vanilla extract and a whole vanilla bean, vanilla bean paste provides the same flavor benefits as vanilla extract with the added bonus of including vanilla bean seeds. No scraping a bean, more vanilla flavor! You can of course, use the same amount of vanilla extract or scrape the seeds from one whole vanilla bean if you prefer.
Vanilla bean powder is just ground up vanilla beans. It imparts all the flavor of vanilla beans without the need to scrape a whole vanilla bean. However, it does darken the icing's coloring. You can use the same amount of vanilla bean paste or vanilla extract to keep the color neutral, if desired.
If you don't have a mini scone pan, just shape the dough into triangles as discussed, then place them about about 2-inches apart on a half sheet baking pan lined with a Silpat silicone mat or parchment paper. Bake as directed.
For full-sized scones: Gather the scone dough, and flatten it into a 6-inch disk. Roll out the disk into an 8-inch circle, then use the bench scraper to cut the disk into 8 wedges. place them about about 2-inches apart on a half sheet baking pan lined with a Silpat silicone mat or parchment paper and bake for 18 to 23 minutes or until golden brown.
Nutrition
Serving: 1scone | Calories: 205kcal | Carbohydrates: 25g | Protein: 3g | Fat: 10g | Saturated Fat: 6g | Polyunsaturated Fat: 1g | Monounsaturated Fat: 3g | Trans Fat: 0.2g | Cholesterol: 38mg | Sodium: 296mg | Potassium: 41mg | Fiber: 1g | Sugar: 9g | Vitamin A: 358IU | Vitamin C: 0.1mg | Calcium: 74mg | Iron: 1mg
Scan the QR code to find the online recipe or visit us at www.scotchandscones.com