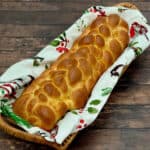
How to Braid an 8-Strand Challah (Straight & Round)
An eight-strand challah looks impressive, but once you learn the repeating pattern it's much easier than it appears. Learn how to braid both a classic straight loaf and a woven round challah with step-by-step photos, a video, and plenty of tips so you'll be turning out bakery-worthy challahs in no time!
Servings: 16 slices
Calories: 169kcal
Special Equipment
Ingredients
- 1 recipe (1 recipe) homemade challah dough, after the first rise
- 1 (1) large egg, plus 1 tablespoon water, for egg wash
- toppings, optional
Instructions
- These braiding instructions begin after your challah dough has completed its first rise. If you haven't made the dough yet, use your favorite challah recipe (or my Best Challah Bread) before starting the braid.
- Portion out 8 equal pieces of dough, cutting it with a bench scraper or knife (for the best accuracy, weigh the dough with a kitchen scale). Shape each piece into a long rope. Lay all the ropes side by side on a lightly floured surface and pinch them together at the top.
For a straight challah
- For the following braiding sequence, number the strands of dough 1 to 8 from left to right. Every time you move any strand it will take the new number of its position in the row. Watch how to make the braid on the video.
- Step 1: Place strand 8 under strand 7 and over strand 1. You're only going to do this step once.
- Step 2: Place strand 8 over strand 5.
- Step 3: Place strand 2 under strand 3 and over strand 8.
- Step 4: Place strand 1 over strand 4.
- Step 5: Place strand 7 under strand 6 and over strand 1.
- Repeat steps 2 to 5, until all the dough is braided.
- Tuck the ends of the loaf underneath on both ends to give a neat finish. Adjust the braid ends and sides with your hands to make everything even.
For a round challah
- Step 1: Lay four strands next to each other horizontally. Lay the remaining four strands next to each other vertically on top of the first two.
- Step 2: Take the right two vertical strands and weave them under the upper two horizontal strands. Take the left two vertical strand sand weave them under the lower two horizontal strands (you now have a pattern akin to a tic-tac-toe board).Push all the strands tightly together in the middle so there’s no space between them, and separate the ends so you’ll have room to start weaving.
- Step 3: Starting with the lower left two vertical strands, place them over the strand pair next to them on the right. Repeat around the circle, going counter-clockwise a total of 4 times.
- Step 4: Now do the same thing starting with the lower right two vertical strand, placing the strand pair over their neighbor on the left, going around the circle clockwise.
- Step 5: Repeat steps 3 and 4, traveling counter-clockwise, then clockwise. By now the strands will be too short to continue.
- Tuck the ends under and adjust the woven round mass into a circle.
Rest and bake the challah
- Line a half sheet baking pan with a Silpat silicone mat or parchment paper. Transfer the shaped dough to the baking pan, then cover with greased plastic wrap.
- Let the shaped dough rise for 45 minutes in a warm place. Preheat the oven to 350 °F.
- For the egg wash, whisk together 1 large egg with 1 tablespoon water. Brush the dough with the egg wash, then sprinkle on any desired toppings.
- Bake the dough for 25 to 35 minutes, rotating the pan front to back halfway through the baking time (a round challah might take 5 to 10 minutes more). When the loaf is golden brown and it sounds hollow when tapped on the bottom (or reads 190 °F on a digital thermometer), remove it from the oven and cool on a wire rack.
- Let the challah cool slightly before slicing or tearing into it. Enjoy!
Recipe Notes
Pay special attention to pinching the ends of the strands together and tucking them under the finished braid. Sometimes despite your best efforts, the ends will come apart while the challah is baking. I call these lobster claws, and while the challah won't look quite as neat, it will still taste fantastic.
For more braiding inspiration, check out the instructions for braiding challahs with 3-strands, 4-strands (2 ways, straight and round), or 6-strands (2 ways, straight and flat). Have a go!
Nutrition
Serving: 1slice | Calories: 169kcal | Carbohydrates: 23g | Protein: 5g | Fat: 6g | Saturated Fat: 1g | Cholesterol: 41mg | Sodium: 235mg | Potassium: 48mg | Fiber: 1g | Sugar: 3g | Vitamin A: 60IU | Calcium: 11mg | Iron: 1mg
Scan the QR code to find the online recipe or visit us at www.scotchandscones.com